Home › Suspension › REAR SUSPENSION › REAR AXLE BEAM

REAR AXLE BEAM > INSTALLATION

for Preparation Click here


1. TEMPORARILY TIGHTEN REAR AXLE BEAM ASSEMBLY


  1. Slowly jack up the rear axle beam assembly with an engine lifter using 2 wooden blocks and 2 attachments or equivalent tools and temporarily install the rear axle beam assembly to the body with the 2 bolts (B).
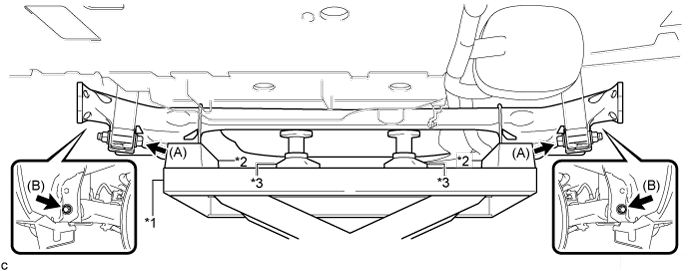

    C249969E01


    Text in Illustration 
    *1
    Engine Lifter
    *2
    Wooden Block
    *3
    Attachment
    -
    -

    NOTICE:
    Make sure to secure the rear axle beam assembly to prevent it from dropping.
  1. Temporarily tighten the rear axle beam assembly to the rear shock absorber assemblies LH and RH with the 2 bolts (A) and 2 nuts.

    NOTICE:
    Since stopper nuts are used, turn the bolts.

    HINT:
    Insert the bolts with the threaded end facing the outside of the vehicle.


2. INSTALL REAR LOWER COIL SPRING INSULATOR LH
  1. Install the rear lower coil spring insulator LH onto the rear axle beam assembly.


3. INSTALL REAR LOWER COIL SPRING INSULATOR RH

HINT:
Perform the same procedure as the LH side.


4. INSTALL REAR UPPER COIL SPRING INSULATOR LH


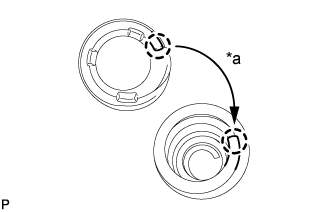
    C110329E04
  1. Install the rear upper coil spring insulator LH so that its gap fits onto the end of rear coil spring LH.
    Text in Illustration 
    *a
    Fit


5. INSTALL REAR UPPER COIL SPRING INSULATOR RH

HINT:
Perform the same procedure as the LH side.


6. INSTALL REAR COIL SPRING LH
  1. Support the spring seat of the rear axle beam assembly using 2 jacks and 2 wooden blocks.

  1. Remove the 2 bolts while holding the 2 nuts and separate the rear axle beam assembly from the rear shock absorber assemblies LH and RH.

    NOTICE:
    Since stopper nuts are used, turn the bolts.

  1. Slowly lower the rear axle beam assembly using 2 jacks and 2 wooden blocks.


    C233115
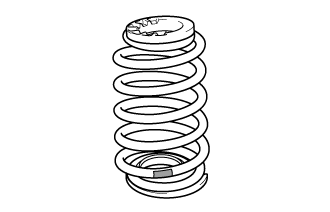
  1. Install the rear coil spring LH onto the rear axle beam assembly.
    Text in Illustration 
    V100144
    Paint Mark

    NOTICE:
    The paint mark of the rear coil spring LH should be towards the underside and rear side of the vehicle.

  1. Slowly jack up the rear axle beam assembly using 2 jacks and 2 wooden blocks, and temporarily install the rear axle beam assembly and rear coil spring LH with the 2 bolts and 2 nuts.


7. INSTALL REAR COIL SPRING RH

HINT:
Perform the same procedure as the LH side.


8. INSTALL REAR AXLE HUB AND BEARING ASSEMBLY LH
  1. Install the rear axle hub and bearing assembly to the rear axle beam assembly with the 4 bolts.

    Torque:
    90 N*m{ 918 kgf*cm , 66 ft.*lbf }


9. INSTALL REAR AXLE HUB AND BEARING ASSEMBLY RH

HINT:
Perform the same procedure as the LH side.


10. INSTALL REAR BRAKE DRUM SUB-ASSEMBLY
  1. Install the 2 rear brake drum sub-assemblies .


11. INSTALL NO. 3 PARKING BRAKE CABLE ASSEMBLY
  1. Install the new No. 1 parking brake cable clamp to the No. 3 parking brake cable assembly .

  1. Install the No. 3 parking brake cable assembly with the bolt and a No. 1 parking brake cable clamp.

    Torque:
    6.0 N*m{ 61 kgf*cm , 53 in.*lbf }


12. INSTALL NO. 2 PARKING BRAKE CABLE ASSEMBLY

HINT:
Perform the same procedure as for the No. 3 parking brake cable assembly.


13. INSTALL NO. 4 REAR BRAKE TUBE
  1. Install the No. 4 rear brake tube to the rear axle beam assembly with the nut.

    Torque:
    5.0 N*m{ 51 kgf*cm , 44 in.*lbf }

  1. Connect the rear flexible hose LH to the rear axle beam assembly with a new clip.

  1. Using a union nut wrench, install the No. 4 rear brake tube to the rear flexible hose LH while holding the rear flexible hose LH with a wrench.

    Torque:
    15 N*m{ 155 kgf*cm , 11 ft.*lbf }

    NOTICE:
    1. Do not bend or damage the brake line.
    2. Do not allow any foreign matter such as dirt and dust to enter the brake line from the connecting points.
    3. Use the formula to calculate special torque values for situations where a union nut wrench is combined with a torque wrench (Click here).


14. INSTALL NO. 3 REAR BRAKE TUBE

HINT:
Perform the same procedure as for the No. 4 rear brake tube.


15. INSTALL SKID CONTROL SENSOR WIRE LH
  1. Install the skid control sensor wire LH to the rear axle beam assembly with the nut.

    Torque:
    7.5 N*m{ 76 kgf*cm , 66 in.*lbf }


16. INSTALL SKID CONTROL SENSOR WIRE RH

HINT:
Perform the same procedure as the LH side.


17. CONNECT SKID CONTROL SENSOR WIRE LH


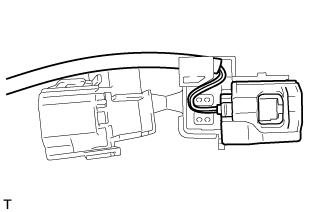
    C235058
  1. Install the skid control sensor wire connector to the connector cover.


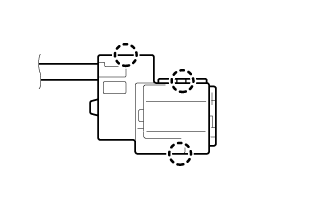
    C235580
  1. Engage the 3 claws to secure the connector cover.

  1. Connect the skid control sensor wire connector to the rear axle hub and bearing assembly.


18. CONNECT SKID CONTROL SENSOR WIRE RH

HINT:
Perform the same procedure as the LH side.


19. ADJUST REAR DRUM BRAKE SHOE CLEARANCE


    C151749E07
  1. Temporarily install the 2 wheel nuts.
    Text in Illustration 
    V100135
    Expand

  1. Remove the shoe adjusting hole plug, and turn the adjuster to expand the shoe until the drum locks.


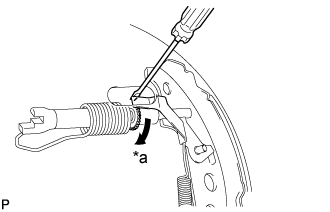
    C233134E03
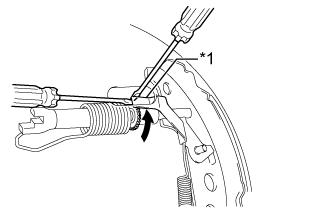
  1. Hold the automatic adjust lever away from the adjuster, and contract the brake shoe by turning the adjust bolt using another screwdriver until the drum can rotate smoothly.
    Text in Illustration 
    *1
    Automatic Adjust Lever
    V100135
    Contract

  1. Install the hole plug.


20. INSTALL REAR WHEEL

Torque:
103 N*m{ 1050 kgf*cm , 76 ft.*lbf }


21. STABILIZE SUSPENSION
  1. Lower the vehicle from the jack.

  1. Bounce the vehicle up and down several times to stabilize the suspension.


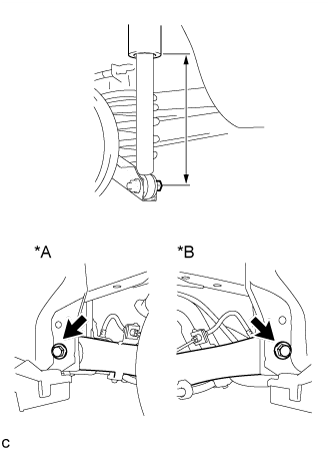
22. FULLY TIGHTEN REAR AXLE BEAM ASSEMBLY


    C249972E01
  1. Suspend the jack on the spring seat of the rear axle beam assembly and adjust the length of the rear shock absorber assembly to the reference value.
    Text in Illustration 
    *A
    LH Side
    *B
    RH Side

    Length of shock absorber:
    220 mm (8.66 in.)

  1. Fully tighten the 2 bolts.

    Torque:
    90 N*m{ 918 kgf*cm , 66 ft.*lbf }


23. FULLY TIGHTEN REAR SHOCK ABSORBER ASSEMBLY LH
  1. Fully tighten the rear shock absorber assembly (lower side) with the bolt.

    Torque:
    49 N*m{ 500 kgf*cm , 36 ft.*lbf }

    NOTICE:
    Since a stopper nut is used, turn the bolt.


24. FULLY TIGHTEN REAR SHOCK ABSORBER ASSEMBLY RH

HINT:
Perform the same procedure as the LH side.


25. CONNECT CABLE TO NEGATIVE AUXILIARY BATTERY TERMINAL


26. BLEED BRAKE LINE
(Click here)


27. INSTALL REAR HEIGHT CONTROL SENSOR SUB-ASSEMBLY (w/ Height Control Sensor)
(Click here)


28. INSPECT REAR WHEEL ALIGNMENT
(Click here)


29. CHECK FOR SPEED SENSOR SIGNAL
(Click here)