Home › Engine / Hybrid System › 1NZ-FXE FUEL › FUEL PUMP

FUEL PUMP > REMOVAL

for Preparation Click here


HINT:
Perform "Inspection After Repair" after replacing the fuel pump assembly (Click here).


1. PRECAUTION

NOTICE:
After turning the power switch off, waiting time may be required before disconnecting the cable from the negative (-) auxiliary battery terminal. Therefore, make sure to read the disconnecting the cable from the negative (-) auxiliary battery terminal notice before proceeding with work (Click here).


2. REMOVE CROSS ANCHOR BRACKET SUB-ASSEMBLY
(Click here)


3. DISCHARGE FUEL SYSTEM PRESSURE
(Click here)


4. DISCONNECT CABLE FROM NEGATIVE AUXILIARY BATTERY TERMINAL

NOTICE:
When disconnecting the cable, some systems need to be initialized after the cable is reconnected (Click here).


5. REMOVE REAR FLOOR SERVICE HOLE COVER


    A264993
  1. Remove the rear floor service hole cover.
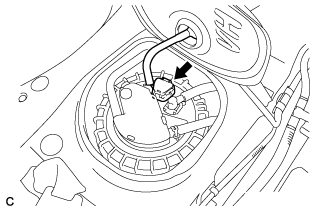


    A264994
  1. Disconnect the connector from the fuel suction tube assembly.


6. DISCONNECT FUEL TANK MAIN TUBE SUB-ASSEMBLY


    A265008E01
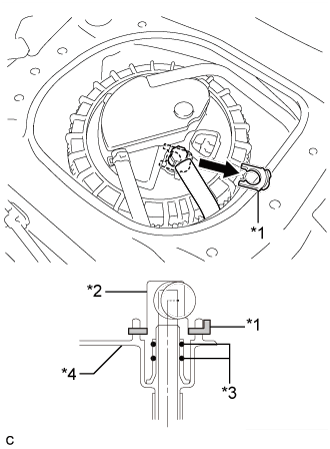
  1. Remove the tube joint clip, then pull the fuel tube joint out of the plug of the fuel suction tube with pump and gauge assembly.
    Text in Illustration 
    *1
    Tube Joint Clip
    *2
    Fuel Tube Joint
    *3
    O-ring
    *4
    Fuel Suction Plate

    NOTICE:
    1. Remove any dirt or foreign matter on the fuel tube joint before performing this work.
    2. Do not allow any scratches or foreign matter to get on the parts when disconnecting them as the fuel tube joint has O-rings that seal the fuel pipe.
    3. Only disconnect the fuel tube joint by hand.
    4. Do not forcibly bend, twist or turn the fuel tank main tube sub-assembly.
    5. Protect the disconnected part by covering it with a plastic bag after disconnecting the fuel tube joint.
    6. If the fuel tube joint and fuel suction plate are stuck, push and pull to release them.


7. DISCONNECT NO. 2 FUEL EMISSION TUBE


    A265009
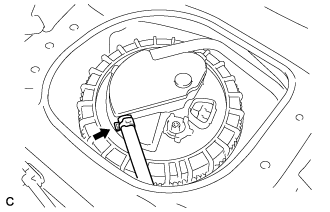
  1. Loosen the clip and disconnect the No. 2 fuel emission tube from the fuel suction tube with pump and gauge assembly.


8. DISCONNECT NO. 1 CANISTER OUTLET HOSE SUB-ASSEMBLY


    A265010
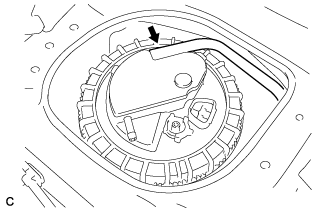
  1. Disconnect the No. 1 canister outlet hose from the fuel suction tube with pump and gauge assembly.


9. REMOVE FUEL PUMP GAUGE RETAINER


    A265011E01
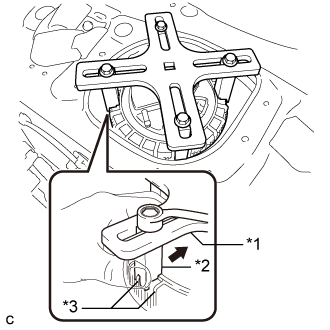
  1. Temporarily install the SST plate and claws to the fuel pump gauge retainer.
    Text in Illustration 
    *1
    SST
    (Plate)
    *2
    SST
    (Claw)
    *3
    Rib

    SST
    09808-14030   (09808-01030, 09808-01040, 09808-01050)

    HINT:
    Engage the SST claws securely with the fuel pump gauge retainer ribs to secure SST.

  1. While pressing the claws of SST to the fuel pump gauge retainer ribs securely, tighten the bolts.

    HINT:
    Install SST while pressing the SST claws toward the fuel pump gauge retainer (towards the center of SST).

  1. Install the SST handle.


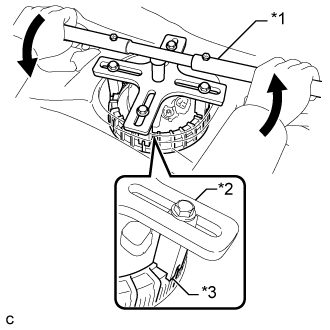
    A265012E01
  1. Lightly press down on SST to prevent it from separating from the retainer. While pressing SST, rotate the handle slowly to loosen the retainer.
    Text in Illustration 
    *1
    SST
    (Handle)
    *2
    SST
    (Plate)
    *3
    SST
    (Claw)

    SST
    09808-14030   (09808-01010, 09808-01020, 09808-01030, 09808-01040, 09808-01050)

    NOTICE:
    1. Do not use any tools other than specified in this operation. Damage to the fuel pump gauge retainer or the fuel tank may result.
    2. Do not press down on SST excessively as this may make the retainer hard to rotate, and may damage components.
    3. Make sure to rotate the SST handle horizontally. If the SST handle is rotated at an angle, SST may come off.
    4. Do not spin SST too fast or use an impact wrench as this may result in damage to components.
    5. If SST comes off of the retainer, loosen the SST bolts and reinstall SST.

    HINT:
    The ribs on the fuel pump gauge retainer can be fitted into the tips of SST.

  1. Remove the fuel pump gauge retainer while holding the fuel suction tube with pump and gauge assembly by hand.


10. REMOVE FUEL SUCTION TUBE WITH PUMP AND GAUGE ASSEMBLY


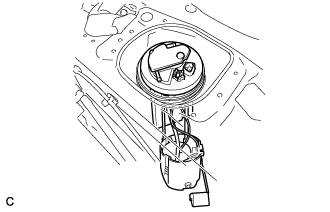
    A265013
  1. Remove the fuel suction tube with pump and gauge assembly from the fuel tank.
    NOTICE:
    Make sure that the fuel sender gauge arm does not bend.


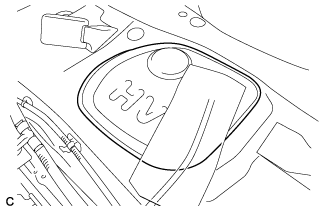
    A265014E01
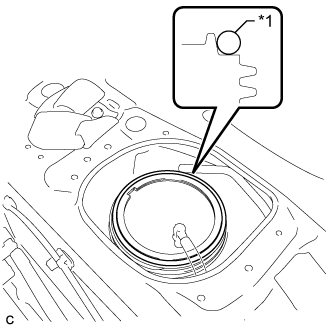
  1. Remove the fuel suction tube set gasket from the fuel tank.
    Text in Illustration 
    *1
    Fuel Suction Tube Set Gasket