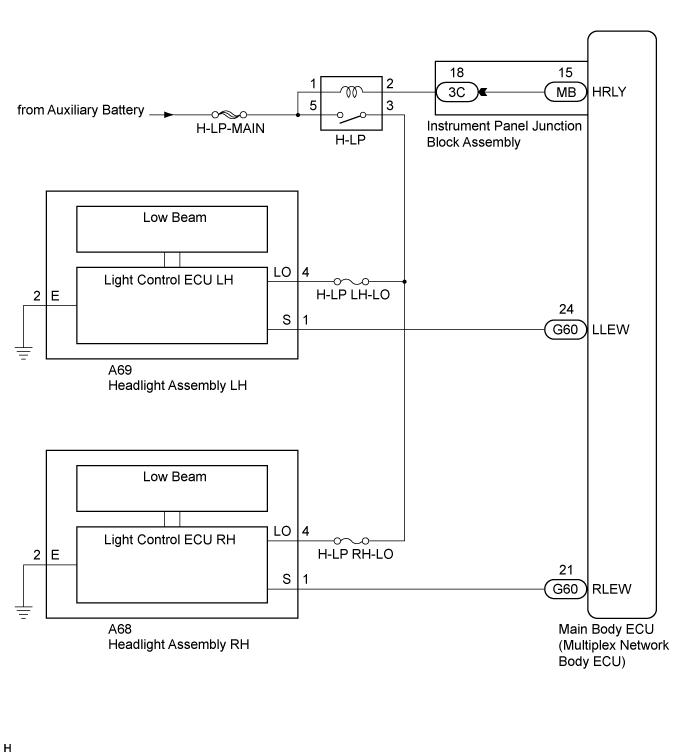
DTC B2430 LED Headlight LH Circuit Malfunction |
DTC B2431 LED Headlight RH Circuit Malfunction |
| DTC No. | DTC Detection Condition | Trouble Area |
| B2430 | LED headlight LH circuit malfunction |
|
| B2431 | LED headlight RH circuit malfunction |
|
| 1.CHECK FOR DTC |
Clear the DTCs (Click here).
Check for DTCs (Click here).
| Result | Proceed to |
| Both DTC B2430 and B2431 are not output. | A |
| Both DTC B2430 and B2431 are output. | B |
| DTC B2430 or B2431 is output. | C |
|
| ||||
|
| ||||
| A | ||
 | ||
| ||
| 2.INSPECT H-LP RELAY |
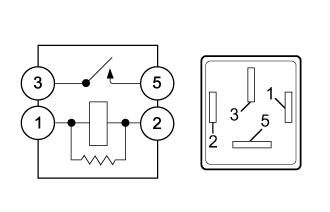 |
Remove the H-LP relay from the No. 2 engine room relay block and No. 2 junction block assembly.
Measure the resistance according to the value(s) in the table below.
| Tester Connection | Condition | Specified Condition |
| 3 - 5 | Voltage not applied between terminals 1 and 2 | 10 kΩ or higher |
| 3 - 5 | Voltage applied between terminals 1 and 2 | Below 1 Ω |
|
| ||||
| OK | |
 |
| 3.CHECK HARNESS AND CONNECTOR (AUXILIARY BATTERY - H-LP RELAY) |
Measure the voltage according to the value(s) in the table below.
| Tester Connector | Condition | Specified Condition |
| Relay terminal 1 - Body ground | Power switch off | 11 to 14 V |
| Relay terminal 5 - Body ground | Power switch off | 11 to 14 V |
|
| ||||
| OK | |
|
| 4.CHECK HARNESS AND CONNECTOR (H-LP RELAY - HEADLIGHT ASSEMBLY LH AND HEADLIGHT ASSEMBLY RH) |
Disconnect the A69 headlight assembly LH connector.
Disconnect the A68 headlight assembly RH connector.
Measure the resistance according to the value(s) in the table below.
| Tester Connection | Condition | Specified Condition |
| Relay terminal 3 - A69-4 (LO) | Always | Below 1 Ω |
| Relay terminal 3 - A68-4 (LO) | Always | Below 1 Ω |
| Relay terminal 3 - Body ground | Always | 10 kΩ or higher |
|
| ||||
| OK | |
|
| 5.CHECK HARNESS AND CONNECTOR (H-LP RELAY - INSTRUMENT PANEL JUNCTION BLOCK ASSEMBLY) |
Disconnect the 3C instrument panel junction block assembly connector.
Measure the resistance according to the value(s) in the table below.
| Tester Connection | Condition | Specified Condition |
| Relay terminal 2 - 3C-18 | Always | Below 1 Ω |
| Relay terminal 2 - Body ground | Always | 10 kΩ or higher |
|
| ||||
| OK | |
|
| 6.INSPECT INSTRUMENT PANEL JUNCTION BLOCK ASSEMBLY |
Remove the instrument panel junction block assembly (Click here).
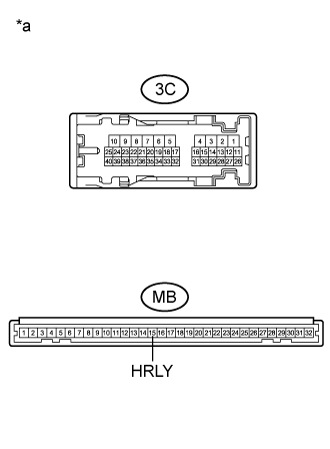 |
Remove the main body ECU (multiplex network body ECU) from the instrument panel junction block assembly.
Measure the resistance according to the value(s) in the table below.
| Tester Connection | Condition | Specified Condition |
| 3C-18 - MB-15 (HRLY) | Always | Below 1 Ω |
| *a | Component without harness connected (Instrument Panel Junction Block Assembly) |
|
| ||||
| OK | ||
| ||
| ||
| 7.CHECK HARNESS AND CONNECTOR (HEADLIGHT ASSEMBLY - H-LP RELAY) |
Disconnect the A69 headlight assembly connector or the A68 headlight assembly connector.
Measure the voltage according to the value(s) in the table below.
| Tester Connection | Condition | Specified Condition |
| A69-4 (LO) - Body ground | Power switch off, light control switch in head position | 11 to 14 V |
| Tester Connection | Condition | Specified Condition |
| A68-4 (LO) - Body ground | Power switch off, light control switch in head position | 11 to 14 V |
|
| ||||
| OK | |
|
| 8.CHECK HARNESS AND CONNECTOR (HEADLIGHT ASSEMBLY - BODY GROUND) |
Measure the resistance according to the value(s) in the table below.
| Tester Connection | Condition | Specified Condition |
| A69-2 (E) - Body ground | Always | Below 1 Ω |
| Tester Connection | Condition | Specified Condition |
| A68-2 (E) - Body ground | Always | Below 1 Ω |
|
| ||||
| OK | |
|
| 9.CHECK HEADLIGHT ASSEMBLY (INPUT VOLTAGE) |
Measure the voltage according to the value(s) in the table below.
| Tester Connection | Condition | Specified Condition |
| A69-1 (S) - Body ground | Power switch on (IG), light control switch in head position | 11 to 14 V |
| Tester Connection | Condition | Specified Condition |
| A68-1 (S) - Body ground | Power switch on (IG), light control switch in head position | 11 to 14 V |
|
| ||||
| OK | |
|
| 10.CHECK LIGHT CONTROL ECU |
Replace the headlight control ECU with a new or known good one (Click here).
Check for DTCs (Click here).
|
| ||||
| OK | ||
| ||
| ||
| 11.CHECK HEADLIGHT ASSEMBLY |
Replace the headlight assembly with a new or known good one (Click here).
Check for DTCs (Click here).
|
| ||||
| OK | ||
| ||
| ||
| 12.CHECK HARNESS AND CONNECTOR (MAIN BODY ECU (MULTIPLEX NETWORK BODY ECU - HEADLIGHT ASSEMBLY) |
Disconnect the G60 main body ECU (multiplex network body ECU) connector.
Measure the resistance according to the value(s) in the table below.
| Tester Connection | Condition | Specified Condition |
| G60-24 (LLEW) - A69-1 (S) | Always | Below 1 Ω |
| G60-24 (LLEW) - Body ground | Always | 10 kΩ or higher |
| Tester Connection | Condition | Specified Condition |
| G60-21 (RLEW) - A68-1 (S) | Always | Below 1 Ω |
| G60-21 (RLEW) - Body ground | Always | 10 kΩ or higher |
|
| ||||
| OK | ||
| ||
| ||

