AUDIO / VIDEO AUDIO AND VISUAL SYSTEM Microphone Circuit between Microphone and Radio Receiver
DESCRIPTION
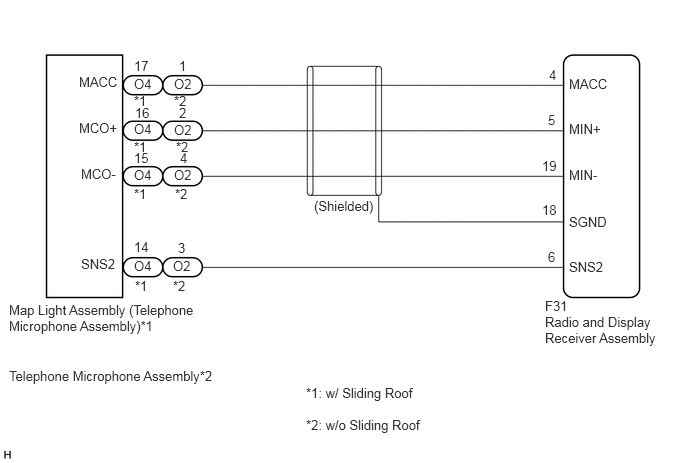
The radio and display receiver assembly and telephone microphone assembly are connected to each other using the microphone connection detection signal lines.
Using this circuit, the radio and display receiver assembly sends power to the telephone microphone assembly, and the telephone microphone assembly sends microphone signals to the radio and display receiver assembly.
The radio and display receiver assembly and map light assembly (telephone microphone assembly) are connected to each other using the microphone connection detection signal lines.
Using this circuit, the radio and display receiver assembly sends power to the map light assembly (telephone microphone assembly), and the map light assembly (telephone microphone assembly) sends microphone signals to the radio and display receiver assembly.
WIRING DIAGRAM
PROCEDURE
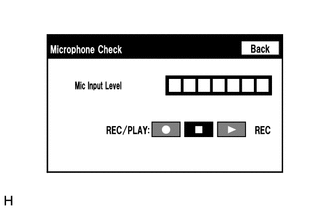
Enter the "Microphone Check" screen. Refer to Check Microphone in Operation Check.
Click hereAudio / Visual / Telematics>AUDIO / VIDEO>AUDIO AND VISUAL SYSTEM>OPERATION CHECK
When a voice is input into the microphone, check that the microphone input level meter changes according to the input voice.
- OK:
Check result is normal.
- Result:
Result Proceed to NG (w/o Sliding Roof) A NG (w/ Sliding Roof) B OK C
A
B
C
Disconnect the F31 radio and display receiver assembly connector.
Disconnect the O2 telephone microphone assembly connector.
Measure the resistance according to the value(s) in the table below.
- Standard Resistance:
Tester Connection Condition Specified Condition F31-6 (SNS2) - O2-3 (SNS2) Always Below 1 Ω F31-4 (MACC) - O2-1 (MACC) Always Below 1 Ω F31-5 (MIN+) - O2-2 (MCO+) Always Below 1 Ω F31-19 (MIN-) - O2-4 (MCO-) Always Below 1 Ω F31-6 (SNS2) or O2-3 (SNS2) - Body ground Always 10 kΩ or higher F31-4 (MACC) or O2-1 (MACC) - Body ground Always 10 kΩ or higher F31-5 (MIN+) or O2-2 (MCO+) - Body ground Always 10 kΩ or higher F31-19 (MIN-) or O2-4 (MCO-) - Body ground Always 10 kΩ or higher F31-18 (SGND) - Body ground Always 10 kΩ or higher
- Result:
Proceed to OK NG
OK
NG
Reconnect the F31 radio and display receiver assembly connector.
Reconnect the O2 telephone microphone assembly connector.
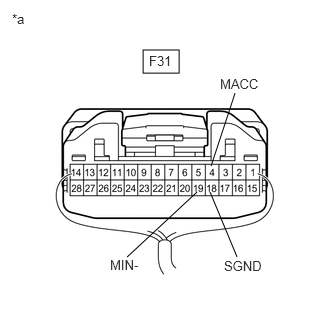
| *a | Component with harness connected
(Radio and Display Receiver Assembly) |
Measure the voltage according to the value(s) in the table below.
- Standard Voltage:
Tester Connection Condition Specified Condition F31-4 (MACC) - Body ground Power switch on (ACC) 4 to 6 V
Measure the resistance according to the value(s) in the table below.
- Standard Resistance:
Tester Connection Condition Specified Condition F31-18 (SGND) - Body ground Always Below 1 Ω F31-19 (MIN-) - Body ground Always Below 1 Ω
- Result:
Proceed to OK NG
OK
NG
Remove the telephone microphone assembly.
Click hereAudio / Visual / Telematics>AUDIO / VIDEO>MICROPHONE>REMOVAL
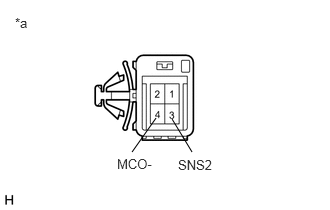
| *a | Component without harness connected
(Telephone Microphone Assembly) |
Measure the resistance according to the value(s) in the table below.
- Standard Resistance:
Tester Connection Condition Specified Condition 3 (SNS2) - 4 (MCO-) Always Below 1 Ω
- Result:
Proceed to OK NG
OK
NG
Reconnect the F31 radio and display receiver assembly connector.
Reconnect the O2 telephone microphone assembly connector.
Turn the power switch on (ACC).
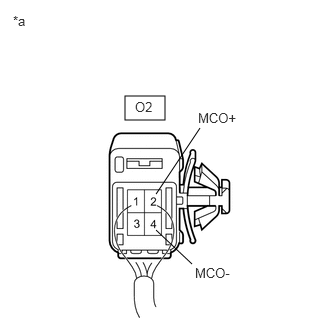
| *a | Component with harness connected
(Telephone Microphone Assembly) |
Connect an oscilloscope to terminals 2 (MCO+) and 4 (MCO-) of the O2 telephone microphone assembly connector.
Check the waveform of the telephone microphone assembly using the oscilloscope.
- Result:
Result Proceed to A waveform synchronized with the voice input to the telephone microphone assembly is output. A A waveform synchronized with the voice input to the telephone microphone assembly is not output. B
A
B
Disconnect the F31 radio and display receiver assembly connector.
Disconnect the O4 map light assembly (telephone microphone assembly) connector.
Measure the resistance according to the value(s) in the table below.
- Standard Resistance:
Tester Connection Condition Specified Condition F31-6 (SNS2) - O4-14 (SNS2) Always Below 1 Ω F31-4 (MACC) - O4-17 (MACC) Always Below 1 Ω F31-5 (MIN+) - O4-16 (MCO+) Always Below 1 Ω F31-19 (MIN-) - O4-15 (MCO-) Always Below 1 Ω F31-6 (SNS2) - Body ground Always 10 kΩ or higher F31-4 (MACC) - Body ground Always 10 kΩ or higher F31-5 (MIN+) - Body ground Always 10 kΩ or higher F31-19 (MIN-) - Body ground Always 10 kΩ or higher F31-18 (SGND) - Body ground Always 10 kΩ or higher
- Result:
Proceed to OK NG
OK
NG
Reconnect the F31 radio and display receiver assembly connector.
Reconnect the O4 map light assembly (telephone microphone assembly) connector.
| *a | Component with harness connected
(Radio and Display Receiver Assembly) |
Measure the voltage according to the value(s) in the table below.
- Standard Voltage:
Tester Connection Condition Specified Condition F31-4 (MACC) - Body ground Power switch on (ACC) 4 to 6 V
Measure the resistance according to the value(s) in the table below.
- Standard Resistance:
Tester Connection Condition Specified Condition F31-18 (SGND) - Body ground Always Below 1 Ω F31-19 (MIN-) - Body ground Always Below 1 Ω
- Result:
Proceed to OK NG
OK
NG
Remove the map light assembly (telephone microphone assembly).
Click hereVehicle Interior>LIGHTING (INT)>PERSONAL LIGHT>REMOVAL
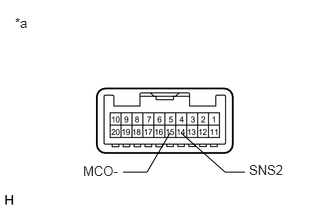
| *a | Component without harness connected
(Map Light Assembly (Telephone Microphone Assembly)) |
Measure the resistance according to the value(s) in the table below.
- Standard Resistance:
Tester Connection Condition Specified Condition 14 (SNS2) - 15 (MCO-) Always Below 1 Ω
- Result:
Proceed to OK NG
OK
Reconnect the F31 radio and display receiver assembly connector.
Reconnect the O4 map light assembly (telephone microphone assembly) connector.
Turn the power switch on (ACC).
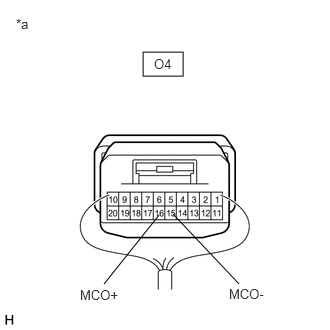
| *a | Component with harness connected
(Map Light Assembly (Telephone Microphone Assembly)) |
Connect an oscilloscope to terminals 16 (MCO+) and 15 (MCO-) of the O4 map light assembly (telephone microphone assembly) connector.
Check the waveform of the map light assembly (telephone microphone assembly) using the oscilloscope.
- Result:
Result Proceed to A waveform synchronized with the voice input to the map light assembly (telephone microphone assembly) is output. A A waveform synchronized with the voice input to the map light assembly (telephone microphone assembly) is not output. B
A
B
Replace the telephone microphone assembly.
Click hereAudio / Visual / Telematics>AUDIO / VIDEO>MICROPHONE>REMOVAL
Check if the same malfunction recurs.
- Result:
Result Proceed to Malfunction does not recur (returns to normal). A Malfunction recurs. B
A
B