INSPECTION
Inspection · Vehicles built from Aug 2008
Versions by build date: Nov 2005 – Jul 2008 from Aug 2008
| INSPECT OUTER REAR VIEW MIRROR ASSEMBLY LH |

Apply battery voltage and check the operation of the mirror.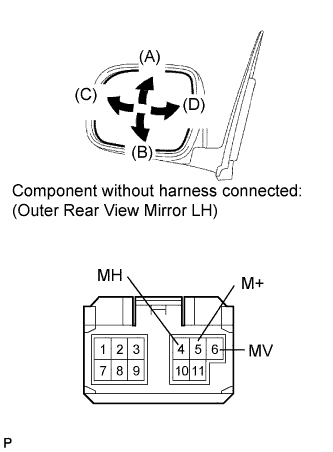

- OK:
Measurement Condition
Specified Condition
Battery positive (+) →Terminal 6 (MV)
Battery negative (-) → Terminal 5 (M+)
Turns upward (A)
Battery positive (+) → Terminal 5 (M+)
Battery negative (-) → Terminal 6 (MV)
Turns downward (B)
Battery positive (+) → Terminal 4 (MH)
Battery negative (-) → Terminal 5 (M+)
Turns left (C)
Battery positive (+) → Terminal 5 (M+)
Battery negative (-) → Terminal 4 (MH)
Turns right (D)
w/ Mirror Heater: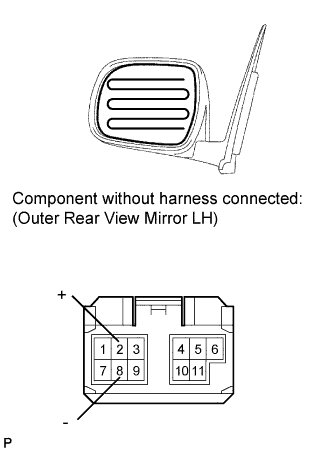
Measure the resistance according to the value (s) in the table below.
- Standard resistance:
Tester Connection
Condition
Specified Condition
2 (+) - 8 (-)
65°C (149°F)
4 to 12 Ω
Apply battery voltage and check the operation of the mirror heater.
- OK:
Measurement Condition
Specified Condition
Battery positive (+) → Terminal 2 (+)
Battery negative (-) → Terminal 8 (-)
Mirror becomes warm
- HINT:
- It will take a short time for the mirror to become warm.
- If the result is not as specified, replace to the outer rear view mirror glass.
- It will take a short time for the mirror to become warm.
w/ Retract Mirror: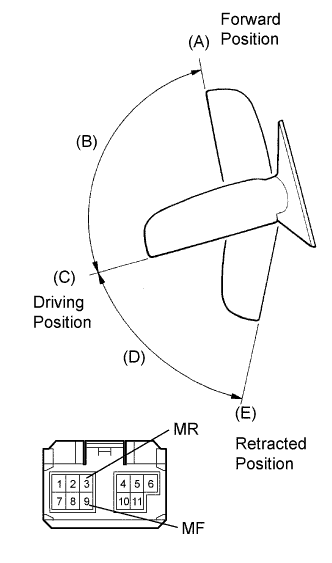
For each position: Disconnect the battery, set the mirror position by hand, connect the battery, and check the retractable mirror's movement.
- OK:
Measurement Condition
Mirror Position
Specified Condition
Battery positive (+) - Terminal 3 (MR)
Battery negative (-) - Terminal 9 (MF)
Forward position (A)
Moves from A to retracted position (E)
Battery positive (+) - Terminal 9 (MF)
Battery negative (-) - Terminal 3 (MR)
Forward position (A)
Does not move
Battery positive (+) - Terminal 3 (MR)
Battery negative (-) - Terminal 9 (MF)
Position in range (B) between forward position (A) and driving position (C)
Moves from position in range (B) to retracted position (E)
Battery positive (+) - Terminal 9 (MF)
Battery negative (-) - Terminal 3 (MR)
Position in range (B) between forward position (A) and driving position (C)
Moves from position in range (B) to forward position (A)
Battery positive (+) - Terminal 3 (MR)
Battery negative (-) - Terminal 9 (MF)
Driving position (C)
Moves from C to retracted position (E)
Battery positive (+) - Terminal 9 (MF)
Battery negative (-) - Terminal 3 (MR)
Driving position (C)
Does not move
Battery positive (+) - Terminal 3 (MR)
Battery negative (-) - Terminal 9 (MF)
Position in range (D) between driving position (C) and retracted position (E)
Moves from position in range (D) to retracted position (E)
Battery positive (+) - Terminal 9 (MF)
Battery negative (-) - Terminal 3 (MR)
Position in range (D) between driving position (C) and retracted position (E)
Moves from position in range (D) to driving position (C)
Battery positive (+) - Terminal 3 (MR)
Battery negative (-) - Terminal 9 (MF)
Retracted position (E)
Does not move
Battery positive (+) - Terminal 9 (MF)
Battery negative (-) - Terminal 3 (MR)
Retracted position (E)
Moves from (E) to driving position (C)
- NOTICE:
- Disconnect and reconnect the battery between each mirror position check.
- The mirror position cannot be changed manually when the battery is connected. To change the mirror position manually, the battery must be disconnected first.
If the result is not as specified, replace the mirror assembly.
- Disconnect and reconnect the battery between each mirror position check.
| INSPECT OUTER REAR VIEW MIRROR ASSEMBLY RH |
Disconnect the mirror connector.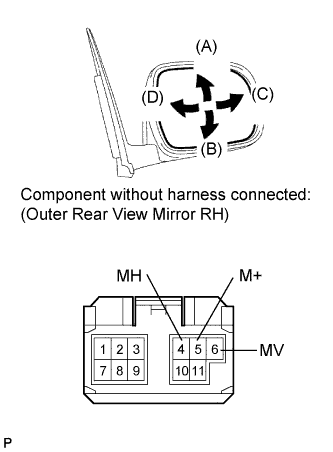
Apply battery voltage and check the operation of the mirror.
- OK:
Measurement Condition
Specified Condition
Battery positive (+) → Terminal 6 (MV)
Battery negative (-) → Terminal 5 (M+)
Turns upward (A)
Battery positive (+) → Terminal 5 (M+)
Battery negative (-) → Terminal 6 (MV)
Turns downward (B)
Battery positive (+) → Terminal 4 (MH)
Battery negative (-) → Terminal 5 (M+)
Turns left (D)
Battery positive (+) → Terminal 5 (M+)
Battery negative (-) → Terminal 4 (MH)
Turns right (C)
w/ Mirror Heater: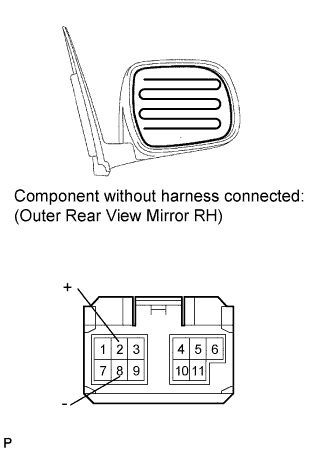
Measure the resistance according to the value (s) in the table below.
- Standard resistance:
Tester Connection
Condition
Specified Condition
2 (+) - 8 (-)
65°C (149°F)
4 to 12 Ω
Apply battery voltage and check the operation of the mirror heater.
- OK:
Measurement Condition
Specified Condition
Battery positive (+) → Terminal 2 (+)
Battery negative (-) → Terminal 8 (-)
Mirror becomes warm
- HINT:
- It will take a short time for the mirror to become warm.
- If the result is not as specified, replace to the outer rear view mirror glass.
- It will take a short time for the mirror to become warm.
w/ Retract Mirror: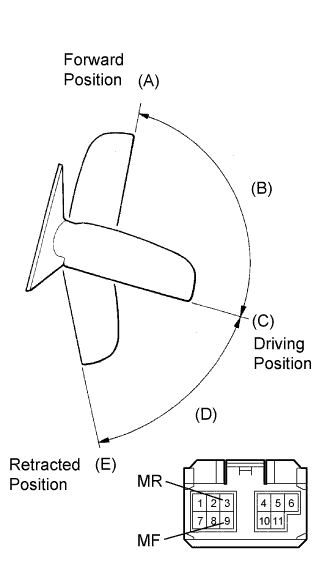
For each position: Disconnect the battery, set the mirror position by hand, connect the battery, and check the retractable mirror's movement.
- OK:
Measurement Condition
Mirror Position
Specified Condition
Battery positive (+) - Terminal 3 (MR)
Battery negative (-) - Terminal 9 (MF)
Forward position (A)
Moves from A to retracted position (E)
Battery positive (+) - Terminal 9 (MF)
Battery negative (-) - Terminal 3 (MR)
Forward position (A)
Does not move
Battery positive (+) - Terminal 3 (MR)
Battery negative (-) - Terminal 9 (MF)
Position in range (B) between forward position (A) and driving position (C)
Moves from position in range (B) to retracted position (E)
Battery positive (+) - Terminal 9 (MF)
Battery negative (-) - Terminal 3 (MR)
Position in range (B) between forward position (A) and driving position (C)
Moves from position in range (B) to forward position (A)
Battery positive (+) - Terminal 3 (MR)
Battery negative (-) - Terminal 9 (MF)
Driving position (C)
Moves from C to retracted position (E)
Battery positive (+) - Terminal 9 (MF)
Battery negative (-) - Terminal 3 (MR)
Driving position (C)
Does not move
Battery positive (+) - Terminal 3 (MR)
Battery negative (-) - Terminal 9 (MF)
Position in range (D) between driving position (C) and retracted position (E)
Moves from position in range (D) to retracted position (E)
Battery positive (+) - Terminal 9 (MF)
Battery negative (-) - Terminal 3 (MR)
Position in range (D) between driving position (C) and retracted position (E)
Moves from position in range (D) to driving position (C)
Battery positive (+) - Terminal 3 (MR)
Battery negative (-) - Terminal 9 (MF)
Retracted position (E)
Does not move
Battery positive (+) - Terminal 9 (MF)
Battery negative (-) - Terminal 3 (MR)
Retracted position (E)
Moves from (E) to driving position (C)
- NOTICE:
- Disconnect and reconnect the battery between each mirror position check.
- The mirror position cannot be changed manually when the battery is connected. To change the mirror position manually, the battery must be disconnected first.
If the result is not as specified, replace the mirror assembly.
- Disconnect and reconnect the battery between each mirror position check.