Speaker Circuit
Circuit diagnosis · Vehicles built from Nov 2005
DESCRIPTION
The radio receiver sends sound signals to the speakers.WIRING DIAGRAM
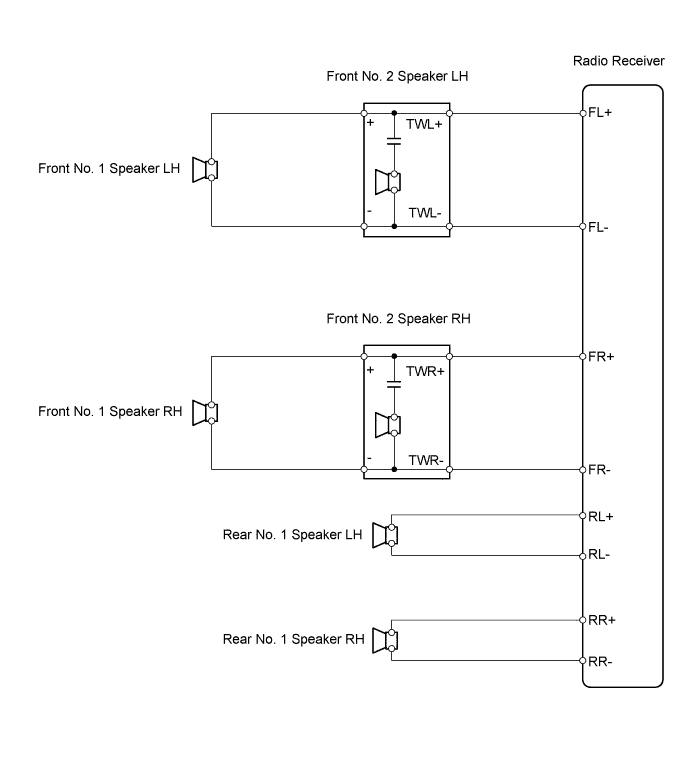

INSPECTION PROCEDURE
| 1. CHECK SPEAKER |

Check that the speakers sound.
Result Result
Proceed to
Front No. 1 speakers do not operate
A
Front No. 2 speakers do not operate
B
Rear No. 1 speakers do not operate
C
All speakers do not operate
D
|
|
||||
|
|
||||
|
|
||||


| A | |
 |
| 2. CHECK FRONT NO. 2 SPEAKER ASSEMBLY |
Check that the front No. 2 speakers sound.
- OK:
- Speakers sound.
|
|
||||
| OK | |
|
| 3. INSPECT FRONT NO. 2 SPEAKER ASSEMBLY |
Disconnect the H6 or G7 receiver connector.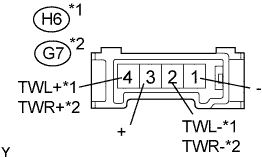
Measure the resistance of the speaker.
- Standard resistance:
Tester Connection
Specified Condition
1 (-) - 2 (TWL-)*1 or (TWR-)*2
Below 1 Ω
3 (+) - 4 (TWL+)*1 or (TWR+)*2
Below 1 Ω
1 (-) - Body ground
10 kΩ or higher
3 (+) - Body ground
10 kΩ or higher
- HINT:
- *1: for LH
- *2: for RH
|
|
||||
| OK | |
|
| 4. CHECK WIRE HARNESS (FRONT NO. 1 SPEAKER - FRONT NO. 2 SPEAKER) |
Disconnect the H1 and H6, or G1 and G7 connectors.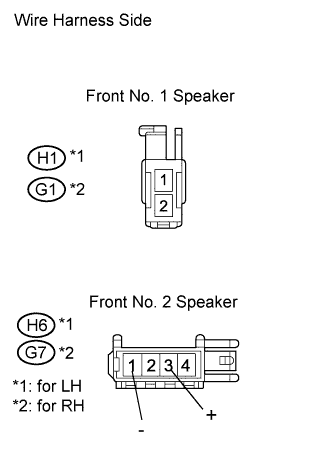
Measure the resistance of the wire harness side connectors.
- Standard resistance:
Tester Connection
Specified Condition
H1-1 - H6-3 (+)
Below 1 Ω
H1-1 - Body ground
10 kΩ or higher
H1-2 - H6-1 (-)
Below 1 Ω
H1-2 - Body ground
10 kΩ or higher
G1-1 - G7-3 (+)
Below 1 Ω
G1-1 - Body ground
10 kΩ or higher
G1-2 - G7-1 (-)
Below 1 Ω
G1-2 - Body ground
10 kΩ or higher
|
|
||||
| OK | ||
 |
||
| ||
| 5. CHECK WIRE HARNESS (RADIO RECEIVER - FRONT NO. 2 SPEAKER) |
Disconnect the E52 receiver connector.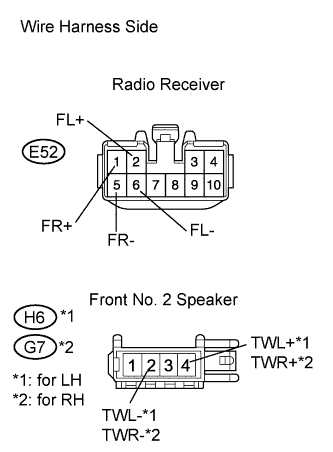
Disconnect the H6 or G7 speaker connector.
Measure the resistance of the wire harness side connectors.
- Standard resistance:
Tester Connection
Specified Condition
E52-1 (FR+) - G7-4 (TWR+)
Below 1 Ω
E52-5 (FR-) - G7-2 (TWR-)
Below 1 Ω
E52-1 (FR+) - Body ground
10 kΩ or higher
E52-5 (FR-) - Body ground
10 kΩ or higher
E52-2 (FL+) - H6-4 (TWL+)
Below 1 Ω
E52-6 (FL-) - H6-2 (TWL-)
Below 1 Ω
E52-2 (FL+) - Body ground
10 kΩ or higher
E52-6 (FL-) - Body ground
10 kΩ or higher
|
|
||||
| OK | |
|
| 6. INSPECT FRONT NO. 2 SPEAKER ASSEMBLY |
Check that the malfunction disappears when another speaker in good condition is installed.
- OK:
- Malfunction disappears.
- HINT:
- Connect all connectors to speakers.
- When there is a possibility that either the right or left front speaker is defective, inspect by interchanging the right one with the left one.
- Connect all connectors to speakers.
|
|
||||
| NG | ||
|
||
| ||
| 7. CHECK WIRE HARNESS (RADIO RECEIVER - REAR NO. 1 SPEAKER) |
Disconnect the E53 receiver connector.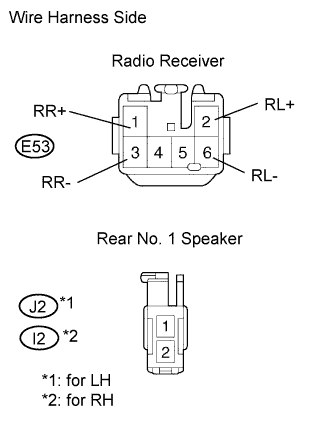
Disconnect the J2 or I2 receiver connector.
Measure the resistance of the wire harness side connectors.
- Standard resistance:
Tester Connection
Specified Condition
E53-1 (RR+) - I2-1
Below 1 Ω
E53-3 (RR-) - I2-2
Below 1 Ω
E53-1 (RR+) - Body ground
10 kΩ or higher
E53-3 (RR-) - Body ground
10 kΩ or higher
E53-2 (RL+) - J2-1
Below 1 Ω
E53-6 (RL-) - J2-2
Below 1 Ω
E53-2 (RL+) - Body ground
10 kΩ or higher
E53-6 (RL-) - Body ground
10 kΩ or higher
|
|
||||
| OK | |
|
| 8. INSPECT REAR NO. 1 SPEAKER ASSEMBLY |
Check the rear No. 1 speakers (Click here).
- OK:
- Rear No. 1 speakers are normal.
|
|
||||
| OK | ||
|
||
| ||