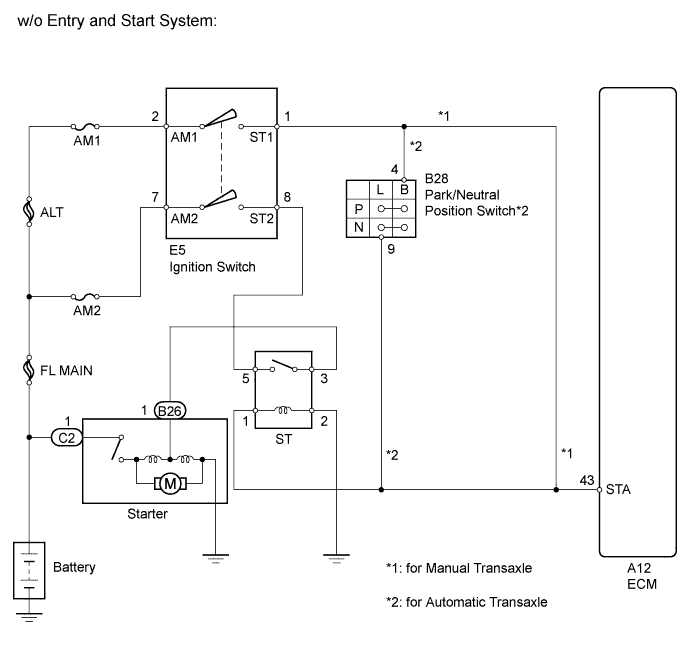
DTC P0617 Starter Relay Circuit High |
| DTC Detection Drive Pattern | DTC Detection Condition | Trouble Area |
| Drive the vehicle for 25 seconds or more at a speed of 20 km/h (12.5 mph) or more and an engine speed of 1000 rpm or more | Conditions (a), (b) and (c) are met for 20 seconds: (a) Vehicle speed is more than 20 km/h (12.5 mph). (b) Engine speed is more than 1000 rpm. (c) STA signal is on. (1 trip detection logic) |
|
| DTC No. | Data List |
| P0617 | Starter Signal |
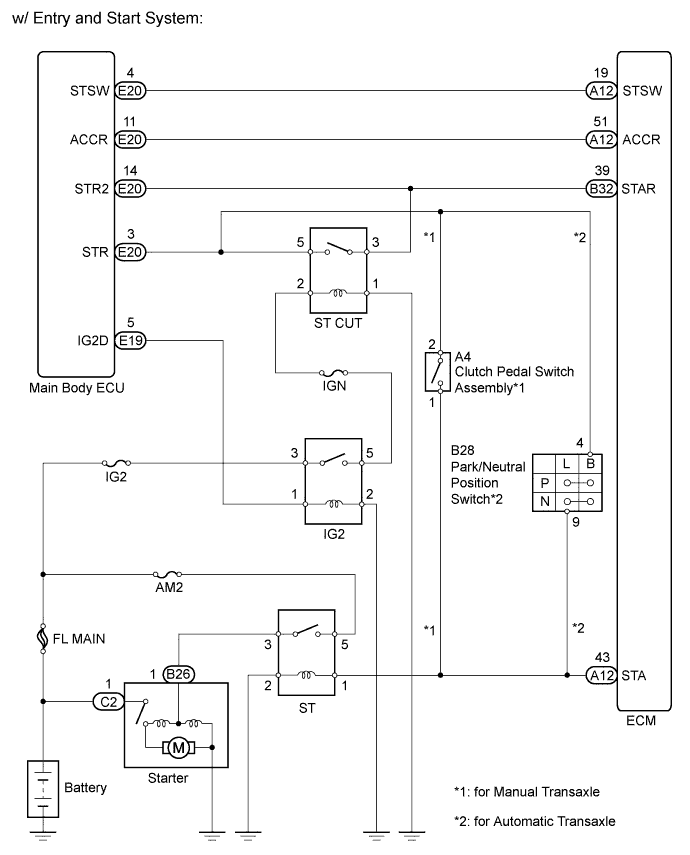
| 1.CHECK IF VEHICLE IS EQUIPPED WITH ENTRY AND START SYSTEM |
Check if the vehicle is equipped with the entry and start system.
| Result | Proceed to |
| w/o Entry and Start System | A |
| w/ Entry and Start System | B |
|
| ||||
| A | |
 |
| 2.READ VALUE USING INTELLIGENT TESTER (STARTER SIGNAL) |
Connect the intelligent tester to the DLC3.
Turn the ignition switch to ON and turn the tester on.
Enter the following menus: Powertrain / Engine and ECT / Data List / Starter Signal.
Read the value displayed on the tester when the ignition switch is turned to ON and when the engine is started.
| Ignition Switch Condition | Starter Signal |
| ON | OFF |
| Engine Start | ON |
| Result | Proceed to |
| OK | A |
| NG (for Manual Transaxle) | B |
| NG (for Automatic Transaxle) | C |
|
| ||||
|
| ||||
|
| ||||
| 3.INSPECT IGNITION SWITCH |
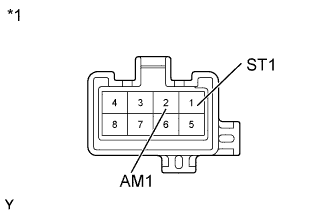 |
Disconnect the ignition switch assembly connector.
Measure the resistance according to the value(s) in the table below.
| Tester Connection | Ignition Switch Position | Specified Condition |
| All terminals | Off | 10 kΩ or higher |
| 2 (AM1) - 1 (ST1) | START | Below 1 Ω |
| *1 | Component without harness connected (Ignition Switch Assembly) |
| Result | Proceed to |
| OK (for RHD) | A |
| OK (for LHD) | B |
| NG | C |
Reconnect the ignition switch assembly connector.
|
| ||||
|
| ||||
| A | |
|
| 4.CHECK HARNESS AND CONNECTOR (IGNITION SWITCH ASSEMBLY - ST RELAY) |
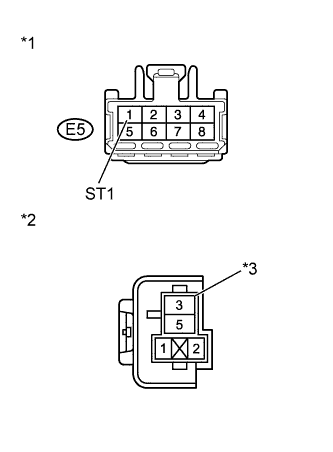 |
Remove the ST relay from the No. 8 relay block.
Disconnect the ignition switch assembly connector.
Measure the resistance according to the value(s) in the table below.
| Tester Connection | Condition | Specified Condition |
| 1 (ST relay holder) or E5-1 - Body ground | Always | 10 kΩ or higher |
| *1 | Front view of wire harness connector (to Ignition Switch Assembly) |
| *2 | No. 8 Relay Block |
| *3 | ST Relay Holder |
Reinstall the ST relay.
Reconnect the ignition switch assembly connector.
|
| ||||
|
| ||||
| 5.CHECK HARNESS AND CONNECTOR (IGNITION SWITCH ASSEMBLY - ST RELAY) |
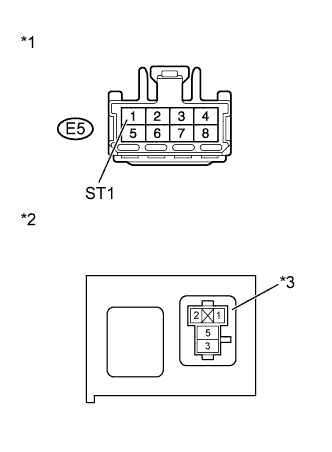 |
Remove the ST relay from the No. 7 relay block.
Disconnect the ignition switch assembly connector.
Measure the resistance according to the value(s) in the table below.
| Tester Connection | Condition | Specified Condition |
| 1 (ST relay holder) or E5-1 - Body ground | Always | 10 kΩ or higher |
| *1 | Front view of wire harness connector (to Ignition Switch Assembly) |
| *2 | No. 7 Relay Block |
| *3 | ST Relay Holder |
Reinstall the ST relay.
Reconnect the ignition switch assembly connector.
|
| ||||
| OK | |
|
| 6.CHECK HARNESS AND CONNECTOR (IGNITION SWITCH ASSEMBLY - ECM) |
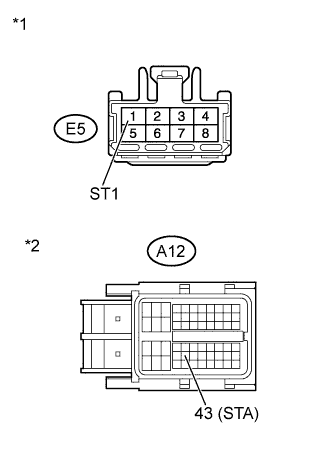 |
Disconnect the ECM connector.
Disconnect the ignition switch assembly connector.
Measure the resistance according to the value(s) in the table below.
| Tester Connection | Condition | Specified Condition |
| E5-1 (ST1) or A12-43 (STA) - Body ground | Always | 10 kΩ or higher |
| *1 | Front view of wire harness connector (to Ignition Switch Assembly) |
| *2 | Front view of wire harness connector (to ECM) |
Reconnect the ECM connector.
Reconnect the ignition switch assembly connector.
|
| ||||
|
| ||||
| 7.INSPECT IGNITION SWITCH |
|
Disconnect the ignition switch assembly connector.
Measure the resistance according to the value(s) in the table below.
| Tester Connection | Ignition Switch Position | Specified Condition |
| All terminals | Off | 10 kΩ or higher |
| 2 (AM1) - 1 (ST1) | START | Below 1 Ω |
| *1 | Component without harness connected (Ignition Switch Assembly) |
Reconnect the ignition switch assembly connector.
|
| ||||
| OK | |
|
| 8.CHECK HARNESS AND CONNECTOR (IGNITION SWITCH ASSEMBLY - PARK/NEUTRAL POSITION SWITCH) |
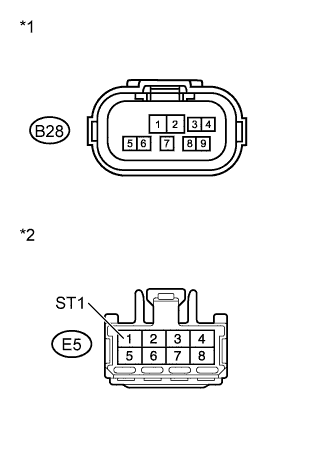 |
Disconnect the park/neutral position switch connector.
Disconnect the ignition switch assembly connector.
Measure the resistance according to the value(s) in the table below.
| Tester Connection | Condition | Specified Condition |
| E5-1 (ST1) or B28-4 - Body ground | Always | 10 kΩ or higher |
| *1 | Front view of wire harness connector (to Park/Neutral Position Switch) |
| *2 | Front view of wire harness connector (to Ignition Switch) |
| Result | Proceed to |
| OK (for RHD) | A |
| OK (for LHD) | B |
| NG | C |
Reconnect the park/neutral position switch connector.
Reconnect the ignition switch assembly connector.
|
| ||||
|
| ||||
| A | |
|
| 9.CHECK HARNESS AND CONNECTOR (PARK/NEUTRAL POSITION SWITCH - ST RELAY) |
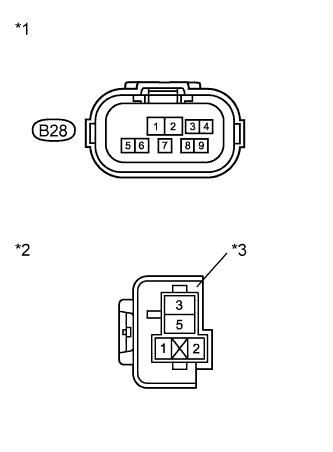 |
Remove the ST relay from the No. 8 relay block.
Disconnect the park/neutral position switch connector.
Measure the resistance according to the value(s) in the table below.
| Tester Connection | Condition | Specified Condition |
| 1 (ST relay holder) or B28-9 - Body ground | Always | 10 kΩ or higher |
| *1 | Front view of wire harness connector (to Park/Neutral Position Switch) |
| *2 | No. 8 Relay Block |
| *3 | ST Relay Holder |
Reinstall the ST relay.
Reconnect the park/neutral position switch connector.
|
| ||||
|
| ||||
| 10.CHECK HARNESS AND CONNECTOR (PARK/NEUTRAL POSITION SWITCH - ST RELAY) |
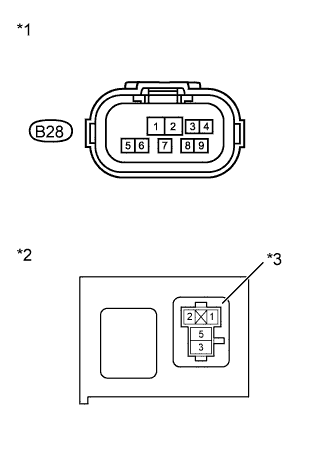 |
Remove the ST relay from the No. 7 relay block.
Disconnect the park/neutral position switch connector.
Measure the resistance according to the value(s) in the table below.
| Tester Connection | Condition | Specified Condition |
| 1 (ST relay holder) or B28-9 - Body ground | Always | 10 kΩ or higher |
| *1 | Front view of wire harness connector (to Park/Neutral Position Switch) |
| *2 | No. 7 Relay Block |
| *3 | ST Relay Holder |
Reinstall the ST relay.
Reconnect the park/neutral position switch connector.
|
| ||||
| OK | |
|
| 11.CHECK HARNESS AND CONNECTOR (PARK/NEUTRAL POSITION SWITCH - ECM) |
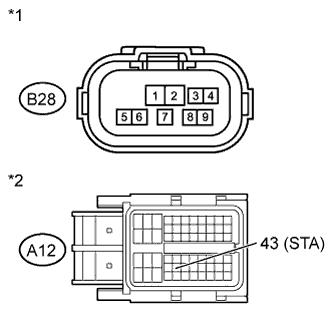 |
Disconnect the ECM connector.
Disconnect the park/neutral position switch connector.
Measure the resistance according to the value(s) in the table below.
| Tester Connection | Condition | Specified Condition |
| A12-43 (STA) or B28-9 - Body ground | Always | 10 kΩ or higher |
| *1 | Front view of wire harness connector (to Park/Neutral Position Switch) |
| *2 | Front view of wire harness connector (to ECM) |
Reconnect the ECM connector.
Reconnect the park/neutral position switch connector.
|
| ||||
|
| ||||
| 12.READ VALUE USING INTELLIGENT TESTER (STARTER SIGNAL) |
Connect the intelligent tester to the DLC3.
Turn the ignition switch to ON and turn the tester on.
Enter the following menus: Powertrain / Engine and ECT / Data List / Starter Signal.
Read the value displayed on the tester when the ignition switch is turned to ON.
| Switch Condition | Starter Signal |
| Ignition switch ON | OFF |
| Result | Proceed to |
| OK | A |
| NG (for Manual Transaxle) | B |
| NG (for Automatic Transaxle) | C |
|
| ||||
|
| ||||
|
| ||||
| 13.CHECK HARNESS AND CONNECTOR (CLUTCH PEDAL SWITCH ASSEMBLY - MAIN BODY ECU) |
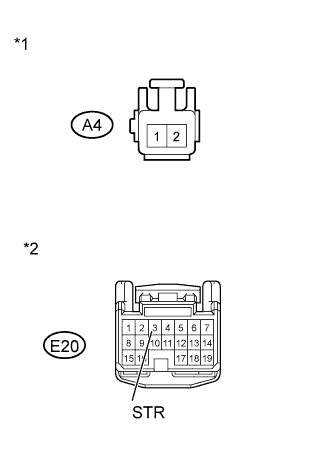 |
Disconnect the clutch pedal switch assembly connector.
Disconnect the main body ECU connector.
Measure the resistance according to the value(s) in the table below.
| Tester Connection | Condition | Specified Condition |
| A4-2 or E20-3 (STR) - Body ground | Always | 10 kΩ or higher |
| *1 | Front view of wire harness connector (to Clutch Pedal Switch Assembly) |
| *2 | Front view of wire harness connector (to Main Body ECU) |
| Result | Proceed to |
| OK (for RHD) | A |
| OK (for LHD) | B |
| NG | C |
Reconnect the clutch pedal switch assembly connector.
Reconnect the main body ECU connector.
|
| ||||
|
| ||||
| A | |
|
| 14.CHECK HARNESS AND CONNECTOR (CLUTCH PEDAL SWITCH ASSEMBLY - ST RELAY) |
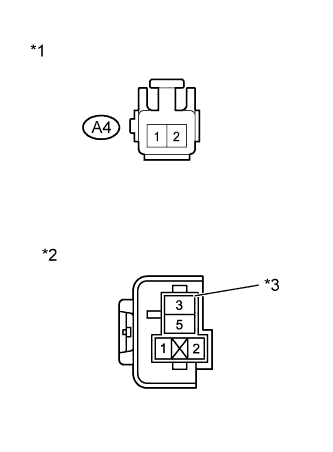 |
Remove the ST relay from the No. 8 relay block.
Disconnect the clutch pedal switch assembly connector.
Measure the resistance according to the value(s) in the table below.
| Tester Connection | Condition | Specified Condition |
| 1 (ST relay holder) or A4-1 - Body ground | Always | 10 kΩ or higher |
| *1 | Front view of wire harness connector (to Clutch Pedal Switch Assembly) |
| *2 | No. 8 Relay Block |
| *3 | ST Relay Holder |
Reinstall the ST relay.
Reconnect the clutch pedal switch assembly connector.
|
| ||||
|
| ||||
| 15.CHECK HARNESS AND CONNECTOR (CLUTCH PEDAL SWITCH ASSEMBLY - ST RELAY) |
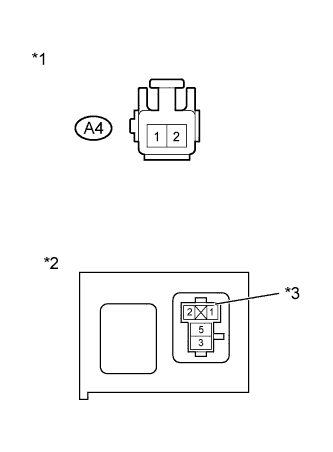 |
Remove the ST relay from the No. 7 relay block.
Disconnect the clutch pedal switch assembly connector.
Measure the resistance according to the value(s) in the table below.
| Tester Connection | Condition | Specified Condition |
| 1 (ST relay holder) or A4-1 - Body ground | Always | 10 kΩ or higher |
| *1 | Front view of wire harness connector (to Clutch Pedal Switch Assembly) |
| *2 | No. 7 Relay Block |
| *3 | ST Relay Holder |
Reinstall the ST relay.
Reconnect the clutch pedal switch assembly connector.
|
| ||||
| OK | |
|
| 16.CHECK HARNESS AND CONNECTOR (CLUTCH PEDAL SWITCH ASSEMBLY - ECM) |
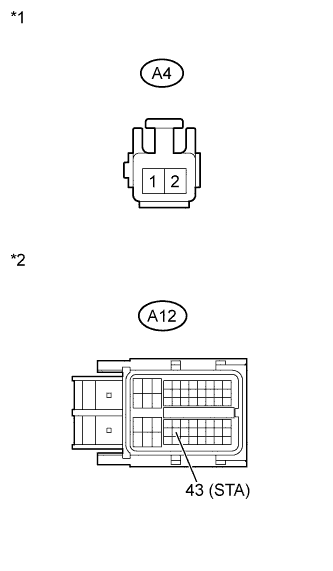 |
Disconnect the ECM connector.
Disconnect the clutch pedal switch assembly connector.
Measure the resistance according to the value(s) in the table below.
| Tester Connection | Condition | Specified Condition |
| A12-43 (STA) or A4-1 - Body ground | Always | 10 kΩ or higher |
| *1 | Front view of wire harness connector (to Clutch Pedal Switch Assembly) |
| *2 | Front view of wire harness connector (to ECM) |
Reconnect the ECM connector.
Reconnect the clutch pedal switch assembly connector.
|
| ||||
| OK | |
|
| 17.INSPECT CLUTCH PEDAL SWITCH ASSEMBLY |
Inspect the clutch pedal switch assembly (Click here).
|
| ||||
|
| ||||
| 18.CHECK HARNESS AND CONNECTOR (PARK/NEUTRAL POSITION SWITCH - MAIN BODY ECU) |
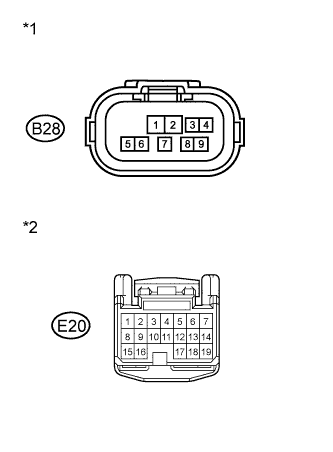 |
Disconnect the park/neutral position switch connector.
Disconnect the main body ECU connector.
Measure the resistance according to the value(s) in the table below.
| Tester Connection | Condition | Specified Condition |
| B28-4 or E20-3 (STR) - Body ground | Always | 10 kΩ or higher |
| *1 | Front view of wire harness connector (to Park/Neutral Position Switch) |
| *2 | Front view of wire harness connector (to Main Body ECU) |
| Result | Proceed to |
| OK (for RHD) | A |
| OK (for LHD) | B |
| NG | C |
Reconnect the park/neutral position switch connector.
Reconnect the main body ECU connector.
|
| ||||
|
| ||||
| A | |
|
| 19.CHECK HARNESS AND CONNECTOR (PARK/NEUTRAL POSITION SWITCH - ST RELAY) |
|
Remove the ST relay from the No. 8 relay block.
Disconnect the park/neutral position switch connector.
Measure the resistance according to the value(s) in the table below.
| Tester Connection | Condition | Specified Condition |
| 1 (ST relay holder) or B28-9 - Body ground | Always | 10 kΩ or higher |
| *1 | Front view of wire harness connector (to Park/Neutral Position Switch) |
| *2 | No. 8 Relay Block |
| *3 | ST Relay Holder |
Reinstall the ST relay.
Reconnect the park/neutral position switch connector.
|
| ||||
|
| ||||
| 20.CHECK HARNESS AND CONNECTOR (PARK/NEUTRAL POSITION SWITCH - ST RELAY) |
|
Remove the ST relay from the No. 7 relay block.
Disconnect the park/neutral position switch connector.
Measure the resistance according to the value(s) in the table below.
| Tester Connection | Condition | Specified Condition |
| 1 (ST relay holder) or B28-9 - Body ground | Always | 10 kΩ or higher |
| *1 | Front view of wire harness connector (to Park/Neutral Position Switch) |
| *2 | No. 7 Relay Block |
| *3 | ST Relay Holder |
Reinstall the ST relay.
Reconnect the park/neutral position switch connector.
|
| ||||
| OK | |
|
| 21.CHECK HARNESS AND CONNECTOR (PARK/NEUTRAL POSITION SWITCH - ECM) |
|
Disconnect the ECM connector.
Disconnect the park/neutral position switch connector.
Measure the resistance according to the value(s) in the table below.
| Tester Connection | Condition | Specified Condition |
| A12-43 (STA) or B28-9 - Body ground | Always | 10 kΩ or higher |
| *1 | Front view of wire harness connector (to Park/Neutral Position Switch) |
| *2 | Front view of wire harness connector (to ECM) |
Reconnect the ECM connector.
Reconnect the park/neutral position switch connector.
|
| ||||
| OK | |
|
| 22.INSPECT PARK/NEUTRAL POSITION SWITCH ASSEMBLY |
Inspect the park/neutral position switch assembly .
|
| ||||
| OK | |
|
| 23.REPLACE ECM |
Replace the ECM (Click here).
|
| ||||
| 24.REPLACE IGNITION SWITCH ASSEMBLY |
Replace the ignition switch assembly (Click here).
|
| ||||
| 25.REPLACE CLUTCH PEDAL SWITCH ASSEMBLY |
Replace the clutch pedal switch assembly (Click here).
|
| ||||
| 26.REPLACE PARK/NEUTRAL POSITION SWITCH ASSEMBLY |
Replace the park/neutral position switch assembly (Click here).
|
| ||||
| 27.REPAIR OR REPLACE HARNESS OR CONNECTOR |
Repair or replace the harness or connector.
| NEXT | |
|
| 28.CONFIRM WHETHER DTC OUTPUT RECURS |
Connect the intelligent tester to the DLC3.
Clear the DTCs (Click here).
Turn the ignition switch off.
Turn the ignition switch to ON.
Drive the vehicle for 25 seconds or more at a speed of 20 km/h (12.5 mph) or more and an engine speed of 1000 rpm or more.
Confirm that the DTC is not output again.
| NEXT | ||
 | ||
| ||
