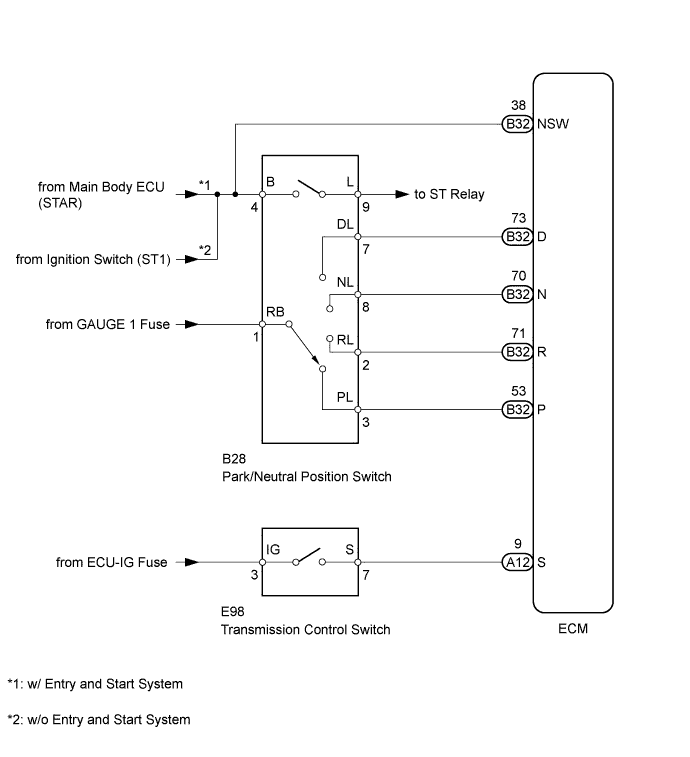
DTC P0705 Transmission Range Sensor Circuit Malfunction (PRNDL Input) |
| DTC Detection Drive Pattern | DTC Detection Condition | Trouble Area |
| Ignition switch ON for 60 seconds | 2 or more of the P, N, NSW, R and D shift lever position signals are on simultaneously for 2 seconds (2 trip detection logic). |
|
| The P, N, NSW, R and D shift lever position signals are all off simultaneously for 60 seconds (2 trip detection logic). | ||
| The P, N, NSW or R shift lever position signal is on when the shift lever is in M for 2 seconds (2 trip detection logic). |
| DATA LIST |
Warm up the engine.
Turn the ignition switch off.
Connect the intelligent tester to the DLC3.
Turn the ignition switch to ON.
Turn the intelligent tester on.
Enter the following menus: Powertrain / Engine and ECT / Data List.
According to the display on the tester, read the Data List.
| Tester Display | Measurement Item/Range | Normal Condition | Diagnostic Note |
| Neutral Position SW Signal | PNP switch status/ ON or OFF |
| When the shift lever position displayed on the intelligent tester differs from the actual position, the adjustment of the PNP switch or shift cable may be incorrect. |
| Shift SW Status (P Range) | PNP switch status/ ON or OFF |
| |
| Shift SW Status (R Range) | PNP switch status/ ON or OFF |
| |
| Shift SW Status (N Range) | PNP switch status/ ON or OFF |
| |
| Sports Shift Up SW | Sport shift up switch status/ ON or OFF |
| - |
| Sports Shift Down SW | Sport shift down switch status/ ON or OFF |
| - |
| Sports Mode Selection SW | Sport mode select switch status/ ON or OFF |
| - |
| Shift SW Status (D Range) | PNP switch status/ ON or OFF |
| When the shift lever position displayed on the intelligent tester differs from the actual position, the adjustment of the PNP switch or shift cable may be incorrect. |
| 1.CHECK PARK/NEUTRAL POSITION SWITCH ASSEMBLY (POWER SOURCE) |
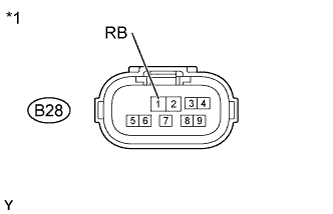 |
Disconnect the park/neutral position switch connector.
Measure the voltage according to the value(s) in the table below.
| Tester Connection | Switch Condition | Specified Condition |
| B28-1 (RB) - Body ground | Ignition switch ON | 11 to 14 V |
| B28-1 (RB) - Body ground | Ignition switch off | Below 1 V |
| *1 | Front view of wire harness connector (to Park/Neutral Position Switch) |
Reconnect the park/neutral position switch connector.
|
| ||||
| OK | |
 |
| 2.CHECK HARNESS AND CONNECTOR (ECM OUTPUT SIGNAL) |
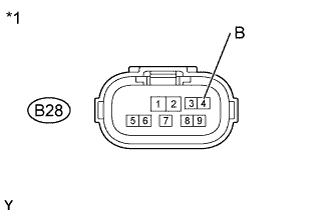 |
Disconnect the park/neutral position switch connector.
Measure the voltage according to the value(s) in the table below.
| Tester Connection | Switch Condition | Specified Condition |
| B28-4 (B) - Body ground | Ignition switch ON | 11 to 14 V |
| B28-4 (B) - Body ground | Ignition switch off | Below 1 V |
| *1 | Front view of wire harness connector (to Park/Neutral Position Switch) |
Reconnect the park/neutral position switch connector.
|
| ||||
| OK | |
|
| 3.INSPECT PARK/NEUTRAL POSITION SWITCH ASSEMBLY |
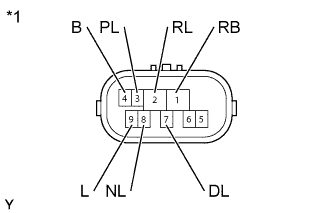 |
Disconnect the park/neutral position switch connector.
Measure the resistance according to the value(s) in the table below.
| Tester Connection | Condition | Specified Condition |
| Shift lever in P | Below 1 Ω |
| 1 (RB) - 2 (RL) | Shift lever in R | Below 1 Ω |
| Shift lever in N | Below 1 Ω |
| 1 (RB) - 7 (DL) | Shift lever in D, M, "+" or "-" | Below 1 Ω |
| Shift lever not in P | 10 kΩ or higher |
| 1 (RB) - 2 (RL) | Shift lever not in R | 10 kΩ or higher |
| Shift lever not in N | 10 kΩ or higher |
| 1 (RB) - 7 (DL) | Shift lever not in D, M, "+" or "-" | 10 kΩ or higher |
| *1 | Component without harness connected (Park/Neutral Position Switch) |
Reconnect the park/neutral position switch connector.
|
| ||||
| OK | |
|
| 4.CHECK TRANSMISSION CONTROL SWITCH (POWER SOURCE) |
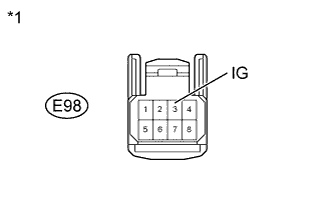 |
Disconnect the transmission control switch connector.
Measure the voltage according to the value(s) in the table below.
| Tester Connection | Switch Condition | Specified Condition |
| E98-3 (IG) - Body ground | Ignition switch ON | 11 to 14 V |
| E98-3 (IG) - Body ground | Ignition switch off | Below 1 V |
| *1 | Front view of wire harness connector (to Transmission Control Switch) |
Reconnect the transmission control switch connector.
|
| ||||
| OK | |
|
| 5.INSPECT TRANSMISSION CONTROL SWITCH |
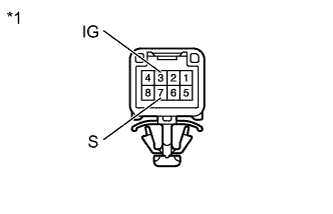 |
Disconnect the transmission control switch connector.
Measure the resistance according to the value(s) in the table below.
| Tester Connection | Condition | Specified Condition |
| 3 (IG) - 7 (S) | Shift lever in M, "+" or "-" | Below 1 Ω |
| 3 (IG) - 7 (S) | Shift lever not in M, "+" or "-" | 10 kΩ or higher |
| *1 | Component without harness connected (Transmission Control Switch) |
Reconnect the transmission control switch connector.
|
| ||||
| OK | |
|
| 6.CHECK HARNESS AND CONNECTOR (BATTERY - ECM) |
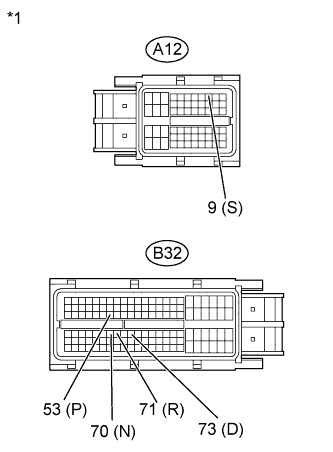 |
Disconnect the ECM connectors.
Measure the voltage according to the value(s) in the table below.
| Tester Connection | Condition | Specified Condition |
| B32-53 (P) - Body ground |
| 11 to 14 V |
| B32-71 (R) - Body ground |
| 11 to 14 V* |
| B32-70 (N) - Body ground |
| 11 to 14 V |
| B32-73 (D) - Body ground |
| 11 to 14 V |
| A12-9 (S) - Body ground |
| 11 to 14 V |
| B32-53 (P) - Body ground |
| Below 1 V |
| B32-71 (R) - Body ground |
| Below 1 V |
| B32-70 (N) - Body ground |
| Below 1 V |
| B32-73 (D) - Body ground |
| Below 1 V |
| A12-9 (S) - Body ground |
| Below 1 V |
| *1 | Front view of wire harness connector (to ECM) |
Reconnect the ECM connectors.
|
| ||||
| OK | |
|
| 7.REPLACE ECM |
Replace the ECM (Click here).
|
| ||||
| 8.CHECK HARNESS AND CONNECTOR (PARK/NEUTRAL POSITION SWITCH - ECM) |
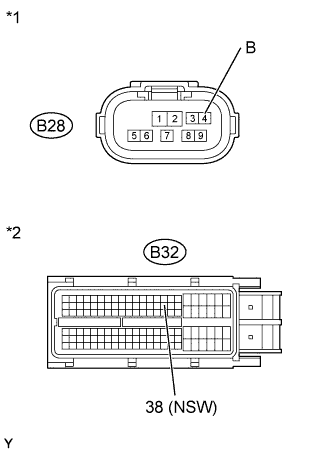 |
Disconnect the park/neutral position switch connector.
Disconnect the ECM connector.
Measure the resistance according to the value(s) in the table below.
| Tester Connection | Condition | Specified Condition |
| B28-4 (B) - B32-38 (NSW) | Always | Below 1 Ω |
| B28-4 (B) - Body ground | Always | 10 kΩ or higher |
| B32-38 (NSW) - Body ground | Always | 10 kΩ or higher |
| *1 | Front view of wire harness connector (to Park/Neutral Position Switch) |
| *2 | Front view of wire harness connector (to ECM) |
Reconnect the park/neutral position switch connector.
Reconnect the ECM connector.
|
| ||||
| OK | |
|
| Go to step 11 |
| 9.REPLACE ECM |
Replace the ECM (Click here).
|
| ||||
| 10.REPLACE PARK/NEUTRAL POSITION SWITCH ASSEMBLY |
Replace the park/neutral position switch (Click here).
|
| ||||
| 11.REPLACE TRANSMISSION CONTROL SWITCH (SHIFT LOCK CONTROL UNIT ASSEMBLY) |
Replace the transmission control switch (Click here).
|
| ||||
| 12.REPAIR OR REPLACE HARNESS OR CONNECTOR |
Repair or replace the harness or connector.
| NEXT | |
|
| 13.CONFIRM WHETHER MALFUNCTION HAS BEEN SUCCESSFULLY REPAIRED |
Connect the intelligent tester to the DLC3.
Clear the DTCs (Click here).
Turn the ignition switch to ON for 60 seconds.
Enter the following menus: Powertrain / Engine and ECT / DTC.
Confirm that the pending DTC is not output.
| NEXT | ||
 | ||
| ||
