Home › ENGINE ยท 2AD-FTV › ENGINE MECHANICAL › REAR CRANKSHAFT OIL SEAL

REAR CRANKSHAFT OIL SEAL > INSTALLATION

for Preparation Click here


1. INSTALL REAR CRANKSHAFT OIL SEAL
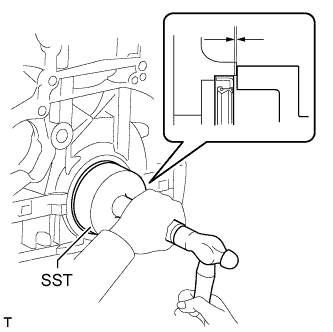
  1. Apply MP grease to the lip of a new oil seal.


    A202329E01
  1. Using SST and a hammer, tap in the oil seal as shown in the illustration.

    SST
    09223-56010  

    Standard depth:
    0 to 0.9 mm (0 to 0.0354 in.)

    NOTICE:
    1. Keep the lip free from foreign matter.
    1. Do not tap the oil seal at an angle.
    1. Make sure that the oil seal is properly installed.
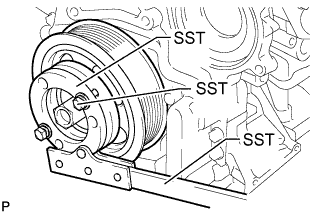


2. INSTALL FLYWHEEL SUB-ASSEMBLY


    A201753E01
  1. Hold the crankshaft pulley with SST.

    SST
    09213-58014   (91551-80840)
    09330-00021  


    A202344E01
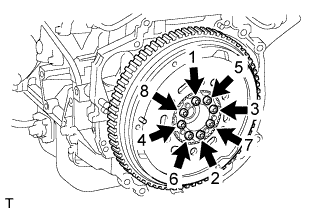
  1. Using a T55 "TORX" socket wrench, install the flywheel with 8 new bolts and uniformly tighten the bolts in several steps in the sequence shown in the illustration.

    Torque:
    71 N*m{ 720 kgf*cm , 52 ft.*lbf }

    NOTICE:
    1. Do not reuse the flywheel installation bolts.
    2. Be sure to check the tightening torque within 5 minutes after tightening.
    3. Do not impact or damage the flywheel installation bolts. Be sure to handle them carefully.
    4. Make sure there is no oil on the bolts.

    HINT:
    Make sure that the seating surface of the flywheel installation bolts and installation surfaces of the crankshaft and flywheel are free from oil and foreign matter.


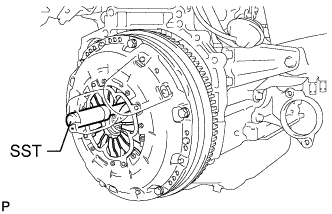
3. INSTALL CLUTCH DISC ASSEMBLY


    C116730E01
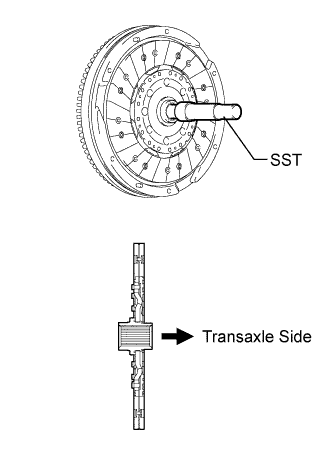
  1. Insert SST into the clutch disc, and then insert them into the flywheel.

    SST
    09301-00310  

    NOTICE:
    Do not insert the clutch disc in the wrong direction.


4. INSTALL CLUTCH COVER ASSEMBLY


    C116732E02
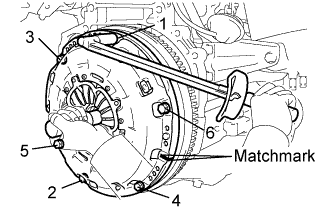
  1. Align the matchmarks on the clutch cover with the one on the flywheel.

  1. Tighten the 6 bolts uniformly in the order shown in the illustration, starting with the bolt located near the knock pin on the top.

    Torque:
    19 N*m{ 195 kgf*cm , 14 ft.*lbf }

    NOTICE:
    1. Following the order in the illustration, make sure to uniformly tighten the bolts 180°.
    2. After checking that the disc is in the center, gently move SST up and down, and right and left to tighten the bolts.


5. INSPECT AND ADJUST CLUTCH COVER ASSEMBLY


    C116193
    C116192E01
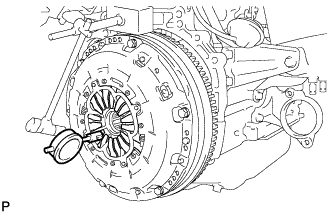
  1. Using a dial indicator with a roller instrument, measure the diaphragm spring tip alignment.

    Maximum non-alignment:
    1.3 mm (0.050 in.)

    If the alignment is not as specified, using SST, adjust the diaphragm spring tip alignment.
    SST
    09333-00013  


6. INSTALL MANUAL TRANSAXLE ASSEMBLY
  1. for 4WD:
    Install the manual transaxle (Click here).

  1. for 2WD:
    Install the manual transaxle (Click here).


7. CONNECT CABLE TO NEGATIVE BATTERY TERMINAL