Home › ENGINE · 2AD-FHV › ENGINE CONTROL SYSTEM › ECD SYSTEM

DTC    P2237    Oxygen (A/F) Sensor Pumping Current Circuit / Open (Bank 1 Sensor 1)

DTC    P2238    Oxygen (A/F) Sensor Pumping Current Circuit Low (Bank 1 Sensor 1)

DTC    P2239    Oxygen (A/F) Sensor Pumping Current Circuit High (Bank 1 Sensor 1)

DTC    P2252    Oxygen (A/F) Sensor Reference Ground Circuit Low (Bank 1 Sensor 1)

DTC    P2253    Oxygen (A/F) Sensor Reference Ground Circuit High (Bank 1 Sensor 1)

for Preparation Click here


DESCRIPTION

HINT:
  1. For more information on the A/F sensor and TOYOTA D-CAT* (Click here).
  2. If P2237, P2238 and/or P2239 is present, refer to the DTC table for TOYOTA D-CAT system (Click here).
  3. These DTCs are recorded when the A/F sensor has a malfunction, although the title is the oxygen sensor.

*: Diesel Clean Advanced Technology.
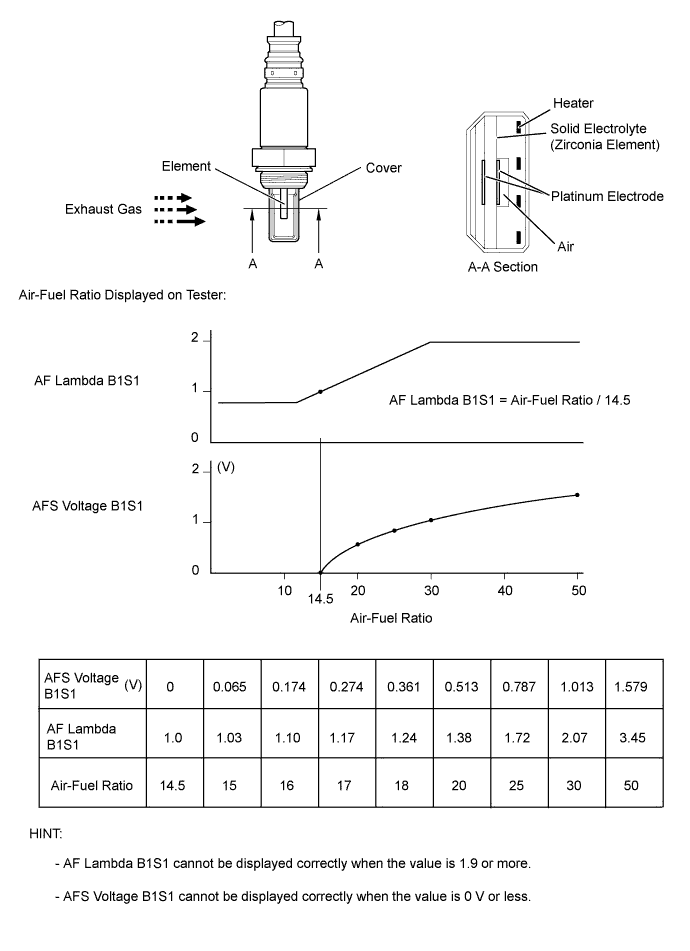
The A/F sensor has the characteristic of providing output voltage which is proportional to the air-fuel ratio. The A/F sensor output voltage*1 is used by the ECM to control the air-fuel ratio.
The A/F sensor is located after the DPNR*2 catalytic converter. This sensor has been developed based on the structure and technology of a sensor that is being used for gasoline engines. The cover portion of the sensor has been changed for use in the diesel engine with TOYOTA D-CAT in order to eliminate the influence of the sensor temperature and particulate matter (PM).
In order to reduce both PM and nitrogen oxides (NOx), the ECM adjusts the air-fuel ratio to slightly rich (but it is lean compared with the stoichiometric air-fuel ratio) based on signals from the A/F sensor. When the ECM performs DPNR catalyst regeneration using adding fuel using the exhaust fuel addition injector, the air-fuel ratio is also properly adjusted using the sensor.
*1: The voltage value changes inside the ECM only.
*2: Diesel Particulate-NOx Reduction system.

A212402E01

HINT:
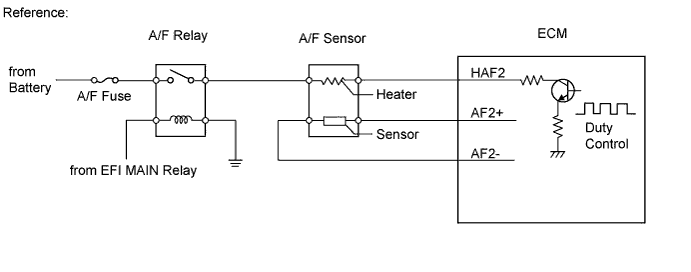
The ECM provides a pulse width modulated control circuit to adjust current through the heater. The A/F sensor heater circuit uses a relay on the B+ side of the circuit.


A210271E02


P2237 
DTC Detection Drive Pattern
DTC Detection Condition
Trouble Area
  1. Drive the vehicle at 50 km/h (30 mph) or more for a total of 300 seconds or more.
  2. Check that "Exhaust Temperature B1S1" displays 200°C (392°F) or higher using the intelligent tester.
When either of the following conditions is met (1 trip detection logic):
  1. A/F sensor circuit malfunction
  2. The resistance of the A/F sensor element is 250 Ω or higher for 5 seconds or more.
Main trouble area: Open in A/F sensor circuit
  1. Open or short in A/F sensor circuit
  2. A/F sensor
  3. A/F sensor heater
  4. A/F relay
  5. A/F sensor heater and relay circuit
  6. ECM

P2238 
DTC Detection Drive Pattern
DTC Detection Condition
Trouble Area
Ignition switch ON for 7 seconds
A/F sensor circuit low (bank 1 sensor 1)
(1 trip detection logic)
Main trouble area: Open in A/F sensor circuit
  1. Open or short in A/F sensor circuit
  2. A/F sensor
  3. A/F sensor heater
  4. A/F relay
  5. A/F sensor heater and relay circuit
  6. ECM

P2239 
DTC Detection Drive Pattern
DTC Detection Condition
Trouble Area
Ignition switch ON for 7 seconds
A/F sensor circuit high (bank 1 sensor 1)
(1 trip detection logic)
Main trouble area: Short in A/F sensor circuit
  1. Open or short in A/F sensor circuit
  2. A/F sensor
  3. A/F sensor heater
  4. A/F relay
  5. A/F sensor heater and relay circuit
  6. ECM

P2252 
DTC Detection Drive Pattern
DTC Detection Condition
Trouble Area
Ignition switch ON for 7 seconds
A/F sensor circuit low (bank 1 sensor 1)
(1 trip detection logic)
Main trouble area: Open in A/F sensor circuit
  1. Open or short in A/F sensor circuit
  2. A/F sensor
  3. A/F sensor heater
  4. A/F relay
  5. A/F sensor heater and relay circuit
  6. ECM

P2253 
DTC Detection Drive Pattern
DTC Detection Condition
Trouble Area
Ignition switch ON for 7 seconds
A/F sensor circuit high (bank 1 sensor 1)
(1 trip detection logic)
Main trouble area: Short in A/F sensor circuit
  1. Open or short in A/F sensor circuit
  2. A/F sensor
  3. A/F sensor heater
  4. A/F relay
  5. A/F sensor heater and relay circuit
  6. ECM

Related Data List 
DTC No.
Data List
P2237
  1. AFS Voltage B1S1
  2. Exhaust Temperature B1S1
P2238
P2239
P2252
P2253

MONITOR DESCRIPTION

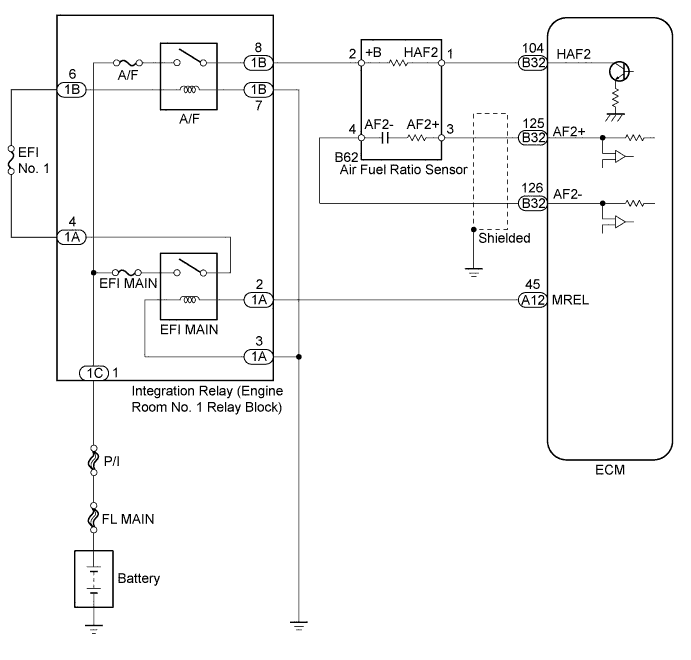
The A/F sensor outputs a voltage in proportion to the air-fuel ratio. If impedance (alternating current resistance) or voltage output of the sensor deviates greatly from the standard range, the ECM interprets this as an open or short malfunction of the A/F sensor circuit.

WIRING DIAGRAM


A200656E02


INSPECTION PROCEDURE

NOTICE:
After replacing the ECM, the new ECM needs registration (Click here) and initialization (Click here).

1.CHECK HARNESS AND CONNECTOR (A/F SENSOR - ECM)


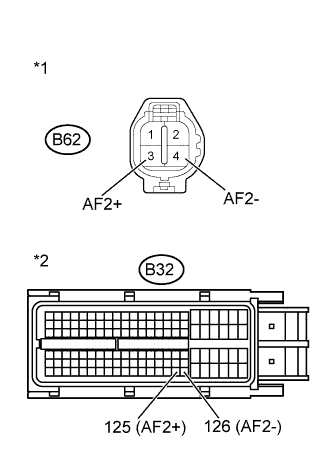
    A128584E05
  1. Disconnect the A/F sensor connector.

  1. Disconnect the ECM connector.

  1. Measure the resistance according to the value(s) in the table below.

    Standard Resistance (Check for Open):
    Tester Connection
    Condition
    Specified Condition
    B62-3 (AF2+) - B32-125 (AF2+)
    Always
    Below 1 Ω
    B62-4 (AF2-) - B32-126 (AF2-)
    Always
    Below 1 Ω

    Standard Resistance (Check for Short):
    Tester Connection
    Condition
    Specified Condition
    B62-3 (AF2+) or B32-125 (AF2+) - Body ground
    Always
    10 kΩ or higher
    B62-4 (AF2-) or B32-126 (AF2-) - Body ground
    Always
    10 kΩ or higher

    Text in Illustration 
    *1
    Front view of wire harness connector
    (to A/F Sensor)
    *2
    Front view of wire harness connector
    (to ECM)

  1. Reconnect the A/F sensor connector.

  1. Reconnect the ECM connector.


NG
Go to step 5
OK


2.REPLACE AIR FUEL RATIO SENSOR
  1. Replace the air fuel ratio sensor (Click here).


NEXT


3.CONFIRM WHETHER MALFUNCTION HAS BEEN SUCCESSFULLY REPAIRED
  1. Warm up the engine.

  1. Connect the intelligent tester to the DLC3.

  1. Turn the ignition switch to ON.

  1. Turn the tester on.

  1. Clear the DTCs (Click here).

  1. Drive the vehicle at 50 km/h (30 mph) or more for a total of 300 seconds or more.

    HINT:
    Make sure that the exhaust gas temperature (Exhaust Temperature B1S1) is 200°C (392°F) or higher.

  1. Confirm that the DTC is not output again.


NG
Go to step 4
OK

END 

4.REPLACE ECM
  1. Replace the ECM (Click here).


NEXT
Go to step 6

5.REPAIR OR REPLACE HARNESS OR CONNECTOR
  1. Repair or replace the harness or connector.


NEXT


6.CONFIRM WHETHER MALFUNCTION HAS BEEN SUCCESSFULLY REPAIRED
  1. Warm up the engine.

  1. Connect the intelligent tester to the DLC3.

  1. Turn the ignition switch to ON.

  1. Turn the tester on.

  1. Clear the DTCs (Click here).

  1. Drive the vehicle at 50 km/h (30 mph) or more for a total of 300 seconds or more.

    HINT:
    Make sure that the exhaust gas temperature (Exhaust Temperature B1S1) is 200°C (392°F) or higher.

  1. Confirm that the DTC is not output again.


NEXT

END