TRANSFER CASE OIL SEAL (for LH Side) > REPLACEMENT |
| 1. DISCONNECT CABLE FROM NEGATIVE BATTERY TERMINAL |
| 2. DRAIN TRANSFER OIL |
Remove the drain plug and gasket, and drain the oil.
Install a new gasket and the drain plug.
| 3. REMOVE ENGINE ASSEMBLY WITH TRANSAXLE |
for 2AD-FTV:
Remove the engine assembly with transaxle (Click here).
for 2AD-FHV:
Remove the engine assembly with transaxle (Click here).
| 4. REMOVE REAR ENGINE MOUNTING BRACKET |
for EA64F:
Remove the rear engine mounting bracket .
for U660F:
Remove the rear engine mounting bracket .
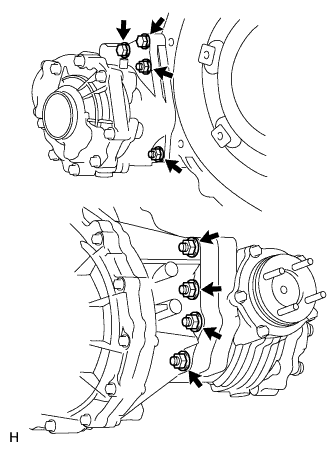
| 5. REMOVE TRANSFER ASSEMBLY |
|
Remove the 6 nuts, 2 bolts and transfer from the transaxle.
| 6. REMOVE TRANSFER CASE OIL SEAL |
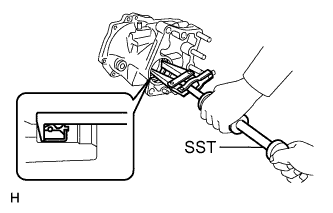 |
Using SST, tap out the transfer case oil seal.
| 7. INSTALL TRANSFER CASE OIL SEAL |
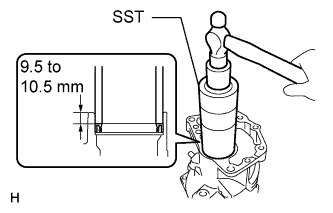 |
Using SST and a hammer, tap in the transfer case oil seal.
Coat a new oil seal lip with MP grease.
| 8. INSTALL TRANSFER ASSEMBLY |
|
Install the transfer to the transaxle with the 6 nuts and 2 bolts.
| 9. INSTALL REAR ENGINE MOUNTING BRACKET |
for EA64F:
Install the rear engine mounting bracket .
for U660F:
Install the rear engine mounting bracket .
| 10. INSTALL TRANSAXLE WITH ENGINE ASSEMBLY |
for 2AD-FTV:
Install the transaxle with engine assembly (Click here).
for 2AD-FHV:
Install the transaxle with engine assembly (Click here).
| 11. ADD TRANSFER OIL |
Remove the case plug (for filler) and gasket.
Pour oil so that the oil level is between 0 to 5.0 mm (0 to 0.197 in.) from the bottom lip of the case plug (for filler) hole.
Wait approximately 5 minutes and check that the oil level has not changed.
Install a new gasket and the case plug (for filler).
| 12. INSPECT TRANSFER OIL |
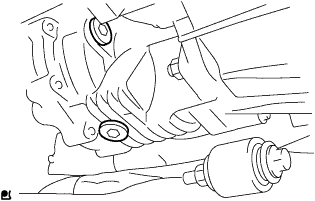 |
Remove the transfer case plug No. 2 (for filler) and gasket.
Check that the oil level is between 0 to 5.0 mm (0 to 0.20 in.) from the bottom lip of the case plug (for filler) hole.
If the result is not as specified, add transfer oil.
When the oil level is too low, check for oil leakage.
Install a new gasket into the case plug (for filler) and then install the plug.
| 13. CONNECT CABLE TO NEGATIVE BATTERY TERMINAL |
| 14. INSPECT SRS WARNING LIGHT |
Check the SRS warning light (Click here).