 |
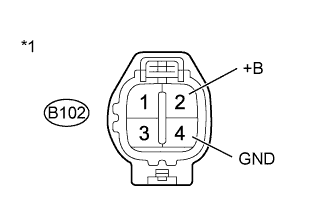
Disconnect the injector driver (EDU) connector.
ECD SYSTEM (for CCo) > Injector Circuit |
| 1.CHECK EDU (POWER SOURCE) |
|
Disconnect the injector driver (EDU) connector.
Measure the voltage according to the value(s) in the table below.
| Tester Connection | Switch Condition | Specified Condition |
| B102-2 (+B) - B102-4 (GND) | Ignition switch ON | 11 to 14 V |
| *1 | Front view of wire harness connector (to Injector Driver (EDU)) |
Reconnect the injector driver (EDU) connector.
|
| ||||
| OK | ||
 | ||
| ||
| 2.INSPECT INTEGRATION NO.1 RELAY (EDU RELAY) |
Inspect the integration relay (EDU relay) .
|
| ||||
| OK | |
 |
| 3.CHECK HARNESS AND CONNECTOR (INTEGRATION RELAY - EDU) |
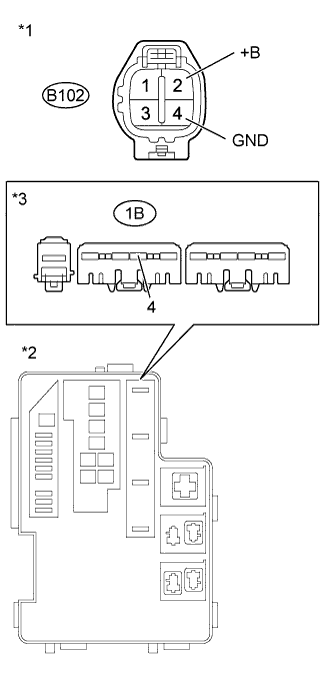 |
Remove the integration relay from the engine room No. 1 relay block.
Remove the EDU connector.
Measure the resistance according to the value(s) in the table below.
| Tester Connection | Condition | Specified Condition |
| B102-2 (+B) - 1B-4 | Always | Below 1 Ω |
| B102-4 (GND) - Body ground | Always | Below 1 Ω |
| Tester Connection | Condition | Specified Condition |
| B102-2 (+B) or 1B-4 - Body ground | Always | 10 kΩ or higher |
| *1 | Front view of wire harness connector (to EDU) |
| *2 | Engine Room No. 1 Relay Block |
| *3 | Front view of wire harness connector (to Integration Relay) |
Reconnect the EDU connector.
Reinstall the integration relay.
|
| ||||
| OK | |
|
| 4.CHECK HARNESS AND CONNECTOR (ENGINE ROOM NO. 1 RELAY BLOCK) |
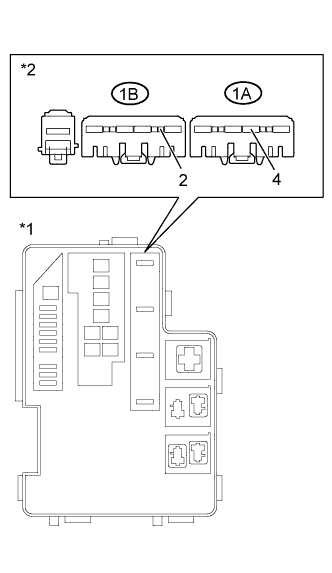 |
Remove the integration relay from the engine room No. 1 relay block.
Measure the resistance according to the value(s) in the table below.
| Tester Connection | Condition | Specified Condition |
| 1B-2 - 1A-4 | Always | Below 1 Ω |
| Tester Connection | Condition | Specified Condition |
| 1B-2 or 1A-4 - Body ground | Always | 10 kΩ or higher |
| *1 | Engine Room No. 1 Relay Block |
| *2 | Front view of wire harness connector (to Integration Relay) |
Reinstall the integration relay.
|
| ||||
| OK | |
|
| 5.CHECK HARNESS AND CONNECTOR (INTEGRATION RELAY - ECM) |
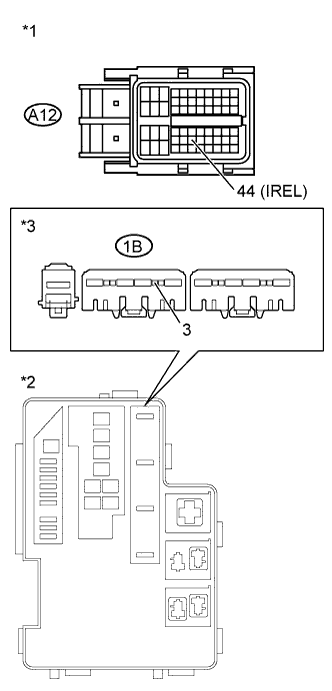 |
Remove the integration relay from the engine room No. 1 relay block.
Disconnect the ECM connector.
Measure the resistance according to the value(s) in the table below.
| Tester Connection | Condition | Specified Condition |
| A12-44 (IREL) - 1B-3 | Always | Below 1 Ω |
| Tester Connection | Condition | Specified Condition |
| A12-44 (IREL) or 1B-3 - Body ground | Always | 10 kΩ or higher |
| *1 | Front view of wire harness connector (to ECM) |
| *2 | Engine Room No. 1 Relay Block |
| *3 | Front view of wire harness connector (to Integration Relay) |
Reconnect the ECM connector.
Reinstall the integration relay.
|
| ||||
| OK | ||
| ||
| ||

