Home › TRANSMISSION · K111F CVT › CONTINUOUSLY VARIABLE TRANSAXLE SYSTEM

DTC    P1585    Acceleration Sensor Circuit


DESCRIPTION

  1. *1: w/ VSC
  2. *2: w/o VSC
The ECM determines the vehicle inclination based on a signal from the yaw rate sensor assembly*1 or deceleration sensor*2.

HINT:
If a CAN communication DTC is output, perform troubleshooting for that DTC first.


DTC Code
DTC Detection Condition
  1. Diagnosis Condition
  2. Malfunction Status
  3. Malfunction Time
  4. Other
Trouble Area
P1585
  1. The ignition switch is ON.
  2. The output value of the yaw rate sensor assembly*1 or deceleration sensor*2 remains at -1.5 G or less, or 1.5 G or more for at least 1.2 seconds.
  3. 3.0 seconds
  4. 1 trip detection logic
  1. Yaw rate sensor assembly (w/ VSC)
  2. Deceleration sensor (w/o VSC)
  3. Brake actuator assembly (Skid control ECU)
  1. The ignition switch is ON.
  2. The power source voltage to the yaw rate sensor assembly*1 or deceleration sensor*2 remains at 4.4 V or less, or 5.6 V or higher for at least 1.2 seconds.
  3. 3.0 seconds
  4. 1 trip detection logic
  1. The ignition switch is ON.
  2. No signal from the yaw rate sensor assembly*1 or deceleration sensor*2 is detected 7 times or more.
  3. 3.0 seconds
  4. 1 trip detection logic
  1. The ignition switch is ON.
  2. With the vehicle stopped, the difference between GL1 and GL2 does not become less than 0.4 G within 60 seconds after exceeding 0.6 G.
  3. 3.0 seconds
  4. 1 trip detection logic
  1. The ignition switch is ON.
  2. A yaw rate sensor assembly*1 or deceleration sensor*2 power source voltage malfunction signal is received for at least 10 seconds with the vehicle speed at 3 km/h (1.8 mph) or more.
  3. 3.0 seconds
  4. 1 trip detection logic

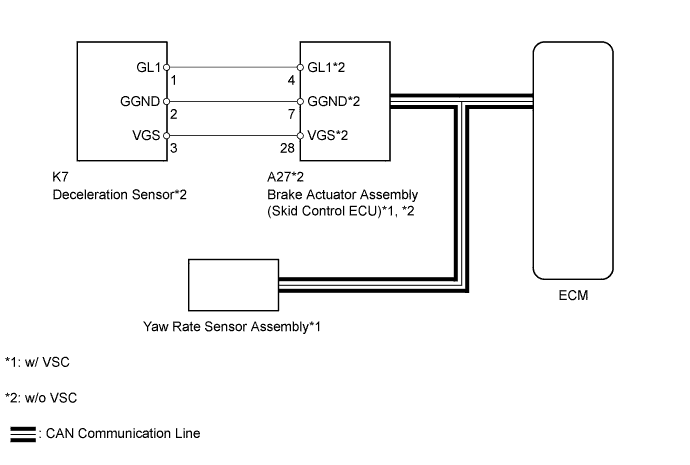
WIRING DIAGRAM


C203972E01


INSPECTION PROCEDURE

  1. *1: w/ VSC
  2. *2: w/o VSC
1.CHECK DTC OUTPUT (IN ADDITION TO DTC P1585)
  1. Connect the intelligent tester to the DLC3.

  1. Turn the ignition switch to ON.

  1. Turn the intelligent tester on.

  1. Enter the following menus: Powertrain / Engine and ECT / DTC.

  1. Read the DTCs using the tester.
    Result 
    Result
    Proceed to
    Only P1585 is output
    A
    P1585 and other DTCs are output
    B

    HINT:
    If any other DTCs besides DTC P1585 are output, perform troubleshooting for those DTCs first.


B
GO TO DTC CHART (Click here)
A


2.READ VALUE USING INTELLIGENT TESTER (G SENSOR)
  1. Connect the intelligent tester to the DLC3.

  1. Turn the ignition switch to ON.

  1. Turn the intelligent tester on.

  1. Enter the following menus: Powertrain / Engine and ECT / Data List.

  1. In accordance with the display on the tester, read the Data List.

    Engine and ECT 
    Tester Display
    Measurement Item/Range
    Normal Condition
    Diagnostic Note
    G sensor
    Converted output voltage of yaw rate sensor assembly*1 or deceleration sensor*2/
    min.: 0 V
    max.: 5 V
    Displays converted voltage of yaw rate sensor assembly*1 or deceleration sensor*2
    1. Vehicle on level ground: 2.31 V to 2.69 V
    2. Decelerating: 1.88 V to 2.5 V
    3. Accelerating: 2.5 V to 3.11 V
    4. G sensor malfunction: Set to 1.87 V
    5. Communication malfunction: Set to 1.87 V
    -
    Result 
    Result
    Proceed to
    Data displayed is as specified under Normal Condition
    A
    Data displayed is not as specified under Normal Condition (w/ VSC)
    B
    Data displayed is not as specified under Normal Condition (w/o VSC)
    C


B
Go to step 5

C
Go to step 10
A


3.REPLACE BRAKE ACTUATOR ASSEMBLY (SKID CONTROL ECU)
  1. Replace the brake actuator assembly (skid control ECU).

    1. w/ VSC (Click here).
    2. w/o VSC (Click here).


NEXT


4.PERFORM INITIALIZATION

NOTICE:
  1. Performing reset memory will clear the learned values of both the yaw rate sensor assembly*1 or deceleration sensor*2 (deceleration sensor 0 point calibration) and CVT oil pressure (CVT oil pressure calibration). Make sure to perform reset memory, yaw rate sensor assembly*1 or deceleration sensor*2 0 point calibration and CVT oil pressure calibration when replacing any of the parts shown in the following table:
    Replaced Part
    1. Continuously variable transaxle assembly
    2. ECM
    3. Oil pressure sensor
    4. Yaw rate sensor assembly (w/ VSC)
    5. Deceleration sensor (w/o VSC)
    6. Brake actuator assembly (skid control ECU)
  2. After performing reset memory, always perform yaw rate sensor assembly*1 or deceleration sensor*2 (deceleration sensor 0 point) calibration first, and then CVT oil pressure calibration.
  3. Always perform 0 point calibration with the vehicle on level ground.
  4. Do not shake or vibrate the vehicle during 0 point calibration.

  1. Using the intelligent tester, perform reset memory, deceleration sensor 0 point calibration and CVT oil pressure calibration (Click here).

  1. Check that no DTC is stored.


NEXT

END 

5.REPLACE YAW RATE SENSOR ASSEMBLY
  1. Replace the yaw rate sensor assembly (Click here).


NEXT


6.PERFORM INITIALIZATION

NOTICE:
  1. Performing reset memory will clear the learned values of both the yaw rate sensor assembly*1 or deceleration sensor*2 (deceleration sensor 0 point calibration) and CVT oil pressure (CVT oil pressure calibration). Make sure to perform reset memory, yaw rate sensor assembly*1 or deceleration sensor*2 0 point calibration and CVT oil pressure calibration when replacing any of the parts shown in the following table:
    Replaced Part
    1. Continuously variable transaxle assembly
    2. ECM
    3. Oil pressure sensor
    4. Yaw rate sensor assembly (w/ VSC)
    5. Deceleration sensor (w/o VSC)
    6. Brake actuator assembly (skid control ECU)
  2. After performing reset memory, always perform yaw rate sensor assembly*1 or deceleration sensor*2 (deceleration sensor 0 point) calibration first, and then CVT oil pressure calibration.
  3. Always perform 0 point calibration with the vehicle on level ground.
  4. Do not shake or vibrate the vehicle during 0 point calibration.

  1. Using the intelligent tester, perform reset memory, deceleration sensor 0 point calibration and CVT oil pressure calibration (Click here).


NEXT


7.CHECK WHETHER DTC OUTPUT RECURS
  1. Clear the DTCs (Click here).

  1. Check whether DTC P1585 is output.
    Result 
    Result
    Proceed to
    P1585 is output
    A
    No DTC output
    B


B
END
A


8.REPLACE BRAKE ACTUATOR ASSEMBLY (SKID CONTROL ECU)
  1. Replace the brake actuator assembly (skid control ECU) (Click here).


NEXT


9.PERFORM INITIALIZATION

NOTICE:
  1. Performing reset memory will clear the learned values of both the yaw rate sensor assembly*1 or deceleration sensor*2 (deceleration sensor 0 point calibration) and CVT oil pressure (CVT oil pressure calibration). Make sure to perform reset memory, yaw rate sensor assembly*1 or deceleration sensor*2 0 point calibration and CVT oil pressure calibration when replacing any of the parts shown in the following table:
    Replaced Part
    1. Continuously variable transaxle assembly
    2. ECM
    3. Oil pressure sensor
    4. Yaw rate sensor assembly (w/ VSC)
    5. Deceleration sensor (w/o VSC)
    6. Brake actuator assembly (skid control ECU)
  2. After performing reset memory, always perform yaw rate sensor assembly*1 or deceleration sensor*2 (deceleration sensor 0 point) calibration first, and then CVT oil pressure calibration.
  3. Always perform 0 point calibration with the vehicle on level ground.
  4. Do not shake or vibrate the vehicle during 0 point calibration.

  1. Using the intelligent tester, perform reset memory, deceleration sensor 0 point calibration and CVT oil pressure calibration (Click here).

  1. Check that no DTC is stored.


NEXT

END 

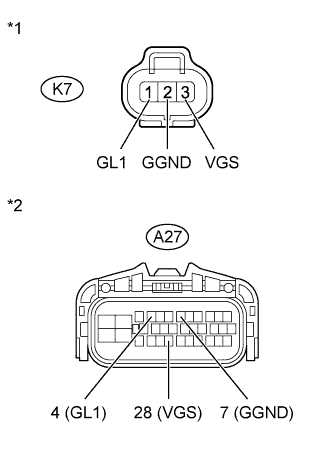
10.CHECK HARNESS AND CONNECTOR (DECELERATION SENSOR - BRAKE ACTUATOR ASSEMBLY)


    C203616E01
  1. Disconnect the deceleration sensor connector.

  1. Disconnect the brake actuator assembly (skid control ECU) connector.

  1. Measure the resistance according to the value(s) in the table below.

    Standard Resistance:
    Tester Connection
    Condition
    Specified Condition
    K7-1 (GL1) - A27-4 (GL1)
    Always
    Below 1 Ω
    K7-2 (GGND) - A27-7 (GGND)
    Always
    Below 1 Ω
    K7-3 (VGS) - A27-28 (VGS)
    Always
    Below 1 Ω
    K7-1 (GL1) or A27-4 (GL1) - Body ground
    Always
    10 kΩ or higher
    K7-2 (GGND) or A27-7 (GGND) - Body ground
    Always
    10 kΩ or higher
    K7-3 (VGS) or A27-28 (VGS) - Body ground
    Always
    10 kΩ or higher

    Text in Illustration 
    *1
    Front view of wire harness connector
    (to Deceleration Sensor)
    *2
    Front view of wire harness connector
    (to Brake Actuator Assembly (Skid Control ECU))


NG
REPAIR OR REPLACE HARNESS OR CONNECTOR
OK


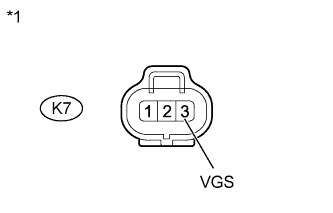
11.INSPECT DECELERATION SENSOR (POWER SOURCE)


    C199166E03
  1. Disconnect the deceleration sensor connector.

  1. Turn the ignition switch to ON.

  1. Measure the voltage according to the value(s) in the table below.

    Standard Voltage:
    Tester Connection
    Switch Condition
    Specified Condition
    K7-3 (VGS) - Body ground
    Ignition switch ON
    4.5 to 5.5 V

    Text in Illustration 
    *1
    Front view of wire harness connector
    (to Deceleration Sensor)


NG
Go to step 15
OK


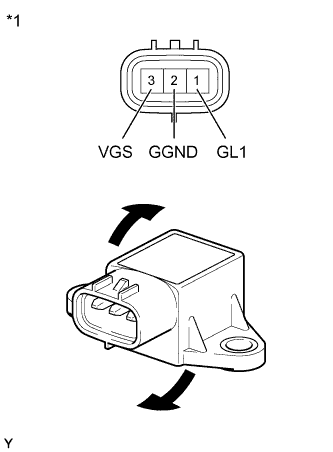
12.INSPECT DECELERATION SENSOR (GL1 VOLTAGE)


    C202167E01
  1. Remove the deceleration sensor (Click here).

  1. Connect 3 dry cell batteries of 1.5 V in series.

  1. Connect the positive (+) lead of the batteries to terminal 3 (VGS) and the negative (-) lead to terminal 2 (GGND) to apply a voltage of 4.5 V.

    NOTICE:
    1. Do not apply 6 V or higher to terminals 3 (VGS) and 2 (GGND).
    2. If the sensor is dropped, replace it with a new one.

  1. Measure the voltage according to the value(s) in the table below.

    Standard Voltage:
    Tester Connection
    Condition
    Specified Condition
    1 (GL1) - 2 (GGND)
    1. 4.5 V applied to terminals 3 (VGS) and 2 (GGND)
    2. Sensor not tilted
    Approx. 2.5 V
    1 (GL1) - 2 (GGND)
    1. 4.5 V applied to terminals 3 (VGS) and 2 (GGND)
    2. Sensor tilted back and forth
    Changes between approx. 0.5 V and 4.5 V

    HINT:
    If the sensor is tilted too much, it may output the wrong value.

    Text in Illustration 
    *1
    Component without harness connected
    (Deceleration Sensor)


NG
Go to step 17
OK


13.REPLACE BRAKE ACTUATOR ASSEMBLY (SKID CONTROL ECU)
  1. Replace the brake actuator assembly (skid control ECU) (Click here).


NEXT


14.PERFORM INITIALIZATION

NOTICE:
  1. Performing reset memory will clear the learned values of both the yaw rate sensor assembly*1 or deceleration sensor*2 (deceleration sensor 0 point calibration) and CVT oil pressure (CVT oil pressure calibration). Make sure to perform reset memory, yaw rate sensor assembly*1 or deceleration sensor*2 0 point calibration and CVT oil pressure calibration when replacing any of the parts shown in the following table:
    Replaced Part
    1. Continuously variable transaxle assembly
    2. ECM
    3. Oil pressure sensor
    4. Yaw rate sensor assembly (w/ VSC)
    5. Deceleration sensor (w/o VSC)
    6. Brake actuator assembly (skid control ECU)
  2. After performing reset memory, always perform yaw rate sensor assembly*1 or deceleration sensor*2 (deceleration sensor 0 point) calibration first, and then CVT oil pressure calibration.
  3. Always perform 0 point calibration with the vehicle on level ground.
  4. Do not shake or vibrate the vehicle during 0 point calibration.

  1. Using the intelligent tester, perform reset memory, deceleration sensor 0 point calibration and CVT oil pressure calibration (Click here).

  1. Check that no DTC is stored.


NEXT

END 

15.REPLACE BRAKE ACTUATOR ASSEMBLY (SKID CONTROL ECU)
  1. Replace the brake actuator assembly (skid control ECU) (Click here).


NEXT


16.PERFORM INITIALIZATION

NOTICE:
  1. Performing reset memory will clear the learned values of both the yaw rate sensor assembly*1 or deceleration sensor*2 (deceleration sensor 0 point calibration) and CVT oil pressure (CVT oil pressure calibration). Make sure to perform reset memory, yaw rate sensor assembly*1 or deceleration sensor*2 0 point calibration and CVT oil pressure calibration when replacing any of the parts shown in the following table:
    Replaced Part
    1. Continuously variable transaxle assembly
    2. ECM
    3. Oil pressure sensor
    4. Yaw rate sensor assembly (w/ VSC)
    5. Deceleration sensor (w/o VSC)
    6. Brake actuator assembly (skid control ECU)
  2. After performing reset memory, always perform yaw rate sensor assembly*1 or deceleration sensor*2 (deceleration sensor 0 point) calibration first, and then CVT oil pressure calibration.
  3. Always perform 0 point calibration with the vehicle on level ground.
  4. Do not shake or vibrate the vehicle during 0 point calibration.

  1. Using the intelligent tester, perform reset memory, deceleration sensor 0 point calibration and CVT oil pressure calibration (Click here).

  1. Check that no DTC is stored.


NEXT

END 

17.REPLACE DECELERATION SENSOR
  1. Replace the deceleration sensor (Click here).


NEXT


18.PERFORM INITIALIZATION

NOTICE:
  1. Performing reset memory will clear the learned values of both the yaw rate sensor assembly*1 or deceleration sensor*2 (deceleration sensor 0 point calibration) and CVT oil pressure (CVT oil pressure calibration). Make sure to perform reset memory, yaw rate sensor assembly*1 or deceleration sensor*2 0 point calibration and CVT oil pressure calibration when replacing any of the parts shown in the following table:
    Replaced Part
    1. Continuously variable transaxle assembly
    2. ECM
    3. Oil pressure sensor
    4. Yaw rate sensor assembly (w/ VSC)
    5. Deceleration sensor (w/o VSC)
    6. Brake actuator assembly (skid control ECU)
  2. After performing reset memory, always perform yaw rate sensor assembly*1 or deceleration sensor*2 (deceleration sensor 0 point) calibration first, and then CVT oil pressure calibration.
  3. Always perform 0 point calibration with the vehicle on level ground.
  4. Do not shake or vibrate the vehicle during 0 point calibration.

  1. Using the intelligent tester, perform reset memory, deceleration sensor 0 point calibration and CVT oil pressure calibration (Click here).

  1. Check that no DTC is stored.


NEXT

END