INTERIOR PANELS / TRIM ROOF HEADLINING REMOVAL
PROCEDURE

 1. PRECAUTION
- NOTICE:
-
After turning the ignition switch off, waiting time may be required before disconnecting the cable from the battery terminal. Therefore, make sure to read the disconnecting the cable from the battery terminal notice before proceeding with work.
-
Click hereGeneral>INTRODUCTION>REPAIR INSTRUCTION>PRECAUTION
2.DISCONNECT CABLE FROM NEGATIVE BATTERY TERMINAL
- NOTICE:
-
When disconnecting the cable, some systems need to be initialized after the cable is reconnected.
-
Click hereGeneral>INTRODUCTION>REPAIR INSTRUCTION>INITIALIZATION
3.REMOVE PACKAGE TRAY TRIM POCKET SUB-ASSEMBLY (w/ Partition Net)
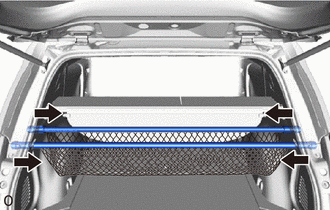
Release the 4 locks and remove the package tray trim pocket sub-assembly.
4.REMOVE TONNEAU COVER ASSEMBLY (w/ Tonneau Cover)
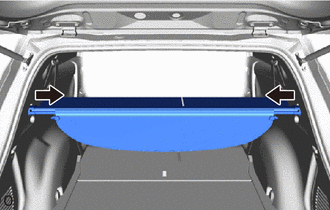
Release the 2 locks and remove the tonneau cover assembly.
5.REMOVE DECK BOARD ASSEMBLY (for Compact Spare Tire)
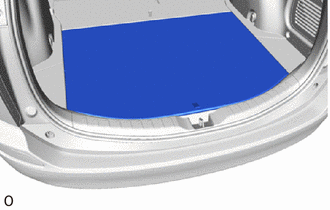
Remove the deck board assembly.
6.REMOVE DECK BOARD ASSEMBLY (for Full Size Spare Tire)
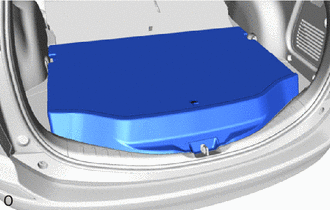
Remove the deck board assembly.
7.REMOVE DECK FLOOR BOX LH
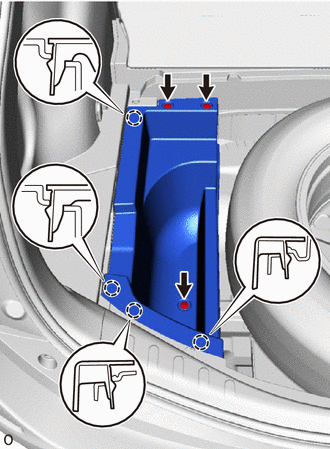
Using a clip remover, remove the 3 clips.
Detach the 4 claws and remove the deck floor box LH.
8.REMOVE REAR FLOOR FINISH PLATE (for Compact Spare Tire)
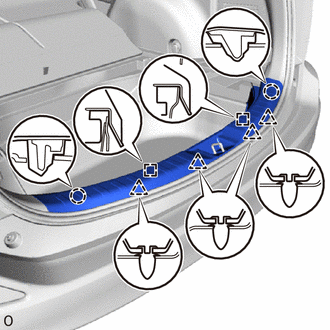
Detach the 2 claws, 4 clips and 2 guides and remove the rear floor finish plate.
9.REMOVE REAR DECK TRIM COVER (for Full Size Spare Tire)
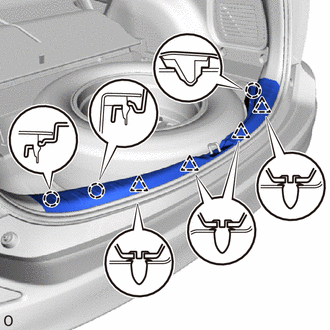
Detach the 3 claws and 4 clips and remove the rear deck trim cover.
10.REMOVE REAR NO. 1 FLOOR MAT SUPPORT SIDE PLATE (for Compact Spare Tire)
Open the rear No. 1 floor board.
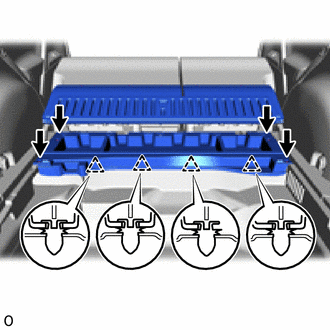
Remove the 4 screws.
Detach the 4 clips and remove the rear No. 1 floor mat support side plate together with the rear No. 1 floor board.
11.REMOVE REAR NO. 1 FLOOR MAT SUPPORT SIDE PLATE (for Full Size Spare Tire)
Open the rear No. 1 floor board.
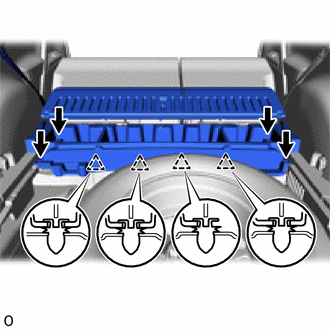
Remove the 4 screws.
Detach the 4 clips and remove the rear No. 1 floor mat support side plate together with the rear No. 1 floor board.
12.REMOVE REAR SEAT ASSEMBLY
for LH Side:
Click hereVehicle Interior>SEAT>REAR SEAT ASSEMBLY(for LH Side)>REMOVAL
for RH Side:
Click hereVehicle Interior>SEAT>REAR SEAT ASSEMBLY(for RH Side)>REMOVAL
13.REMOVE FRONT DOOR SCUFF PLATE LH
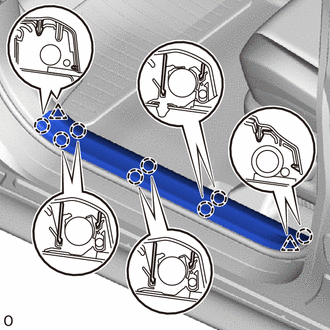
Detach the 8 claws and 2 clips and remove the front door inside scuff plate LH.
14.REMOVE FRONT DOOR SCUFF PLATE RH
- HINT:
-
Use the same procedure described for the LH side.
15.REMOVE FRONT DOOR OPENING TRIM WEATHERSTRIP LH
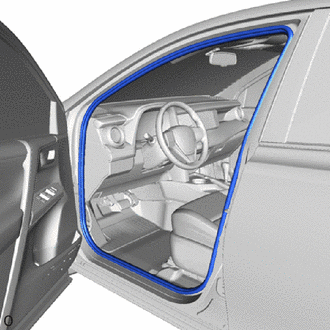
Remove the front door opening trim weatherstrip LH.
16.REMOVE FRONT DOOR OPENING TRIM WEATHERSTRIP RH
- HINT:
-
Use the same procedure described for the LH side.
17.REMOVE REAR DOOR SCUFF PLATE LH
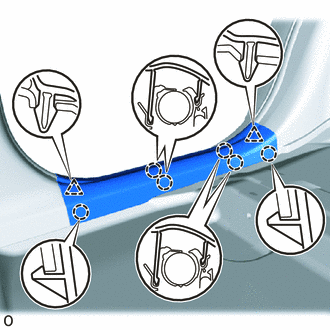
Detach the 2 claws and 6 clips and remove the rear door scuff plate LH.
18.REMOVE REAR DOOR SCUFF PLATE RH
- HINT:
-
Use the same procedure described for the LH side.
19.REMOVE REAR DOOR OPENING TRIM WEATHERSTRIP LH
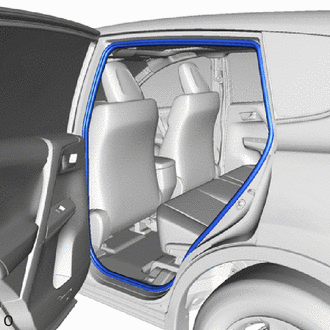
Remove the rear door opening trim weatherstrip LH.
20.REMOVE REAR DOOR OPENING TRIM WEATHERSTRIP RH
- HINT:
-
Use the same procedure described for the LH side.
21.REMOVE DECK TRIM SIDE PANEL ASSEMBLY LH
Remove the screw and 2 bolts.
Remove the bolt and disconnect the rear seat outer belt floor anchor.
Open the tether anchor set bracket cover.
Remove the bolt and tether anchor set bracket.
Remove the bolt and luggage hold belt striker assembly.
Detach the 6 claws and 4 clips and remove the deck trim side panel assembly LH.
Disconnect the connector.
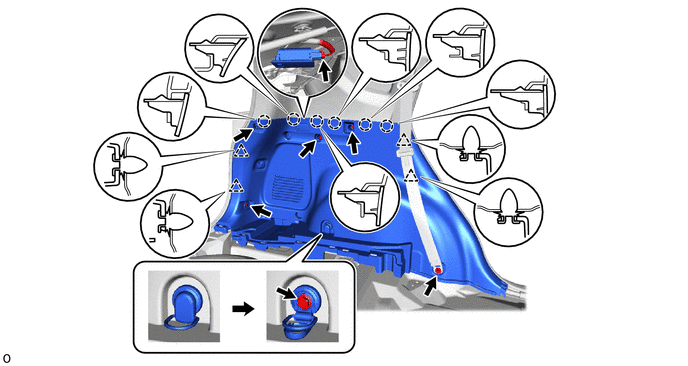
22.REMOVE DECK TRIM SIDE PANEL ASSEMBLY RH
Remove the screw and 2 bolts.
Remove the bolt and disconnect the rear seat outer belt floor anchor.
Open the tether anchor set bracket cover.
Remove the bolt and tether anchor set bracket.
Remove the bolt and luggage hold belt striker assembly.
Detach the 6 claws and 4 clips and remove the deck trim side panel assembly RH.
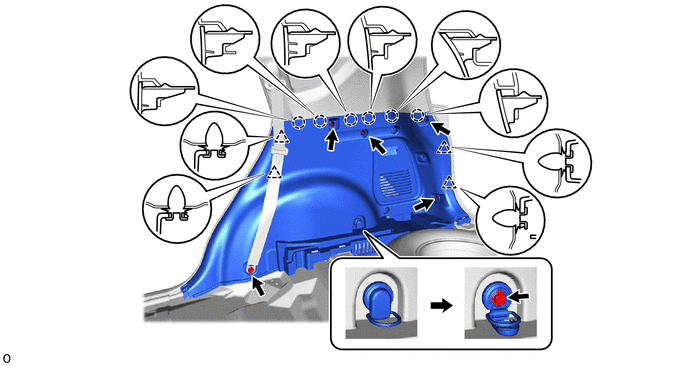
23.REMOVE SEAT BELT ANCHOR COVER CAP
24.REMOVE INNER ROOF SIDE GARNISH ASSEMBLY LH
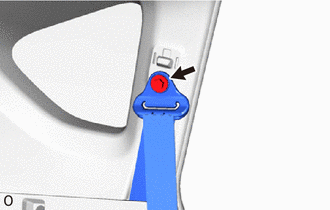
Remove the bolt and disconnect the rear seat outer belt shoulder anchor.
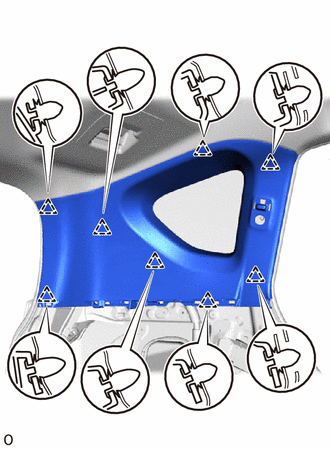
Detach the 8 clips and remove the inner roof side garnish assembly LH.
25.REMOVE INNER ROOF SIDE GARNISH ASSEMBLY RH
- HINT:
-
Use the same procedure described for the LH side.
26.REMOVE SHOULDER BELT ANCHOR COVER RH
27.REMOVE OUTER LAP BELT ANCHOR COVER
28.REMOVE LOWER CENTER PILLAR GARNISH LH
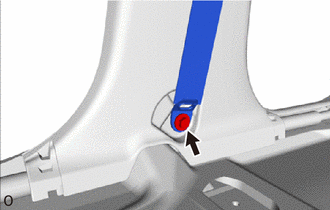
Remove the bolt and disconnect the front seat outer belt floor anchor.
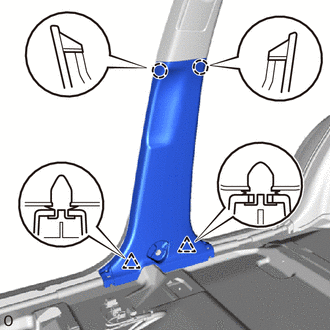
Detach the 2 clips and 2 claws and remove the lower center pillar garnish LH.
29.REMOVE LOWER CENTER PILLAR GARNISH RH
- HINT:
-
Use the same procedure described for the LH side.
30.REMOVE CENTER PILLAR GARNISH LH
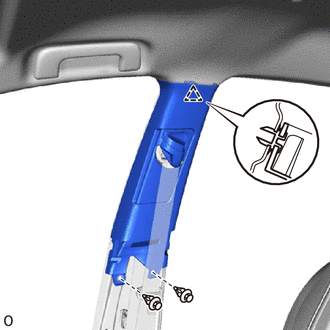
Remove the 2 clips.
Detach the clip and remove the center pillar garnish LH.
Pass the front seat outer belt floor anchor through the hole of the center pillar garnish LH.
31.REMOVE CENTER PILLAR GARNISH RH
- HINT:
-
Use the same procedure described for the LH side.
32.REMOVE FRONT PILLAR GARNISH LH
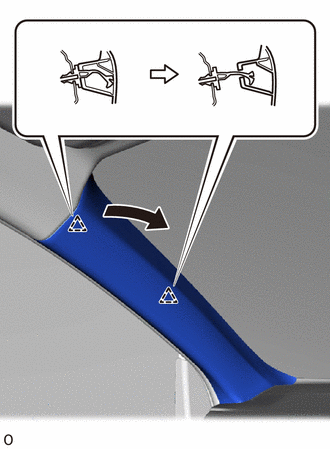
| *1 | Front Pillar Garnish Clip |
Pull the upper part of the front pillar garnish LH toward the inside of the cabin and detach the 2 front pillar garnish clips.
- HINT:
-
Make the front pillar garnish LH hang down from the front pillar garnish clip.
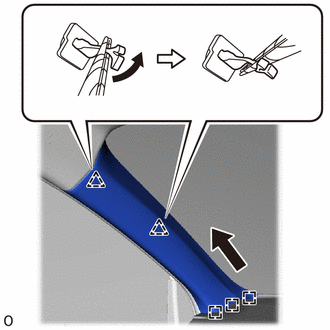
| *1 | Front Pillar Garnish Clip |

|
Protective Tape |
Turn the ends of the 2 front pillar garnish clips 90° with needle-nose pliers and disconnect them from the front pillar garnish LH.
- NOTICE:
- ·
Front pillar garnish clips are reusable if they are not removed from the vehicle and have no damage.
·Replace the front pillar garnish clips with new ones if they are removed from the vehicle.
- HINT:
-
Tape the tips of the needle-nose pliers before use.
Detach the 3 guides and remove the front pillar garnish LH.
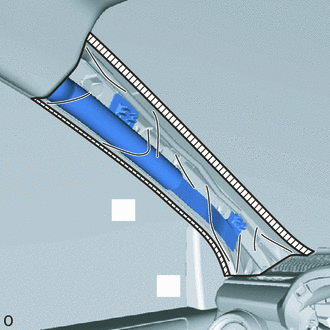
| *1 | Curtain Shield Airbag Assembly LH |
| *2 | Protective Cover |
|
|
Adhesive Tape |
Protect the curtain shield airbag assembly LH.
Completely cover the curtain shield airbag assembly LH with a cloth or nylon sheet and secure the ends of the cover with adhesive tape as shown in the illustration.
- NOTICE:
-
Cover the curtain shield airbag assembly LH with a protective cover as soon as the front pillar garnish assembly LH is removed.
33.REMOVE FRONT PILLAR GARNISH RH
- HINT:
-
Use the same procedure described for the LH side.
34.REMOVE UPPER INSTRUMENT PANEL
35.REMOVE VISOR ASSEMBLY LH
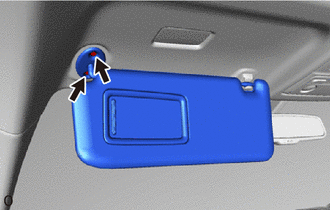
Remove the 2 screws and visor assembly LH.
36.REMOVE VISOR ASSEMBLY RH
- HINT:
-
Use the same procedure described for the LH side.
37.REMOVE VISOR HOLDER
- HINT:
-
Use the same procedure for both visor holders.
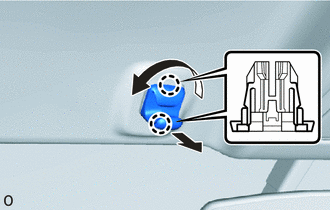
Turn the visor holder clockwise approximately 45° and pull it as shown in the illustration.
Detach the 2 claws and remove the visor holder.
38.REMOVE MAP LIGHT ASSEMBLY
39.REMOVE ASSIST GRIP SUB-ASSEMBLY
- HINT:
-
Use the same procedure for all assist grips.
|
|
Protective Tape |
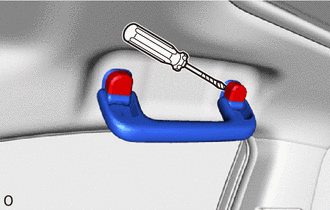
Using a screwdriver, detach the 4 claws and remove the 2 assist grip covers.
- HINT:
-
Tape the screwdriver tip before use.
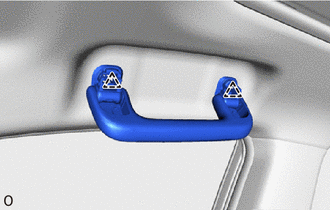
Detach the 2 clips and remove the assist grip sub-assembly.
40.REMOVE NO. 1 ROOM LIGHT ASSEMBLY
41.REMOVE INNER REAR VIEW MIRROR STAY HOLDER COVER (w/ EC Mirror)
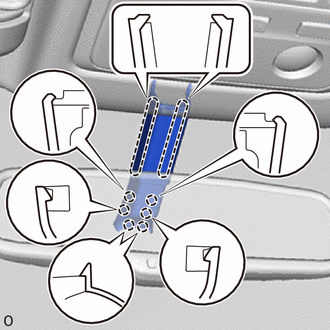
Detach the 8 claws and remove the inner rear view mirror stay holder cover.
42.REMOVE SUN ROOF OPENING TRIM MOULDING (w/ Sliding Roof)
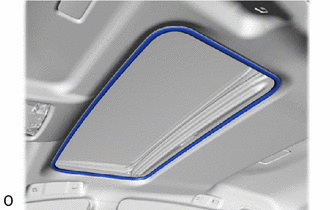
Remove the sun roof opening trim moulding.
43.REMOVE ROOF HEADLINING ASSEMBLY
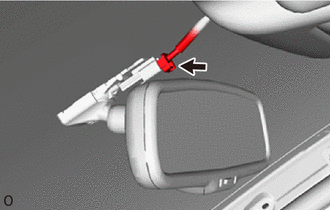
w/ EC Mirror:
Disconnect the connector.
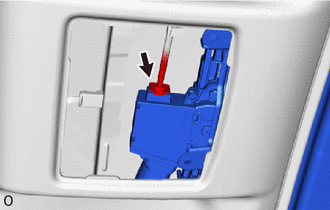
w/ Sliding Roof:
Disconnect the connector.
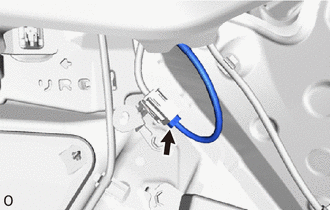
Disconnect the connector from the rear pillar RH.
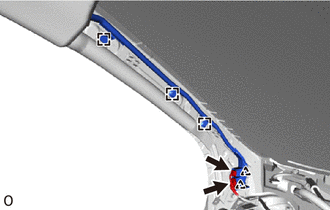
Disconnect the 2 connectors and detach the 2 clips and 3 wire harness clamps from the front pillar LH.
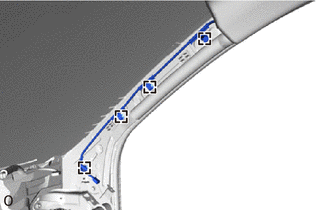
Detach the 4 wire harness clamps from the front pillar RH.
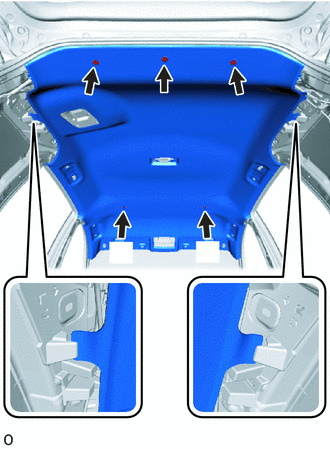
| *A | w/o Sliding Roof |
w/o Sliding Roof:
Remove the 5 clips.
w/ Sliding Roof:
Remove the 3 clips.
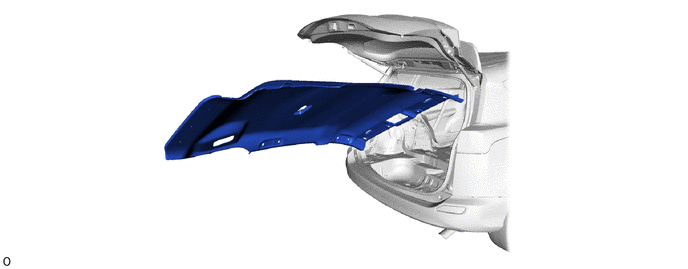
Remove the roof headlining assembly as shown in the illustration.
- NOTICE:
-
Be careful not to damage the roof headlining assembly when taking it out.
44.REMOVE REAR SIDE RAIL SPACER LH
- HINT:
-
When removing or replacing the rear side rail spacer LH, be sure to remove the curtain shield airbag assembly LH.
-
Click hereVehicle Interior>SUPPLEMENTAL RESTRAINT SYSTEMS>CURTAIN SHIELD AIRBAG ASSEMBLY>REMOVAL
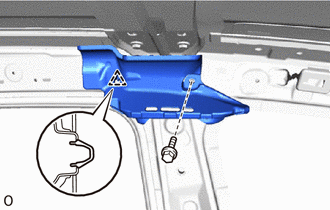
Remove the bolt.
Detach the clip and remove the rear side rail spacer LH.
45.REMOVE REAR SIDE RAIL SPACER RH
- HINT:
-
Use the same procedure described for the LH side.
46.REMOVE REAR NO. 2 SIDE RAIL SPACER LH
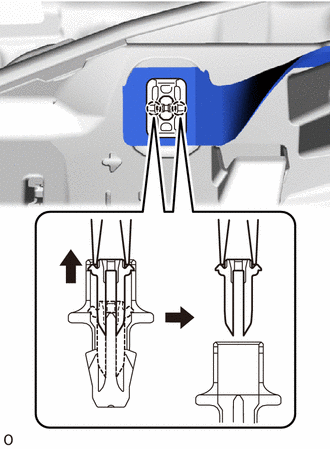
| *1 | Pin |
| *2 | Clip |
Using needle-nose pliers, release the lock by pinching the 2 locks of the pin, and pull out the pin from the clip.
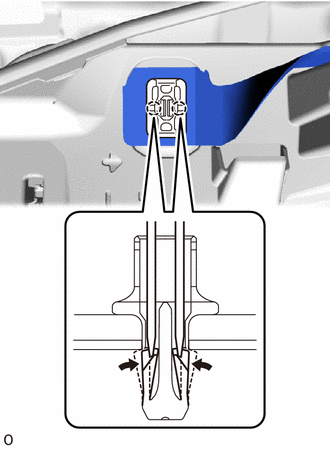
Using 2 screwdrivers, detach the 2 claws by inserting the screwdrivers into the grooves of the clip as shown in the illustration, and then remove the clip from the vehicle body and disconnect the rear part of the curtain shield airbag assembly LH.
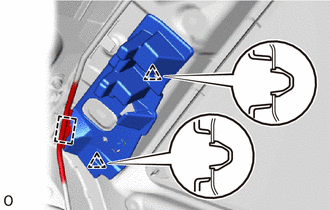
Detach the wire harness clamp.
Detach the 2 clips and remove the rear No. 2 side rail spacer LH.
47.REMOVE REAR NO. 2 SIDE RAIL SPACER RH
- HINT:
-
Use the same procedure described for the LH side.