DOOR / HATCH POWER BACK DOOR DRIVE UNIT INSTALLATION
CAUTION / NOTICE / HINT
- HINT:
-
A bolt without a torque specification is shown in the standard bolt chart.
-
Click hereGeneral>SPECIFICATIONS>STANDARD BOLT>SPECIFIED TORQUE FOR STANDARD BOLTS
PROCEDURE

 1.INSTALL BACK DOOR DAMPER STAY LOWER BRACKET LH
Perform this procedure when replacing only the back door damper stay lower bracket LH.
Install the joint.
Set the protector cover to the joint.
Set the power back door unit assembly to the joint.
Using a 3 mm pin punch and hammer, tap a new pin into the joint.
Return the protecte cover to its original position and install the back door unit assembly set LH (spindle) to the back door damper stay lower bracket.
2.INSTALL BACK DOOR DAMPER STAY LOWER BRACKET RH
- HINT:
-
Use the same procedure as for the LH side.
3.INSTALL POWER BACK DOOR UNIT ASSEMBLY SET LH
Install a new power back door unit assembly set LH.
- NOTICE:
-
The spindle unit and bracket cannot be disassembled once they have been assembled. Therefore, when replacing the spindle, upper bracket or lower bracket, make sure to replace the spindle, upper bracket and lower bracket as a set.
When replacing the bolt with a new one:
Clean the threaded portion on the vehicle body with non-residue solvent.
When reusing the bolt:
Clean the threaded portion on the vehicle body with non-residue solvent.
Apply adhesive to the threads of the 4 bolts.
- Adhesive:
Toyota Genuine Adhesive 1324, Three Bond 1324 or equivalent
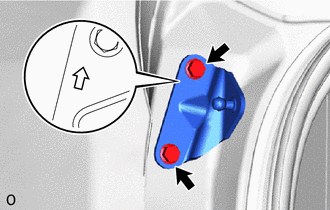
Temporarily install a new back door damper stay upper bracket LH.
Tighten the 2 bolts to install a new back door damper stay upper bracket LH.
- HINT:
-
Tighten the bolts in the order shown in the illustration.
- Torque:
- except TMMC Made : 7.5 N*m (76 kgf*cm, 66 in.*lbf)
- for TMMC Made : 8.0 N*m (82 kgf*cm, 71 in.*lbf)
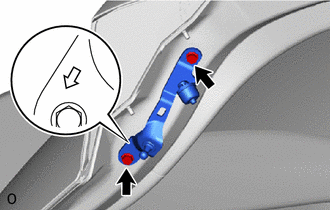
Temporarily install a new back door damper stay lower bracket LH.
Tighten the 2 bolts to install a new back door damper stay lower bracket LH.
- HINT:
-
Tighten the bolts in the order shown in the illustration.
- Torque:
- except TMMC Made : 7.5 N*m (76 kgf*cm, 66 in.*lbf)
- for TMMC Made : 8.0 N*m (82 kgf*cm, 71 in.*lbf)
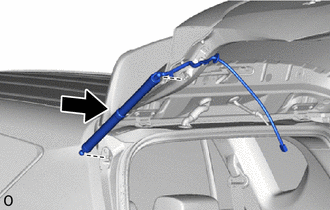
Install the power back door unit assembly set LH (spindle).
- NOTICE:
- ·
Install the power back door unit assembly set LH while supporting the back door by hand.
·Check that the power back door unit assembly set LH is engaged in the ball joint and that the back door unit assembly cannot be pulled out.
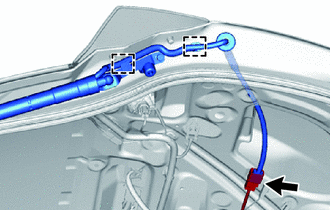
Connect the connector.
Attach the 2 clamps.
When reusing the power back door unit assembly set LH:
- NOTICE:
-
The spindle unit and bracket cannot be disassembled once they have been assembled. Therefore, when replacing the spindle, upper bracket or lower bracket, make sure to replace the spindle, upper bracket and lower bracket as a set.
When replacing the bolt with a new one:
Clean the threaded portion on the vehicle body with non-residue solvent.
When reusing the bolt:
Clean the threaded portion on the vehicle body with non-residue solvent.
Apply adhesive to the threads of the 4 bolts.
- Adhesive:
Toyota Genuine Adhesive 1324, Three Bond 1324 or equivalent
for Back Door Side:
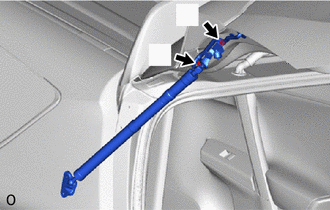
Temporarily install the power back door unit assembly set LH (back door damper stay lower bracket LH).
Tighten the 2 bolts to install the power back door unit assembly set LH (back door damper stay lower bracket LH).
- HINT:
-
Tighten the bolts in the order shown in the illustration.
- Torque:
- except TMMC Made : 7.5 N*m (76 kgf*cm, 66 in.*lbf)
- for TMMC Made : 8.0 N*m (82 kgf*cm, 71 in.*lbf)
- NOTICE:
- ·
Install the power back door unit assembly set LH while supporting the back door by hand.
·Check that the power back door unit assembly set LH is engaged in the ball joint and that the back door unit assembly cannot be pulled out.
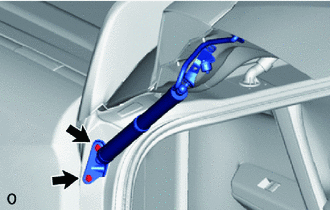
for Body Side:
Temporarily install the power back door unit assembly set LH (back door damper stay upper bracket LH).
Tighten the 2 bolts to install the power back door unit assembly set LH (back door damper stay upper bracket LH).
- HINT:
-
Tighten the bolts in the order shown in the illustration.
- Torque:
- except TMMC Made : 7.5 N*m (76 kgf*cm, 66 in.*lbf)
- for TMMC Made : 8.0 N*m (82 kgf*cm, 71 in.*lbf)
- NOTICE:
- ·
Install the power back door unit assembly set LH while supporting the back door by hand.
·Check that the power back door unit assembly set LH is engaged in the ball joint and that the back door unit assembly cannot be pulled out.
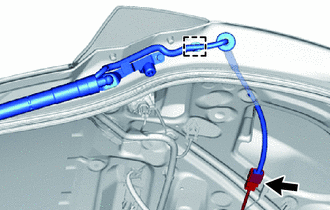
Connect the connector.
Attach the clamp and grommet.
4.INSTALL POWER BACK DOOR UNIT ASSEMBLY SET RH
- HINT:
-
Use the same procedure as for the LH side.
5.INSTALL POWER BACK DOOR SENSOR ASSEMBLY LH
6.INSTALL POWER BACK DOOR SENSOR ASSEMBLY RH
- HINT:
-
Use the same procedure as for the LH side.
7.INSTALL BACK DOOR TRIM BOARD ASSEMBLY
8.INSTALL BACK DOOR SIDE GARNISH LH
9.INSTALL BACK DOOR SIDE GARNISH RH
- HINT:
-
Use the same procedure as for the LH side.
10.INSTALL BACK DOOR CENTER GARNISH