SUPPLEMENTAL RESTRAINT SYSTEMS SEAT POSITION SENSOR INSTALLATION
PROCEDURE

 1.INSTALL SEAT POSITION AIRBAG SENSOR
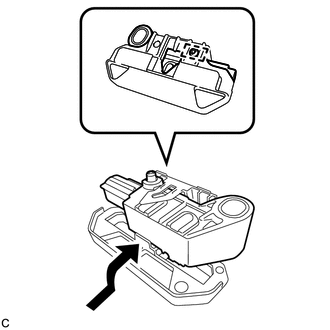
| *1 | Pin |
Install the seat position airbag sensor to the seat slide position sensor protector with the pin as shown in the illustration.
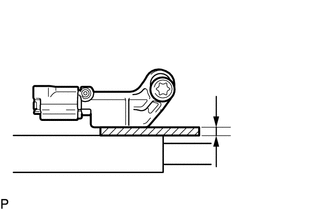
| *1 | Seat Position Airbag Sensor |
| *2 | Feeler Gauge |
| *3 | Seat Rail |
Using a 1.3 mm (0.0512 in.) feeler gauge, temporarily install the seat position airbag sensor.
- NOTICE:
- ·
If the seat position airbag sensor has been dropped, or there are any cracks, dents or other defects in the case or connector, replace the seat position airbag sensor with a new one.
·When installing the seat position airbag sensor, be careful that the SRS wiring does not interfere with or is pinched between other parts.
- HINT:
-
Be sure that the clearance between the seat position airbag sensor and seat rail is between 0.6 mm (0.0236 in.) and 2.0 mm (0.0787 in.).
Using a T30 "TORX" socket wrench, tighten the "TORX" screw to install the seat position airbag sensor.
- Torque:
- 8.0 N*m (82 kgf*cm, 71 in.*lbf)
Make sure that the clearance between the seat position airbag sensor and seat rail is between 0.6 mm (0.0236 in.) and 2.0 mm (0.0787 in.).
Install the wire harness to the seat slide position sensor protector.
Connect the connector.
Check that there is no looseness in the installation parts of the seat position airbag sensor.
2.INSTALL FRONT SEAT CUSHION SHIELD LH (for Manual Seat)
3.INSTALL VERTICAL ADJUSTING HANDLE LH (for Manual Seat)
4.INSTALL RECLINING ADJUSTER RELEASE HANDLE LH (for Manual Seat)
5.INSTALL FRONT SEAT ASSEMBLY LH
for Manual Seat:
Click hereVehicle Interior>SEAT>FRONT SEAT ASSEMBLY(for Manual Seat)>INSTALLATION
for Power Seat:
Click hereVehicle Interior>SEAT>FRONT SEAT ASSEMBLY(for Power Seat)>INSTALLATION
6.CONNECT CABLE TO NEGATIVE BATTERY TERMINAL
- NOTICE:
-
When disconnecting the cable, some systems need to be initialized after the cable is reconnected.
-
Click hereGeneral>INTRODUCTION>REPAIR INSTRUCTION>INITIALIZATION
7.PERFORM DIAGNOSTIC SYSTEM CHECK
8.CHECK SRS WARNING LIGHT