THEFT DETERRENT / KEYLESS ENTRY SMART KEY SYSTEM(for Start Function) Power Source Mode does not Change to ON (IG and ACC)
DESCRIPTION
If any of the following operations are performed, the certification ECU (smart key ECU assembly) receives a signal, and changes the power source mode.
With the electrical key transmitter sub-assembly in the cabin, the engine switch is pressed.
When the battery of the electrical key transmitter sub-assembly is depleted, the brake pedal is depressed and the electrical key transmitter sub-assembly is held near the engine switch.
When the entry cancel function has been canceled through the customized parameters, the brake pedal is depressed and the electrical key transmitter sub-assembly is held near the engine switch.
- HINT:
- ·
When the cable is disconnected and reconnected to the negative (-) battery terminal, the power source mode returns to the state it was in before the cable was disconnected.
·If the room oscillator does not recognize the key, the cause of the malfunction may be stored in the certification ECU (smart key ECU assembly).
·If the cause of the malfunction is stored in the certification ECU (smart key ECU assembly), the following table is helpful in checking whether or not the malfunction was caused by wave interference.
| Problem Symptom | Data List Item |
|---|---|
| Operating Engine Switch / Key RF Signal Interference | When the engine switch was operated, the electrical key transmitter sub-assembly could not be confirmed due to wave interference. Therefore, the output frequency was switched to the other channel (changed from channel 1 to channel 2 or from channel 2 to channel 1).
If the cause of the malfunction has not been stored but any devices that can cause wave interference in the cabin have been removed and the room oscillator successfully recognizes the key, the possibility of wave interference is high. |
| Problem Symptom | Data List Item | Active Test Item |
|---|---|---|
| Power source mode does not change to on (IG) or on (ACC) | Power Source Control:
·
Start Switch1 ·
Start Switch2 ·
Power Supply Condition ·
IG1 Relay Monitor(Inside) ·
IG2 Relay Monitor(Inside) ·
IG1 Relay Monitor(Outside) ·
IG2 Relay Monitor(Outside) ·
Latch Circuit ·
ACC Relay Monitor |
- |
WIRING DIAGRAM
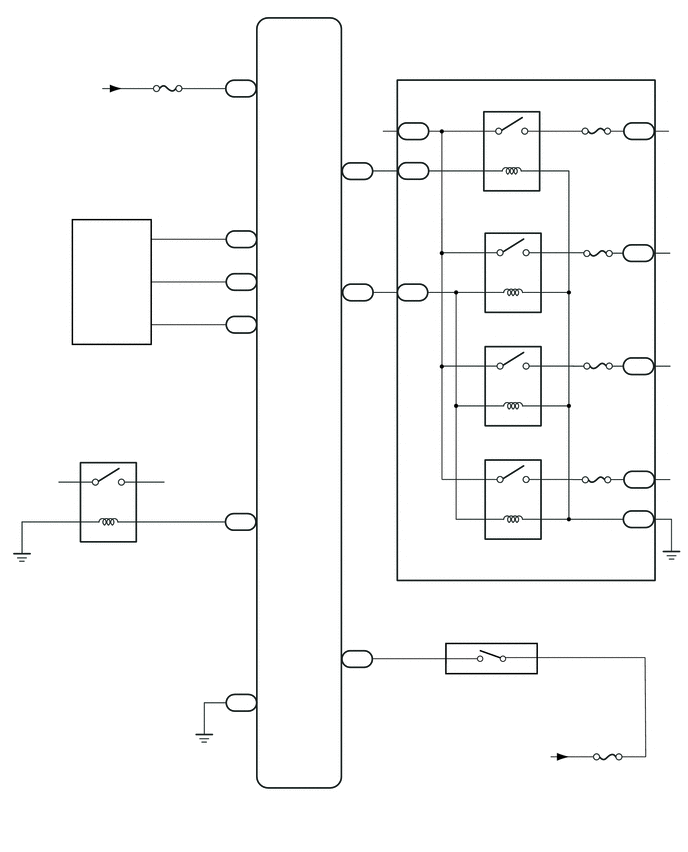
CAUTION / NOTICE / HINT
- NOTICE:
- ·
When using the Techstream with the engine switch off to troubleshoot:
Connect the Techstream to the DLC3 and turn a courtesy light switch on and off at 1.5 second intervals until communication between the Techstream and vehicle begins.
·The smart key system (for Start Function) uses a multiplex communication system (LIN communication system) and the CAN communication system. Inspect the communication function by following How to Proceed with Troubleshooting (Click here Vehicle Interior>THEFT DETERRENT / KEYLESS ENTRY>SMART KEY SYSTEM(for Start Function)>HOW TO PROCEED WITH TROUBLESHOOTING). Troubleshoot the smart key system (for Start Function) after confirming that the communication systems are functioning properly.
·Make sure that no DTCs are output. If any DTCs are output, proceed to the Diagnostic Trouble Code Chart.
·If the smart key system is disabled through the customize function, enable the system before performing troubleshooting.
·Before replacing the certification ECU (smart key ECU assembly) or electrical key transmitter sub-assembly, refer to the smart key system (for Start Function) precaution.
Click hereVehicle Interior>THEFT DETERRENT / KEYLESS ENTRY>SMART KEY SYSTEM(for Start Function)>PRECAUTION
·Inspect the fuses of circuits related to this system before performing the following inspection procedure.
·After completing repairs, confirm that the problem does not occur.
PROCEDURE
Check the wireless door lock function by operating the electrical key transmitter sub-assembly.
- OK:
Wireless door lock function operates
- Result:
Proceed to OK NG
OK
NG
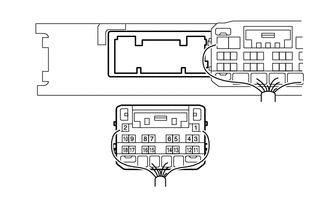
| *a | Rear view of wire harness connector
(to Certification ECU (Smart Key ECU Assembly)) |
Disconnect the G82 certification ECU (smart key ECU assembly) connector.
Measure the voltage according to the value(s) in the table below.
- Standard Voltage:
Tester Connection Condition Specified Condition G82-2 (+B) - Body ground Always 11 to 14 V
- Result:
Proceed to OK NG
OK
NG
| *a | Rear view of wire harness connector
(to Certification ECU (Smart Key ECU Assembly)) |
Disconnect the G82 certification ECU (smart key ECU assembly) connector.
Measure the resistance according to the value(s) in the table below.
- Standard Resistance:
Tester Connection Condition Specified Condition G82-11 (E) - Body ground Always Below 1 Ω
- Result:
Proceed to OK NG
OK
NG
Remove the battery from the electrical key transmitter sub-assembly.
Click hereVehicle Interior>DOOR LOCK>TRANSMITTER BATTERY(w/ Entry and Start System)>REPLACEMENT
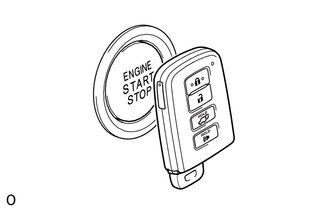
With the brake pedal depressed, hold the electrical key transmitter near the engine switch and check if the power source mode changes.
- HINT:
-
If the power source mode changes, the cabin verification is malfunctioning.
- OK:
The power source mode changes.
- Result:
Proceed to The power source mode does not change The power source mode changes
The power source mode does not change
The power source mode changes
Connect the Techstream to the DLC3.
Turn the engine switch on (IG).
Turn the Techstream on.
Enter the following menus: Body / Power Source Control / Data List.
According to the display on the Techstream, read the Data List.
- Body Electrical > Power Source Control > Data List
-
Tester Display Measurement Item Range Normal Condition Diagnostic Note Stop Light Switch1 State of brake pedal ON or OFF ON: Brake pedal depressed
OFF: Brake pedal released·Use this item to determine whether the stop light switch is malfunctioning.
·The engine cannot be started when this item is "OFF".
·When this item is malfunctioning, the engine can be started by pressing and holding the engine switch for a certain period of time.
- Body Electrical > Power Source Control > Data List
-
Tester Display Stop Light Switch1 - 50003 223 3
- OK:
ON (brake pedal depressed) and OFF (brake pedal released) appear on the screen according to the stop light switch condition.
- Result:
Proceed to OK NG
OK
NG
Read the Data List according to the display on the Techstream.
- Body Electrical > Power Source Control > Data List
-
Tester Display Measurement Item Range Normal Condition Diagnostic Note Power Supply Condition Power supply state IG2 ON, ST ON, All OFF, IG1 ON or ACC ON ALL OFF: Engine switch off
ACC ON: Engine switch on (ACC) (ACC relay on)
IG1 ON: Engine switch on (IG) (IG1 relay on)
IG2 ON: Engine switch on (IG) (IG2 relay on)
ST ON: Sending engine start request signalSince the IG1 and IG2 relays turn on at approximately the same time, IG1 ON may not be displayed (the IG1 relay turns on for a very short time).
- Body Electrical > Power Source Control > Data List
-
Tester Display Power Supply Condition - 50003 223 18
With the engine switch off and brake pedal depressed, hold the electrical key transmitter sub-assembly near the engine switch for 2 seconds or more and read the Data List.
- HINT:
-
If the entry key function has been canceled on the customization menu, ACC ON is displayed in the Data List.
- OK:
IG2 ON is displayed in the Data List.
- Result:
Proceed to OK NG
OK
NG
Read the Data List according to the display on the Techstream.
Measure the voltage according to the value(s) in the table below.
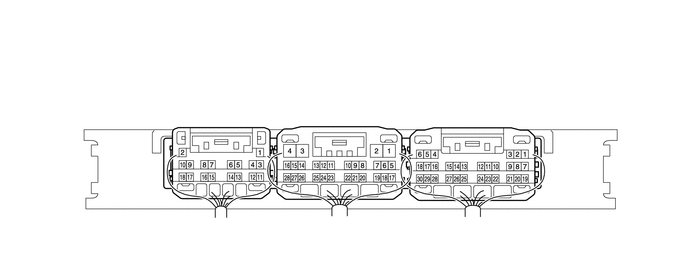
| *a | Component with harness connected
(Certification ECU (Smart Key ECU Assembly)) |
- | - |
Read the Data List according to the display on the Techstream.
- Body Electrical > Power Source Control > Data List
-
Tester Display Measurement Item Range Normal Condition Diagnostic Note Power Supply Condition Power supply state IG2 ON, ST ON, All OFF, IG1 ON or ACC ON All OFF: Engine switch off (ACC and IG)
ACC ON: Engine switch on (ACC)
IG1 ON: Engine switch on (IG) (IG1 relay on)
IG2 ON: Engine switch on (IG) (IG2 relay on)
ST ON: Sending engine start request signalSince the IG1 and IG2 relays turn on at approximately the same time, IG1 ON may not be displayed (the IG1 relay turns on for a very short time).
- Body Electrical > Power Source Control > Data List
-
Tester Display Power Supply Condition - 50003 223 18
Measure the voltage while checking the Data List on the Techstream.
- Standard Voltage:
Tester Connection Switch Condition Specified Condition G84-6 (IG1D) - Body ground Engine switch off 1 V or less Engine switch on (ACC) Engine switch on (IG) 9 V or higher G82-9 (IG2D) - Body ground Engine switch off 1 V or less Engine switch on (ACC) Engine switch on (IG) 9 V or higher G84-4 (ACCD) - Body ground Engine switch off 1 V or less Engine switch on (IG) 8.5 V or higher Engine switch on (ACC)
- Result:
Proceed to OK NG
OK
Click hereGeneral>INTRODUCTION>HOW TO TROUBLESHOOT ECU CONTROLLED SYSTEMS>HOW TO PROCEED WITH TROUBLESHOOTING
NG
Enter the following menus: Body Electrical / Smart Key / Trouble Codes.
Check for DTCs.
- Body Electrical > Smart Key > Trouble Codes
- 50001 125
- Result:
Result Proceed to The following DTCs are not output:·B2784
·B278A
A DTC B2784 is output. B DTC B278A is output. C
A
B
Click hereVehicle Interior>THEFT DETERRENT / KEYLESS ENTRY>IMMOBILISER SYSTEM(w/ Smart Key System)>B2784
C
Click hereVehicle Interior>THEFT DETERRENT / KEYLESS ENTRY>IMMOBILISER SYSTEM(w/ Smart Key System)>B278A
Disconnect the A5 connector from the stop light switch assembly.
Measure the resistance according to the value(s) in the table below.
- Standard Resistance:
Tester Connection Condition Specified Condition G82-18 (STP1) - A5-1 Always Below 1 Ω G82-18 (STP1) or A5-1- Body ground 10 kΩ or higher
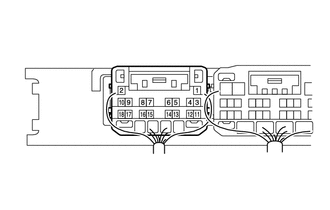
| *a | Component with harness connected
(Certification ECU (Smart Key ECU Assembly)) |
Reconnect the A5 connector from the stop light switch assembly.
Measure the voltage according to the value(s) in the table below.
- Standard Voltage:
Tester Connection Condition Specified Condition G82-18 (STP1) - Body ground Brake pedal released 1 V or less Brake pedal depressed 9 V or higher
- Result:
Proceed to OK NG
OK
NG
Disconnect the A5 connector from the stop light switch assembly.
Inspect the stop light switch assembly.
Click hereVehicle Exterior>LIGHTING (EXT)>STOP LIGHT SWITCH>INSPECTION
- Result:
Proceed to OK NG
OK
NG
Read the Data List according to the display on the Techstream.
- Body Electrical > Power Source Control > Data List
-
Tester Display Measurement Item Range Normal Condition Diagnostic Note Start Switch1 Engine switch 1 status ON or OFF ON: Engine switch pressed
OFF: Engine switch not pressed·If the engine switch is pressed for a short time, the display may not change.
·Use this item to determine whether the engine switch input signal is malfunctioning.
Start Switch2 Engine switch 2 status ON or OFF ON: Engine switch pressed
OFF: Engine switch not pressed·Backup for engine switch 1. However, when the engine switch is pressed and held, the control functions only when both engine switch 1 and 2 are normal.
·Behaves the same way as engine switch 1.
- Body Electrical > Power Source Control > Data List
-
Tester Display Start Switch1 Start Switch2 - 50003 223 4,5
- OK:
ON (Engine switch is pressed) and OFF (Engine switch is not pressed) appear on the screen.
- Result:
Proceed to OK NG
OK
NG
Inspect the engine switch.
Click hereEngine / Hybrid System>2AR-FE STARTING>ENGINE SWITCH>INSPECTION
- Result:
Proceed to OK NG
OK
NG
Disconnect the G84 connector from the certification ECU (smart key ECU assembly).
Disconnect the G24 connector from the engine switch.
Measure the resistance according to the value(s) in the table below.
- Standard Resistance:
Tester Connection Condition Specified Condition G84-28 (SSW1) - G24-5 (SS1) Always Below 1 Ω G84-30 (SSW2) - G24-1 (SS2) G84-28 (SSW1) or G24-5 (SS1) - Body ground 10 kΩ or higher G84-30 (SSW2) or G24-1 (SS2) - Body ground
- Result:
Proceed to OK NG
OK
NG