EXTERIOR PANELS / TRIM FRONT BUMPER INSTALLATION
CAUTION / NOTICE / HINT
- HINT:
-
A bolt without a torque specification is shown in the standard bolt chart.
-
Click hereGeneral>SPECIFICATIONS>STANDARD BOLT>SPECIFIED TORQUE FOR STANDARD BOLTS
PROCEDURE

 52029
1.INSTALL FRONT BUMPER UPPER REINFORCEMENT SUB-ASSEMBLY
Install the front bumper upper reinforcement sub-assembly with the 2 bolts.
52536
2.INSTALL FRONT BUMPER SIDE RETAINER LH
Attach the claw to install the front bumper side retainer LH.
Install the screw.
Install the clip.
52535
3.INSTALL FRONT BUMPER SIDE RETAINER RH
- HINT:
-
Use the same procedure described for the LH side.
4.INSTALL HEADLIGHT ASSEMBLY LH
for Halogen Headlight:
Click hereVehicle Exterior>LIGHTING (EXT)>HEADLIGHT ASSEMBLY(for Halogen Headlight)>REMOVAL
for HID Headlight:
Click hereVehicle Exterior>LIGHTING (EXT)>HEADLIGHT ASSEMBLY(for HID Headlight)>REMOVAL
5.INSTALL HEADLIGHT ASSEMBLY RH
- HINT:
-
Use the same procedure described for the LH side.
52131A
6.INSTALL FRONT BUMPER REINFORCEMENT
Install the front bumper reinforcement with the 8 bolts.
- Torque:
- 50 N*m (510 kgf*cm, 37 ft.*lbf)
Attach the 3 clamps.
52085
7.INSTALL FRONT BUMPER CENTER STAY SUB-ASSEMBLY
Install the front bumper center stay sub-assembly with the 2 bolts.
Install the clip.
52614
8.INSTALL FRONT BUMPER NO. 2 ENERGY ABSORBER
Install the front bumper No. 2 energy absorber.
52119A
9.INSTALL FRONT BUMPER COVER
w/ Fog Light:
Connect the 2 fog light connectors.
w/ Headlight Cleaner System:
Connect the headlight washer hose.
Attach the 8 claws to install the front bumper cover.
Install the 2 bolts and clip.
Install the center hood cushion and 2 radiator grille protectors.
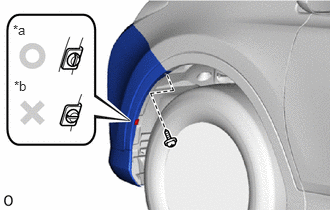
| *a | Correct |
| *b | Incorrect |
Install the pin hold clip and screw.
- HINT:
- ·
Insert the pin hold clip with the slot aligned vertically. Do not rotate the clip after inserting it. After installation, confirm that the slot is vertical.
·Use the same procedure for both pin hold clips and screws.
Install the 4 screws.
w/ Headlight Cleaner System:
Fill the washer jar with washer fluid.
53896B
10.INSTALL FRONT FENDER FRONT SPLASH SHIELD LH
Attach the clamp to install the front fender front splash shield LH.
Install the 3 screws.
53895B
11.INSTALL FRONT FENDER FRONT SPLASH SHIELD RH
- HINT:
-
Use the same procedure described for the LH side.
12.CONNECT CABLE TO NEGATIVE BATTERY TERMINAL (for HID Headlight)
- NOTICE:
-
When disconnecting the cable, some systems need to be initialized after the cable is reconnected.
-
Click hereGeneral>INTRODUCTION>REPAIR INSTRUCTION>INITIALIZATION
13.ADJUST HEADLIGHT AIMING
for Halogen Headlight:
Click hereVehicle Exterior>LIGHTING (EXT)>HEADLIGHT ASSEMBLY(for Halogen Headlight)>ADJUSTMENT
for HID Headlight:
Click hereVehicle Exterior>LIGHTING (EXT)>HEADLIGHT ASSEMBLY(for HID Headlight)>ADJUSTMENT
14.ADJUST FOG LIGHT AIMING (w/ Fog Light)