PARK ASSIST / MONITORING REAR VIEW MONITOR SYSTEM Reverse Signal Circuit
DESCRIPTION
The radio and display receiver assembly*1 or navigation ECU sub-assembly*2 receives a reverse signal from the park/neutral position switch assembly*3 or back-up light switch assembly*4.
*1: w/o Navigation System
*2: w/ Navigation System
*3: except Manual Transaxle
*4: for Manual Transaxle
WIRING DIAGRAM
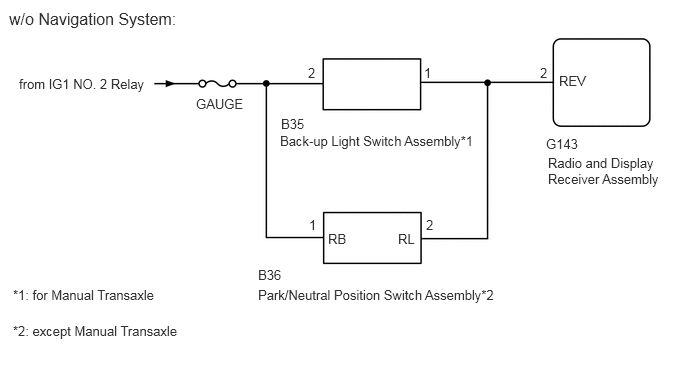
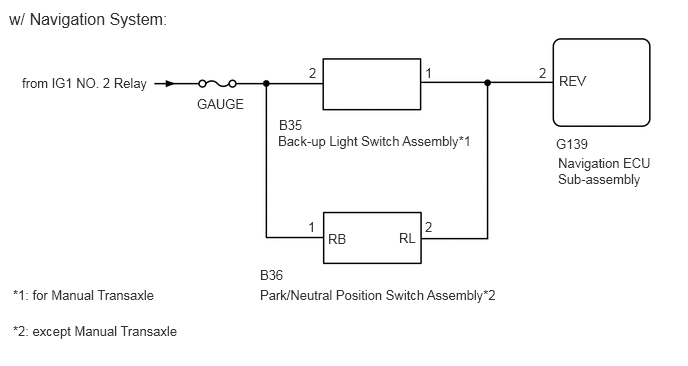
CAUTION / NOTICE / HINT
- NOTICE:
-
Inspect the fuses for circuits related to this system before performing the following inspection procedure.
PROCEDURE
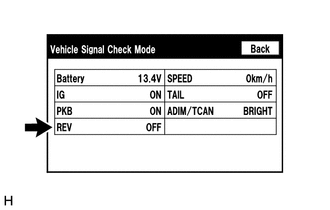
Enter the "Function Check/Setting I" mode and select "Vehicle Signal".
Check that the display changes between ON and OFF according to the shift lever position.
- OK:
Shift Lever Position Display R ON Except R OFF
- HINT:
-
This display is updated once per second. As a result, it is normal for the display to lag behind the actual shift lever position.
- Result:
Proceed to OK NG (w/o Navigation System) NG (w/ Navigation System)
OK
Click hereAudio / Visual / Telematics>PARK ASSIST / MONITORING>REAR VIEW MONITOR SYSTEM>PROBLEM SYMPTOMS TABLE
NG (w/o Navigation System)
NG (w/ Navigation System)
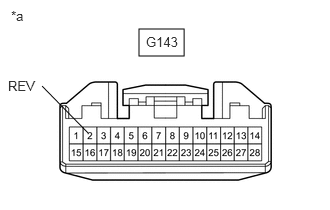
| *a | Front view of wire harness connector
(to Radio and Display Receiver Assembly) |
Disconnect the radio and display receiver assembly connector.
Measure the voltage according to the value(s) in the table below.
- Standard Voltage:
Tester Connection Condition Specified Condition G143-2 (REV) - Body ground Ignition switch ON, shift lever in R 11 to 14 V G143-2 (REV) - Body ground Ignition switch ON, shift lever not in R Below 1 V
- Result:
Proceed to OK NG (except Manual Transaxle) NG (for Manual Transaxle)
OK
NG (except Manual Transaxle)
NG (for Manual Transaxle)
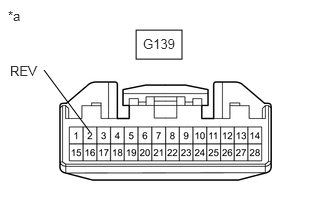
| *a | Front view of wire harness connector
(to Navigation ECU Sub-assembly) |
Disconnect the navigation ECU sub-assembly connector.
Measure the voltage according to the value(s) in the table below.
- Standard Voltage:
Tester Connection Condition Specified Condition G139-2 (REV) - Body ground Ignition switch ON, shift lever in R 11 to 14 V G139-2 (REV) - Body ground Ignition switch ON, shift lever not R Below 1 V
- Result:
Proceed to OK NG (except Manual Transaxle) NG (for Manual Transaxle)
OK
NG (except Manual Transaxle)
NG (for Manual Transaxle)
Disconnect the G143 radio and display receiver assembly connector.
Disconnect the B36 park/neutral position switch assembly connector.
Measure the resistance according to the value(s) in the table below.
- Standard Resistance:
Tester Connection Condition Specified Condition G143-2 (REV) - B36-2 (RL) Always Below 1 Ω G143-2 (REV) - Body ground Always 10 kΩ or higher
- Result:
Proceed to OK NG
OK
NG
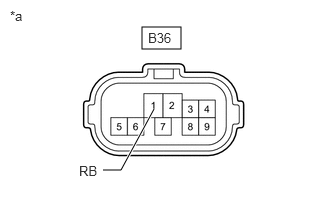
| *a | Front view of wire harness connector
(to Park/Neutral Position Switch Assembly) |
Disconnect the park/neutral position switch assembly connector.
Measure the voltage according to the value(s) in the table below.
- Standard Voltage:
Tester Connection Switch Condition Specified Condition B36-1 (RB) - Body ground Ignition switch ON 11 to 14 V
- Result:
Proceed to OK (for U660F) OK (for U760E) OK (for U760F) OK (for K111) OK (for K111F) NG
OK (for U660F)
Click hereDrivetrain>U660F AUTOMATIC TRANSMISSION / TRANSAXLE>PARK / NEUTRAL POSITION SWITCH>REMOVAL
OK (for U760E)
Click hereDrivetrain>U760E AUTOMATIC TRANSMISSION / TRANSAXLE>PARK / NEUTRAL POSITION SWITCH>REMOVAL
OK (for U760F)
Click hereDrivetrain>U760F AUTOMATIC TRANSMISSION / TRANSAXLE>PARK / NEUTRAL POSITION SWITCH>REMOVAL
OK (for K111)
OK (for K111F)
NG
Disconnect the G139 navigation ECU sub-assembly connector.
Disconnect the B36 park/neutral position switch assembly connector.
Measure the resistance according to the value(s) in the table below.
- Standard Resistance:
Tester Connection Condition Specified Condition G139-2 (REV) - B36-2 (RL) Always Below 1 Ω G139-2 (REV) - Body ground Always 10 kΩ or higher
- Result:
Proceed to OK NG
OK
NG
| *a | Front view of wire harness connector
(to Park/Neutral Position Switch Assembly) |
Disconnect the park/neutral position switch assembly connector.
Measure the voltage according to the value(s) in the table below.
- Standard Voltage:
Tester Connection Switch Condition Specified Condition B36-1 (RB) - Body ground Ignition switch ON 11 to 14 V
- Result:
Proceed to OK (for U660F) OK (for U760E) OK (for U760F) OK (for K111) OK (for K111F) NG
OK (for U660F)
Click hereDrivetrain>U660F AUTOMATIC TRANSMISSION / TRANSAXLE>PARK / NEUTRAL POSITION SWITCH>REMOVAL
OK (for U760E)
Click hereDrivetrain>U760E AUTOMATIC TRANSMISSION / TRANSAXLE>PARK / NEUTRAL POSITION SWITCH>REMOVAL
OK (for U760F)
Click hereDrivetrain>U760F AUTOMATIC TRANSMISSION / TRANSAXLE>PARK / NEUTRAL POSITION SWITCH>REMOVAL
OK (for K111)
OK (for K111F)
NG
Disconnect the G143 radio and display receiver assembly connector.
Disconnect the B35 back-up light switch assembly connector.
Measure the resistance according to the value(s) in the table below.
- Standard Resistance:
Tester Connection Condition Specified Condition G143-2 (REV) - B35-1 Always Below 1 Ω G143-2 (REV) - Body ground Always 10 kΩ or higher
- Result:
Proceed to OK NG
OK
NG
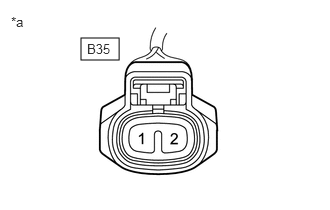
| *a | Front view of wire harness connector
(to Back-up Light Switch Assembly) |
Disconnect the back-up light switch assembly connector.
Measure the voltage according to the value(s) in the table below.
- Standard Voltage:
Tester Connection Switch Condition Specified Condition B35-2 - Body ground Ignition switch ON 11 to 14 V
- Result:
Proceed to OK (for EA64) OK (for EA64F) OK (for EB61) OK (for EB61F) NG
OK (for EA64)
OK (for EA64F)
OK (for EB61)
OK (for EB61F)
NG
Disconnect the G139 navigation ECU sub-assembly connector.
Disconnect the B35 back-up light switch assembly connector.
Measure the resistance according to the value(s) in the table below.
- Standard Resistance:
Tester Connection Condition Specified Condition G139-2 (REV) - B35-1 Always Below 1 Ω G139-2 (REV) - Body ground Always 10 kΩ or higher
- Result:
Proceed to OK NG
OK
NG
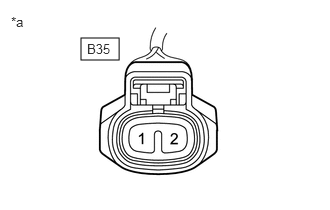
| *a | Front view of wire harness connector
(to Back-up Light Switch Assembly) |
Disconnect the back-up light switch assembly connector.
Measure the voltage according to the value(s) in the table below.
- Standard Voltage:
Tester Connection Switch Condition Specified Condition B35-2 - Body ground Ignition switch ON 11 to 14 V
- Result:
Proceed to OK (for EA64) OK (for EA64F) OK (for EB61F) NG
OK (for EA64)
OK (for EA64F)
OK (for EB61F)
NG