3ZR-FAE ENGINE CONTROL ECM INSTALLATION
PROCEDURE

 89668
1.INSTALL NO. 2 ECM BRACKET
Install the No. 2 ECM bracket with the 2 screws.
- Torque:
- 3.0 N*m (31 kgf*cm, 27 in.*lbf)
89667E
2.INSTALL NO. 1 ECM BRACKET
Install the No. 1 ECM bracket with the 2 screws.
- Torque:
- 3.0 N*m (31 kgf*cm, 27 in.*lbf)
89661
3.INSTALL ECM
Install the ECM with the 3 bolts.
- Torque:
- 6.5 N*m (66 kgf*cm, 58 in.*lbf)
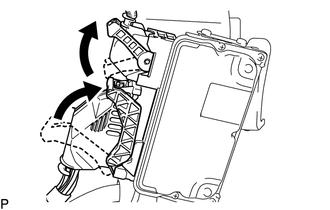
Connect the 2 ECM connectors and move the 2 levers as shown in the illustration.
- NOTICE:
- ·
When connecting a connector, make sure that dirt, water and other foreign matter is not stuck between the connector and ECM.
·Make sure that the 2 levers are in the positions shown in the illustration.
4.INSTALL AIR CLEANER CASE SUB-ASSEMBLY
Install the air cleaner case sub-assembly with the 3 bolts.
- Torque:
- 5.0 N*m (51 kgf*cm, 44 in.*lbf)
Attach the wire harness clamp to the air cleaner case sub-assembly.
17705
5.INSTALL AIR CLEANER CAP SUB-ASSEMBLY
11212
6.INSTALL NO. 2 CYLINDER HEAD COVER
7.CONNECT CABLE TO NEGATIVE BATTERY TERMINAL
- NOTICE:
-
When disconnecting the cable, some systems need to be initialized after the cable is reconnected.
-
Click hereGeneral>INTRODUCTION>REPAIR INSTRUCTION>INITIALIZATION
8.PERFORM INITIALIZATION
9.RESET MEMORY (for CVT)
When replacing the ECM, perform the Reset Memory procedure (initialization).
Click hereDrivetrain>K111F MULTIDRIVE / CVT>CONTINUOUSLY VARIABLE TRANSAXLE SYSTEM>INITIALIZATION