HEATING / AIR CONDITIONING HEATER ASSEMBLY INSTALLATION
PROCEDURE

 1.INSTALL WATER HOSE AND FUEL HOSE
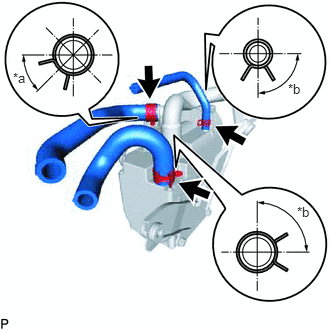
| *a | 45° |
| *b | 90° |
for AD Series Engine:
Connect the 2 water hoses and fuel hose to the heater assembly and engage the 3 clips as shown in the illustration.
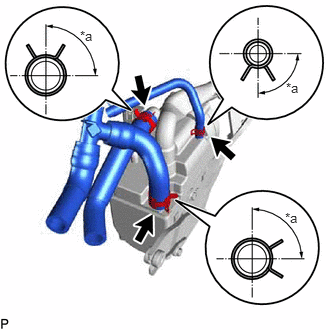
| *a | 90° |
for 2WW:
Connect the 2 water hoses and fuel hose to the heater assembly and engage the 3 clips as shown in the illustration.
87403A
2.INSTALL NO. 1 EXHAUST PIPE SUB-ASSEMBLY
Install the 2 new gaskets to the heater assembly.
Install the No. 1 exhaust pipe sub-assembly to the heater assembly with the 2 bolts.
- Torque:
- 9.8 N*m (100 kgf*cm, 87 in.*lbf)
87100A
3.INSTALL HEATER AND ACCESSORY ASSEMBLY
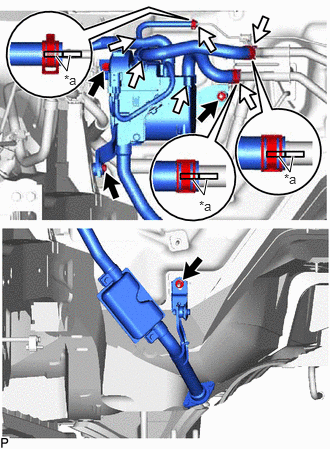
| *a | Marking |
for AD Series Engine:
Install the heater and accessory assembly with the 2 bolts and nut.
- Torque:
- 9.8 N*m (100 kgf*cm, 87 in.*lbf)
Connect the No. 1 exhaust pipe sub-assembly to the body with the nut.
- Torque:
- 9.8 N*m (100 kgf*cm, 87 in.*lbf)
Connect each hose and engage the 3 clips as shown in the illustration.
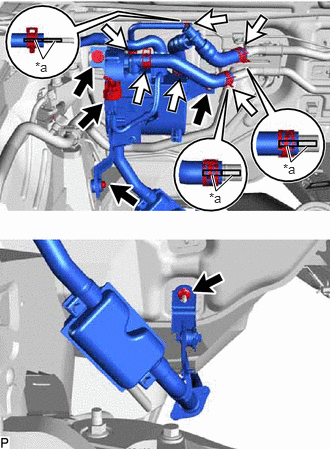
| *a | Marking |
for 2WW:
Install the heater and accessory assembly with the 2 bolts and nut.
- Torque:
- 9.8 N*m (100 kgf*cm, 87 in.*lbf)
Connect the No. 1 exhaust pipe sub-assembly to the body with the nut.
- Torque:
- 9.8 N*m (100 kgf*cm, 87 in.*lbf)
Connect each hose and engage the 3 clips as shown in the illustration.
Connect the connector to the heater and accessory assembly.
87403B
4.INSTALL NO. 2 EXHAUST PIPE SUB-ASSEMBLY
Install a new gasket to the No. 2 exhaust pipe sub-assembly.
Temporarily install the No. 2 exhaust pipe sub-assembly with the 2 nuts and bolt.
Tighten the 2 nuts and then tighten the bolt.
- Torque:
- 9.8 N*m (100 kgf*cm, 87 in.*lbf)
55789D
5.INSTALL NO. 3 COWL TOP PANEL INSULATOR (for 2WW)
12611
6.INSTALL NO. 1 ENGINE COVER (for 2WW)