2WW FUEL FUEL INJECTOR REMOVAL
PROCEDURE

 1. PRECAUTION
- NOTICE:
- ·
After the engine has stopped, wait at least 1 minute before releasing the high pressure lines.
·When working on the fuel circuit, protect the generator assembly against contamination. Cover the generator assembly with suitable materials. Failure to comply with this procedure may result in a generator assembly malfunction.
·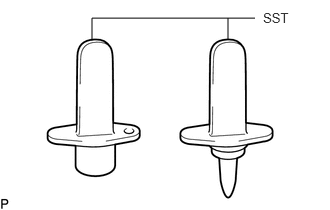 2.656,0.188 0.958,0.188 0.958,0.188 0.958,0.417 false 2.375,0.406 2.375,0.188 false 2.74,0.104 3.198,0.302 0.458,0.198 10 false SST
After disconnecting the pressure line, it is absolutely essential to seal the injector assemblies and the common rail assembly with SST.
- SST:
PZ4TB-04941-79
·After turning the ignition switch off, waiting time may be required before disconnecting the cable from the negative (-) battery terminal. Therefore, make sure to read the disconnecting the cable from the negative (-) battery terminal notices before proceeding with work.
Click hereGeneral>INTRODUCTION>REPAIR INSTRUCTION>PRECAUTION
2.DISCONNECT CABLE FROM NEGATIVE BATTERY TERMINAL
- NOTICE:
-
When disconnecting the cable, some systems need to be initialized after the cable is reconnected.
-
Click hereGeneral>INTRODUCTION>REPAIR INSTRUCTION>INITIALIZATION
12611
3.REMOVE NO. 1 ENGINE COVER
4.REMOVE ENGINE COVER
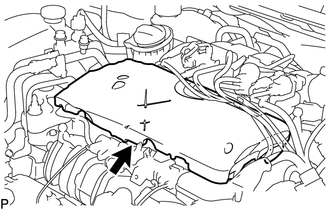
Remove the engine cover.
5.REMOVE INJECTION PIPE SUB-ASSEMBLY
- NOTICE:
-
Reset SST in a timely manner to prevent bending of pressure lines.
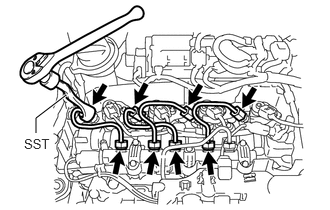
Using SST, loosen the 4 union nuts at the common rail assembly end of the 2 No. 1 injection pipe sub-assemblies and 2 No. 2 injection pipe sub-assemblies.
- SST:
PZ4TB-04959-10
Using SST, loosen the 4 union nuts at the 4 injector assembly ends of the 2 No. 1 injection pipe sub-assemblies and 2 No. 2 injection pipe sub-assemblies.
- SST:
PZ4TB-04959-10
Remove the 2 No. 1 injection pipe sub-assemblies and 2 No. 2 injection pipe sub-assemblies.
6.REMOVE CAMSHAFT POSITION SENSOR
23760
7.DISCONNECT NOZZLE LEAKAGE PIPE ASSEMBLY
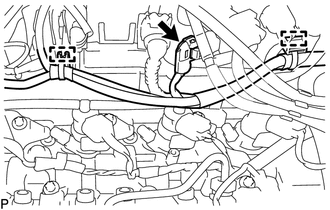
Disconnect the connector and detach the 2 clamps to disconnect the wire harness.
Click hereEngine / Hybrid System>2WW FUEL>FUEL SYSTEM>PRECAUTION
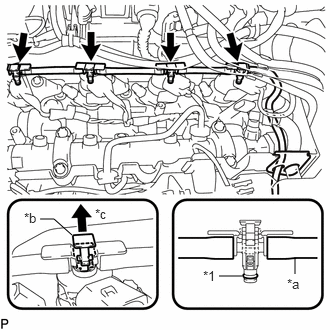
| *1 | Sealing Ring |
| *a | Leakage Line |
| *b | Clip |
| *c | Pull up |
Pull up the 4 clips and disconnect the nozzle leakage pipe assembly from the 4 injector assemblies as shown in the illustration.
- NOTICE:
-
If a sealing ring is damaged, the entire leakage line must be replaced.
Remove the 4 sealing rings from the nozzle leakage pipe assembly.
23670
8.REMOVE INJECTOR ASSEMBLY
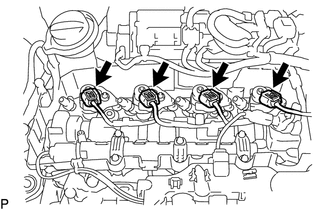
Disconnect the 4 injector assembly connectors.
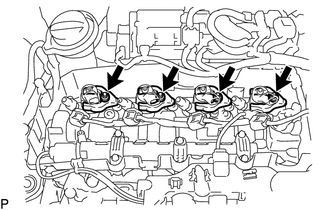
Using an E10 "TORX" socket wrench, remove the 4 bolts and 4 centering rings.
Remove the 4 clamping claws from the 4 injector assemblies.
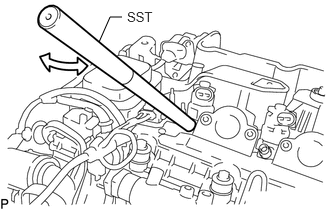
Remove the 4 injector assemblies from the cylinder head cover sub-assembly.
Pull out the injector assembly with light rotational movements.
- SST:
PZ4TB-04942-79
- HINT:
- ·
If an injector assembly is stuck tight, mount SST (rod) to the pressure line connection.
·Move the injector assembly with SST (rod) only by a few degrees.