EXTERIOR PANELS / TRIM FRONT BUMPER REASSEMBLY
CAUTION / NOTICE / HINT
- HINT:
-
A bolt without a torque specification is shown in the standard bolt chart.
-
Click hereGeneral>SPECIFICATIONS>STANDARD BOLT>SPECIFIED TORQUE FOR STANDARD BOLTS
PROCEDURE

 52711
1.INSTALL FRONT BUMPER MOULDING
Install the front bumper guard with the 11 clips.
52411
2.INSTALL FRONT BUMPER GUARD
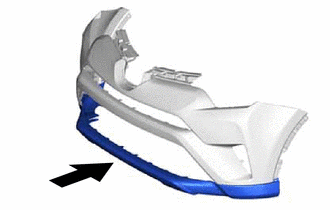
Install the front bumper guard as shown in the illustration.
Install the 2 clips.
52414
3.INSTALL FRONT BUMPER GUARD PAD LH
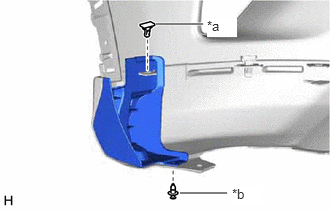
| *a | Clip A |
| *b | Clip B |
Install the front bumper guard pad LH with the clip labeled B.
Install the clip labeled A.
52413A
4.INSTALL FRONT BUMPER GUARD PAD RH
- HINT:
-
Use the same procedure described for the LH side.
53128A
5.INSTALL LOWER RADIATOR GRILLE LH
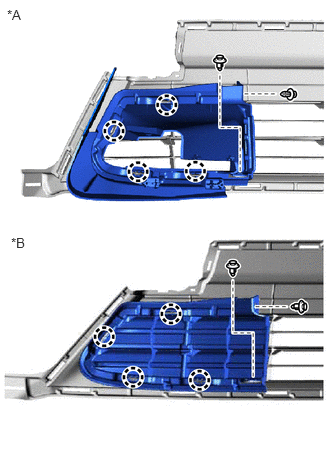
| *A | for Automatic Transaxle (U660F) |
| *B | except Automatic Transaxle (U660F) |
Attach the 4 claws to install the lower radiator grille LH.
Install the 2 clips.
for Automatic Transaxle (U660F):
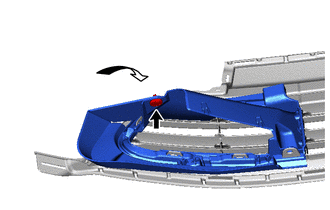
Close the lower radiator grille LH with the clip as shown in the illustration.
Attach the 2 claws and 2 guides to install the duct.
Install the 2 screws.
53113E
6.INSTALL LOWER NO. 2 RADIATOR GRILLE
Attach the 22 claws to install the lower No. 2 radiator grille.
Install the 2 clips.
53286C
7.INSTALL FRONT BUMPER ARM HOLE COVER LH
Attach the 4 claws and guide to install the front bumper arm hole cover LH.
53285J
8.INSTALL FRONT BUMPER ARM HOLE COVER RH
- HINT:
-
Use the same procedure described for the LH side.
52113D
9.INSTALL FRONT BUMPER EXTENSION LH
Install the front bumper extension LH with the 5 clips.
52112D
10.INSTALL FRONT BUMPER EXTENSION RH
- HINT:
-
Use the same procedure described for the LH side.
53112E
11.INSTALL LOWER NO. 1 RADIATOR GRILLE
Attach the 16 claws and 2 guides to install the lower No. 1 radiator grille.
53101
12.INSTALL RADIATOR GRILLE SUB-ASSEMBLY
52114A
13.INSTALL FRONT BUMPER EXTENTION MOUNTING BRACKET
Install the front bumper extension moulding bracket with the 2 screws.
52722
14.INSTALL FRONT BUMPER EXTENSION MOULDING LH (w/ Fog Light)
Attach the 3 claws to install the front bumper extension moulding LH.
52721
15.INSTALL FRONT BUMPER EXTENSION MOULDING RH (w/ Fog Light)
- HINT:
-
Use the same procedure described for the LH side.
52128C
16.INSTALL FRONT BUMPER HOLE COVER LH
Attach the 5 claws to install the front bumper hole cover LH.
Install the clip.
52127D
17.INSTALL FRONT BUMPER HOLE COVER RH
- HINT:
-
Use the same procedure described for the LH side.
82113
18.INSTALL NO. 3 ENGINE ROOM WIRE
Attach each clamp to install the No. 3 engine room wire.
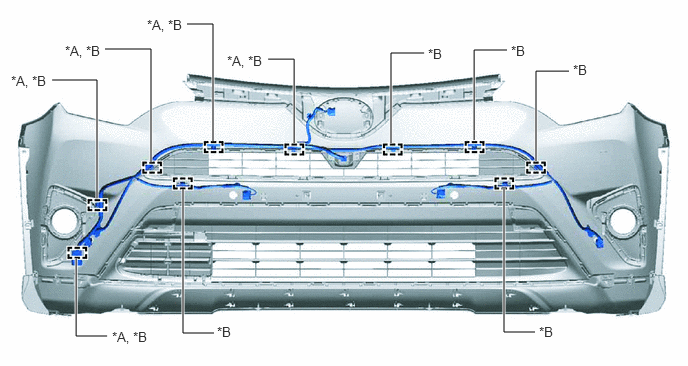
| *A | w/ Pre-crash Safety System | *B | w/ TOYOTA Parking Assist-sensor System |
81220
19.INSTALL FOG LIGHT ASSEMBLY LH (w/ Fog Light)
81210A
20.INSTALL FOG LIGHT ASSEMBLY RH (w/ Fog Light)
- HINT:
-
Use the same procedure described for the LH side.
85208A
21.INSTALL HEADLIGHT WASHER ACTUATOR SUB-ASSEMBLY LH (w/ Headlight Cleaner System)
85207A
22.INSTALL HEADLIGHT WASHER ACTUATOR SUB-ASSEMBLY RH (w/ Headlight Cleaner System)
- HINT:
-
Use the same procedure described for the LH side.
23.INSTALL HEADLIGHT CLEANER HOSE (w/ Headlight Cleaner System)
85045
24.INSTALL TYPE 1 HEADLIGHT WASHER NOZZLE SUB-ASSEMBLY LH (w/ Headlight Cleaner System)
85044
25.INSTALL TYPE 1 HEADLIGHT WASHER NOZZLE SUB-ASSEMBLY RH (w/ Headlight Cleaner System)
- HINT:
-
Use the same procedure described for the LH side.
86790B
26.INSTALL FRONT TELEVISION CAMERA ASSEMBLY (w/ Panoramic View Monitor System)
89341A
27.INSTALL NO. 1 ULTRASONIC SENSOR (w/ TOYOTA Parking Assist-sensor System)
89348D
28.INSTALL ULTRASONIC SENSOR CLIP (w/ TOYOTA Parking Assist-sensor System)
88211B
29.INSTALL MILLIMETER WAVE RADAR SENSOR ASSEMBLY (w/ Pre-crash Safety System)