WINDOW / GLASS QUARTER WINDOW GLASS INSTALLATION
CAUTION / NOTICE / HINT
- NOTICE:
-
Make sure to use Toyota Genuine Windshield Glass Adhesive (High Modulus Type) or an equivalent high modulus adhesive.
- HINT:
- ·
Use the same procedure for the RH and LH sides.
·The procedure listed below is for the LH side.
·A bolt without a torque specification is shown in the standard bolt chart.
Click hereGeneral>SPECIFICATIONS>STANDARD BOLT>SPECIFIED TORQUE FOR STANDARD BOLTS
PROCEDURE

 62720A
1.CLEAN QUARTER WINDOW ASSEMBLY LH
Clean the outer circumference of the quarter window assembly with a non-residue solvent.
- HINT:
- ·
Do not touch the quarter window assembly surface after cleaning it.
- ·
Be careful not to damage the quarter window assembly and clips.
62720A
2.INSTALL QUARTER WINDOW ASSEMBLY LH
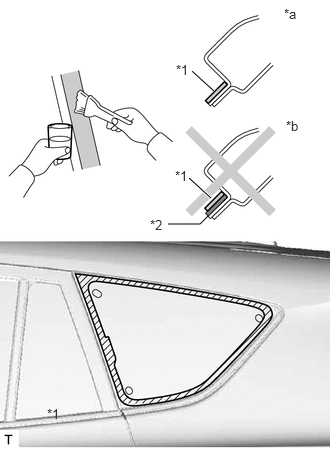
| *1 | Primer M |
| *2 | Adhesive |
| *a | CORRECT |
| *b | INCORRECT |

|
Primer M |
Using a brush or sponge, apply Primer M to the exposed part of the vehicle body.
- NOTICE:
- ·
Allow the Primer M coating to dry for 3 minutes or more.
·Throw away any leftover primer.
·Do not apply too much primer.
Using a brush or sponge, apply Primer G to the contact surface of the new quarter window assembly.
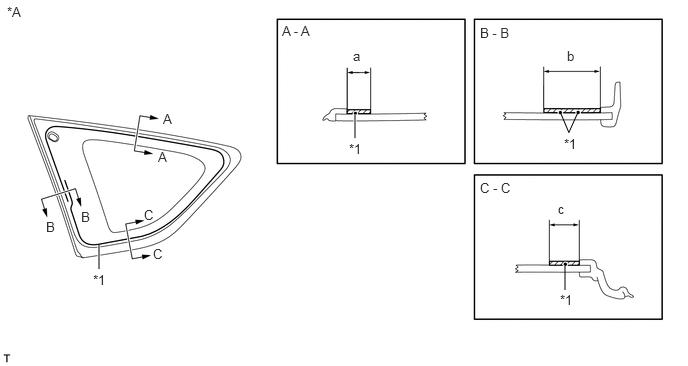
| *A | Back Side | - | - |
| *1 | Adhesive Center Line | - | - |
|
|
Primer G | - | - |
- HINT:
-
If primer is applied to an area that is not specified, wipe off the primer with non-residue solvent before it dries.
- NOTICE:
- ·
Allow the primer to dry for 3 minutes or more.
·Throw away any leftover primer.
·Do not apply too much primer.
- Standard:
Area Specified Condition a 11 mm (0.4331 in.) b 24.9 mm (0.9803 in.) c 13.4 mm (0.5276 in.)
Apply adhesive to the quarter window assembly.
- Adhesive:
Toyota Genuine Windshield Glass Adhesive (High modulus Type) or Equivalent
Cut off the tip of the cartridge nozzle as shown in the illustration.
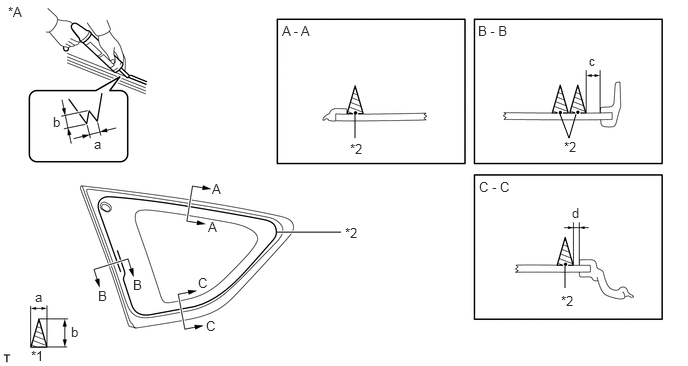
| *A | Back Side | - | - |
| *1 | Adhesive | *2 | Adhesive Center Line |
- Standard:
Area Specified Condition a 8.0 mm (0.3150 in.) b 12.0 mm (0.4724 in.) c 5.9 mm (0.2323 in.) d 2.4 mm (0.0945 in.)
- HINT:
-
After cutting off the tip, use all adhesive within the time written in the table below.
- Usage Time Frame:
Temperature Usage Time Frame 35°C (95°F) 15 minutes 20°C (68°F) 1 hour 40 minutes 5°C (41°F) 8 hours
Load the sealer gun with the cartridge.
Apply adhesive to the quarter window assembly as shown in the illustration.
Install the quarter window assembly to the vehicle body.
Hold the quarter window assembly in place securely with protective tape or equivalent until the adhesive hardens.
- NOTICE:
- ·
Allow the primer coating to dry for 3 minutes or more.
·Check that the clips are attached to the body correctly.
·Check the clearance between the body and glass.
Lightly press the front surface of the glass to ensure a close fit.
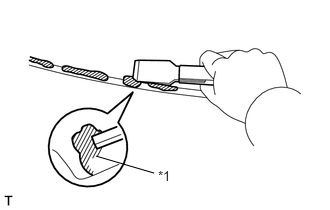
| *1 | Adhesive |
Using a scraper, remove any excess or protruding adhesive.
- HINT:
-
Apply adhesive to the glass rim.
- NOTICE:
-
Do not drive the vehicle within the time written in the table below.
- Minimum Time:
Temperature Minimum Time Prior to Driving Vehicle 35°C (95°F) 1 hour 30 minutes 20°C (68°F) 5 hours 5°C (41°F) 24 hours
62720A
3.CHECK FOR LEAKS AND REPAIR
Conduct a leak test after the adhesive has completely hardened.
Seal any leaks with auto glass sealer.
63310
4.INSTALL ROOF HEADLINING ASSEMBLY
62470A
5.INSTALL INNER ROOF SIDE GARNISH ASSEMBLY RH
64718A
6.INSTALL DECK TRIM SERVICE HOLE COVER
62480A
7.INSTALL INNER ROOF SIDE GARNISH ASSEMBLY LH
73178A
8.INSTALL SEAT BELT ANCHOR COVER CAP
64730J
9.INSTALL DECK TRIM SIDE PANEL ASSEMBLY RH
64740E
10.INSTALL DECK TRIM SIDE PANEL ASSEMBLY LH
62332C
11.INSTALL REAR DOOR OPENING TRIM WEATHERSTRIP LH
67918E
12.INSTALL REAR DOOR SCUFF PLATE LH
13.INSTALL REAR SEAT ASSEMBLY
58577E
14.INSTALL REAR NO. 1 FLOOR MAT SUPPORT SIDE PLATE
64716P
15.INSTALL REAR DECK TRIM COVER (for Full Size Spare Tire)
58417H
16.INSTALL REAR NO. 3 FLOOR BOARD
58416K
17.INSTALL REAR NO. 2 FLOOR BOARD
58386
18.INSTALL REAR FLOOR FINISH PLATE (w/o Spare Tire)
64997
19.INSTALL DECK FLOOR BOX LH
58410B
20.INSTALL DECK BOARD ASSEMBLY
64910N
21.INSTALL TONNEAU COVER ASSEMBLY (w/ Tonneau Cover)
64309A
22.INSTALL PACKAGE TRAY TRIM POCKET SUB-ASSEMBLY (w/ Partition Net)