HEATING / AIR CONDITIONING COMPRESSOR(for 1AD-FTV, 2AD-FHV, 2AD-FTV) INSTALLATION
PROCEDURE

 1.INSPECT COMPRESSOR OIL
When replacing the compressor assembly with a new one, gradually discharge the inert gas (helium) from the service valve, and drain the following amount of oil before installation.
- NOTICE:
- ·
If a new compressor assembly with pulley is installed without removing the same amount of compressor oil as is remaining in the pipes, the amount of compressor oil will be excessive. This prevents heat exchange in the refrigerant cycle and will cause a refrigeration failure.
·A certain amount of compressor oil remains in the compressor assembly with pulley during circulation and the compressor may be damaged if the amount of compressor oil is more/less than this amount. Therefore, make sure to adjust the amount of compressor oil correctly.
·If the amount of compressor oil remaining in the removed compressor assembly with pulley is too low, check for compressor oil leakage.
·Do not race the engine before replacing the compressor assembly with pulley.
·for Make sure to use ND-OIL 8 or equivalent compressor oil.
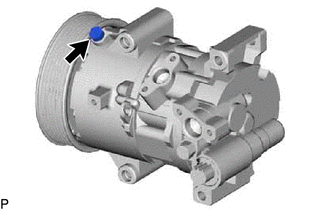
Remove the drain bolt (seal washer) from the removed compressor assembly with pulley.
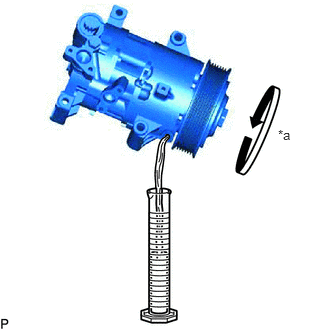
| *a | Turn clockwise |
Drain the compressor oil from the oil port of the removed compressor assembly with pulley as shown in the illustration and measure the removed oil as quantity B.
- NOTICE:
- ·
Make sure to drain the compressor oil from the oil port.
·Keep your face away from the compressor port because turning the pulley may cause gas or oil to spray out.
Calculate oil quantity C by subtracting oil quantity B, measured in the previous step, from oil quantity A (70 cc (2.37 fl.oz.)), which is the amount of oil in a new compressor assembly with pulley.
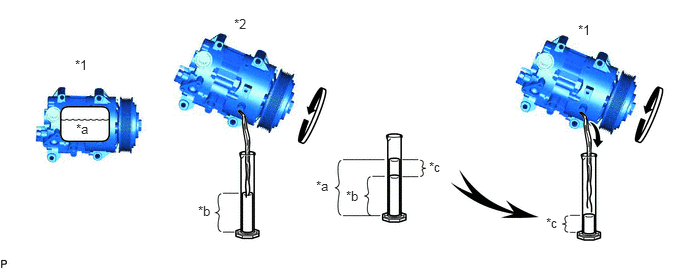
| *1 | New Compressor Assembly with Pulley | *2 | Removed Compressor Assembly with Pulley |
| *a | Oil quantity A (70 cc (2.37 fl.oz.)) | *b | Oil quantity B |
| *c | Oil quantity C | - | - |
Remove the drain bolt (seal washer) from a new compressor assembly with pulley, drain oil quantity C from the oil port, and use the amount of oil remaining in the compressor assembly with pulley as the standard value.
- NOTICE:
- ·
Make sure to drain the compressor oil from the oil port.
·Make sure to add the compressor oil from the oil port, not from the discharge or intake port.
·If a tool is used to add compressor oil to the new compressor assembly with pulley, make sure that it is free of foreign matter.
·If the amount of compressor oil remaining in the removed compressor assembly with pulley cannot be estimated because the compressor was damaged and oil was discharged due to a frontal collision, etc., install the new compressor assembly with pulley without removing any oil. If the condenser with receiver assembly is also replaced, do not add the specified oil for condenser with receiver assembly replacement (40 cc (1.35 fl.oz.)).
Install the drain bolt (seal washer) to the new compressor assembly with pulley.
- Torque:
- 30 N*m (306 kgf*cm, 22 ft.*lbf)
- HINT:
-
The drain bolt (seal washer) can be reused.
- NOTICE:
-
Make sure that there is no damage or foreign matter on the seal washer edge.
88310
2.INSTALL COMPRESSOR ASSEMBLY WITH PULLEY
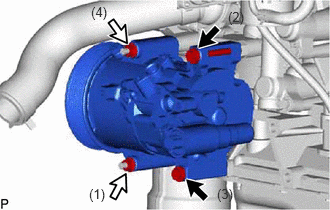
Using an E8 "TORX" socket wrench, install the compressor assembly with pulley with the 2 stud bolts.
- Torque:
- 9.8 N*m (100 kgf*cm, 87 in.*lbf)
Install the 2 bolts and 2 nuts.
- Torque:
- 25 N*m (255 kgf*cm, 18 ft.*lbf)
- HINT:
-
Tighten the nuts and bolts in the order shown in the illustration to install the compressor assembly with pulley.
Connect the connector and attach the harness clamp.
88704
3.CONNECT SUCTION HOSE SUB-ASSEMBLY
Remove the vinyl tape from the suction hose sub-assembly.
Sufficiently apply compressor oil to a new O-ring and the fitting surface of the compressor assembly with pulley.
- Compressor Oil:
ND-OIL 8 or equivalent
Install the O-ring to the suction hose sub-assembly.
Install the suction hose sub-assembly to the compressor assembly with pulley with the bolt.
- Torque:
- 9.8 N*m (100 kgf*cm, 87 in.*lbf)
88703
4.CONNECT DISCHARGE HOSE SUB-ASSEMBLY
Remove the vinyl tape from the discharge hose sub-assembly.
Sufficiently apply compressor oil to a new O-ring and the fitting surface of the compressor assembly with pulley.
- Compressor Oil:
ND-OIL 8 or equivalent
Install the O-ring to the discharge hose sub-assembly.
Install the discharge hose sub-assembly to the compressor assembly with pulley with the bolt.
- Torque:
- 9.8 N*m (100 kgf*cm, 87 in.*lbf)
17362B
5.INSTALL NO. 2 AIR TUBE
17343D
6.INSTALL NO. 3 AIR HOSE
57104E
7.INSTALL FRONT CROSSMEMBER SUB-ASSEMBLY
51217A
8.INSTALL FRONT SUSPENSION MEMBER REINFORCEMENT RH
51218A
9.INSTALL FRONT SUSPENSION MEMBER REINFORCEMENT LH
51443
10.INSTALL REAR ENGINE UNDER COVER RH
51444
11.INSTALL REAR ENGINE UNDER COVER LH
16361A
12.INSTALL V-RIBBED BELT
for 2AD-FHV: Click hereEngine / Hybrid System>2AD-FHV ENGINE MECHANICAL>DRIVE BELT>INSTALLATION
for 2AD-FTV: Click hereEngine / Hybrid System>2AD-FTV ENGINE MECHANICAL>DRIVE BELT>INSTALLATION
13.CHARGE AIR CONDITIONING SYSTEM WITH REFRIGERANT
14.WARM UP ENGINE
15.INSPECT FOR REFRIGERANT LEAK
51441
16.INSTALL NO. 1 ENGINE UNDER COVER