UB80F AUTOMATIC TRANSMISSION / TRANSAXLE TRANSMISSION WIRE INSTALLATION
PROCEDURE

 82125J
1.INSTALL TRANSMISSION WIRE (w/ Stop And Start System)
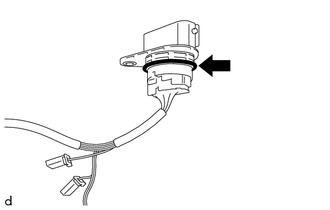
Coat the O-ring of the transmission wire with Toyota Genuine ATF WS.
Install the transmission wire to the automatic transaxle case sub-assembly with the bolt.
- Torque:
- 5.4 N*m (55 kgf*cm, 48 in.*lbf)
Connect the transmission revolution sensor (NT) connector and transmission revolution sensor (NC) connector.
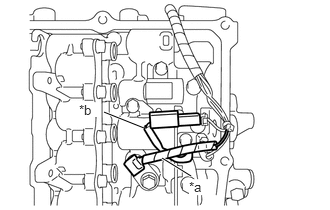
Install the temperature sensor to the transmission valve body assembly with the bolt and temperature sensor clamp.
- Torque:
- 10.8 N*m (110 kgf*cm, 8 ft.*lbf)
- NOTICE:
-
 1.688,1.646 1.99,1.833 true 1.083,1.167 1.5,1.333 true 1.969,1.865 2.198,2.031 0.229,0.167 10 true *a 0.823,1.063 1.052,1.219 0.229,0.156 10 true *b
*a Transmission Wire (Temperature Sensor Wire) *b Transmission Revolution Sensor (NC) Wire
-
To prevent it from being pinched between the transmission valve body assembly and the transmission case side cover, pass the transmission revolution sensor (NC) wire under the transmission wire (temperature sensor wire) as shown in the illustration.
Engage the clamp to connect the transmission wire (oil pump with solenoid assembly) to the solenoid lock plate.
Connect the transmission wire connector.
Engage the wire harness clamp to connect the transmission wire (oil pump with solenoid assembly).
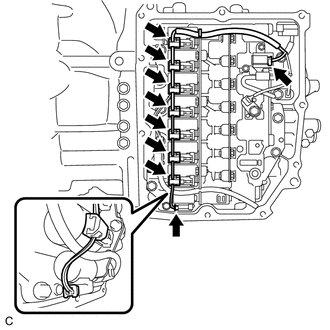
Connect the 9 solenoid valve connectors.
- NOTICE:
-
 0,0 0,0 false

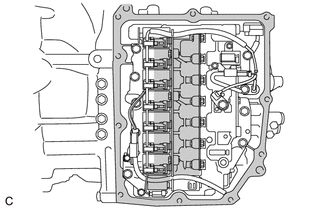
Do not let transmission wire protrude into this area.
- ·
To prevent it from being pinched between the transmission valve body assembly and the transmission case side cover, do not let the transmission wire ride up over the area shown in the illustration.
·To prevent it from being pinched between the transmission case side cover and the automatic transaxle case sub-assembly, do not let the transmission wire protrude toward the transmission case side cover installation surface.
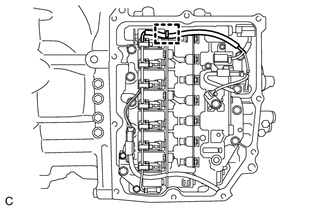
Engage the clamp to connect the transmission wire to the solenoid lock plate.
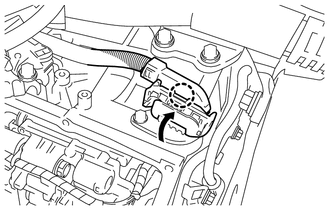
Connect the transmission wire connector and rotate the lever and engage the claw.
- HINT:
-
Rotate the lever until the claw of the transmission wire connector makes a click sound.
82125J
2.INSTALL TRANSMISSION WIRE (w/o Stop And Start System)
Coat the O-ring of the transmission wire with Toyota Genuine ATF WS.
Install the transmission wire to the automatic transaxle case sub-assembly with the bolt.
- Torque:
- 5.4 N*m (55 kgf*cm, 48 in.*lbf)
Connect the transmission revolution sensor (NT) connector and transmission revolution sensor (NC) connector.
Install the temperature sensor to the transmission valve body assembly with the bolt and temperature sensor clamp.
- Torque:
- 10.8 N*m (110 kgf*cm, 8 ft.*lbf)
- NOTICE:
-
1.688,1.646 1.99,1.833 true 1.083,1.167 1.5,1.333 true 1.969,1.865 2.198,2.031 0.229,0.167 10 true *a 0.823,1.063 1.052,1.219 0.229,0.156 10 true *b
*a Transmission Wire (Temperature Sensor Wire) *b Transmission Revolution Sensor (NC) Wire
-
To prevent it from being pinched between the transmission valve body assembly and the transmission case side cover, pass the transmission revolution sensor (NC) wire under the transmission wire (temperature sensor wire) as shown in the illustration.
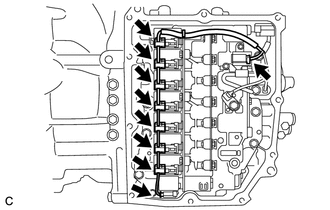
Connect the 9 solenoid valve connectors.
- NOTICE:
-
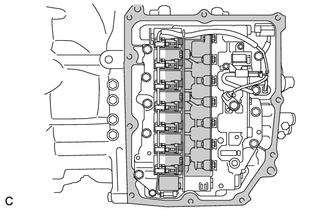 0,0 0,0 false
Do not let transmission wire protrude into this area.
- ·
To prevent it from being pinched between the transmission valve body assembly and the transmission case side cover, do not let the transmission wire ride up over the area shown in the illustration.
·To prevent it from being pinched between the transmission case side cover and the automatic transaxle case sub-assembly, do not let the transmission wire protrude toward the transmission case side cover installation surface.
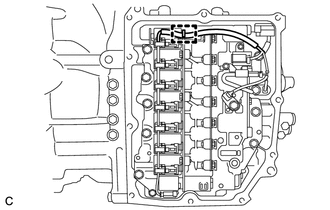
Engage the clamp to connect the transmission wire to the solenoid lock plate.
Connect the transmission wire connector and rotate the lever and engage the claw.
- HINT:
-
Rotate the lever until the claw of the transmission wire connector makes a click sound.
35151F
3.INSTALL TRANSMISSION CASE SIDE COVER
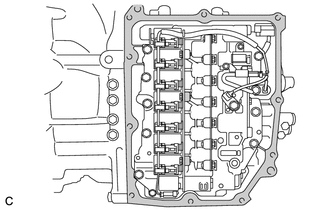
|
|
Area to be cleaned |
Clean the transmission case side cover installation surface of the automatic transaxle case sub-assembly.
- NOTICE:
-
Completely remove any oil or grease from the contact surfaces of the automatic transaxle case sub-assembly.
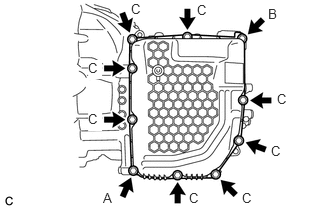
Temporarily install a new transmission case side cover to the automatic transaxle case sub-assembly with the 2 bolts ((A) and (B)).
- NOTICE:
-
To avoid damaging the gasket, prevent it from contacting the surrounding area during installation procedures.
Temporarily install the 8 bolts (C).
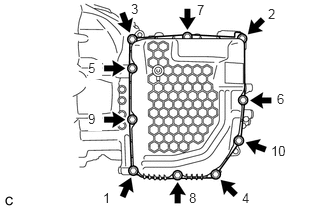
Tighten the 10 bolts in the order shown in the illustration.
- Torque:
- 7.0 N*m (71 kgf*cm, 62 in.*lbf)
32901C
4.INSTALL OIL COOLER UNION SUB-ASSEMBLY
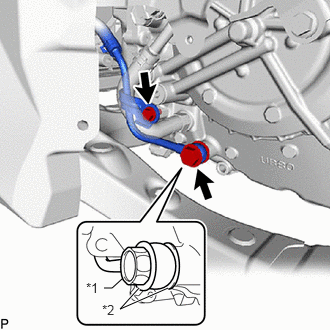
| *1 | Oil Cooler Union Bolt |
| *2 | Gasket |
Pass the oil cooler union sub-assembly through 2 new gaskets and temporarily install it to the automatic transaxle case sub-assembly with the oil cooler union bolt.
Temporarily install the oil cooler union sub-assembly bracket portion to the automatic transaxle case sub-assembly with the bolt.
Tighten the oil cooler union bolt.
- Torque:
- 22.6 N*m (230 kgf*cm, 17 ft.*lbf)
Tighten the bolt.
- Torque:
- 12 N*m (122 kgf*cm, 9 ft.*lbf)
12361A
5.INSTALL FRONT ENGINE MOUNTING INSULATOR
17650H
6.INSTALL VACUUM SWITCHING VALVE (for Active Control Engine Mount System)
7.ADJUST AUTOMATIC TRANSAXLE FLUID
53737D
8.INSTALL FRONT FENDER APRON SEAL LH
51420
9.INSTALL NO. 2 ENGINE UNDER COVER ASSEMBLY
51441
10.INSTALL NO. 1 ENGINE UNDER COVER
53895B
11.INSTALL FRONT FENDER FRONT SPLASH SHIELD RH
53896B
12.INSTALL FRONT FENDER FRONT SPLASH SHIELD LH