LIGHTING (EXT) HEADLIGHT ASSEMBLY(for Single Beam Headlight) REMOVAL
CAUTION / NOTICE / HINT
The necessary procedures (adjustment, calibration, initialization or registration) that must be performed after parts are installed, removed or replaced during the headlight ECU sub-assembly LH removal/installation are shown below.
| Replacement Part or Procedure | Necessary Procedures | Effects/Inoperative Functions when not Performed | Link |
|---|---|---|---|
| Headlight ECU sub-assembly LH | ·
Synchronize the vehicle information ·
Initialization of the headlight ECU sub-assembly LH |
Automatic headlight beam level control system | ( ) |
| Front bumper assembly (Including removal and installation) | ·
Ultrasonic sensor detection angle ·
Ultrasonic sensor detection angle registration |
Parking support brake system (for Gasoline model) | ()
|
| Front television camera view adjustment | Panoramic view monitor system (for Gasoline model) | ()
|
| Replacement Part or Procedure | Necessary Procedures | Effects/Inoperative Functions when not Performed | Link |
|---|---|---|---|
| Headlight ECU sub-assembly LH | ·
Synchronize the vehicle information ·
Initialization of the headlight ECU sub-assembly LH |
Automatic headlight beam level control system | ()
|
| Front bumper assembly (Including removal and installation) | ·
Ultrasonic sensor detection angle ·
Ultrasonic sensor detection angle registration |
Parking support brake system (for HV model) | ()
|
| Front television camera view adjustment | Panoramic view monitor system (for HV model) | ()
|
- NOTICE:
-
Even if the headlight ECU sub-assembly RH is replaced with a new one, synchronize the vehicle information and initialization are not necessary.
- HINT:
- ·
Use the same procedure for the RH and LH sides.
·The procedure listed below is for the LH side.
PROCEDURE

 1.REMOVE FRONT BUMPER ASSEMBLY
2.REMOVE HEADLIGHT ASSEMBLY LH
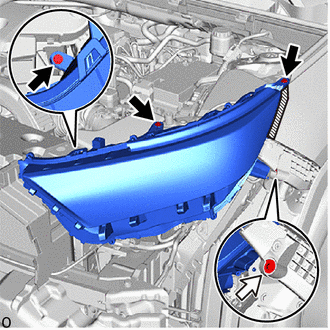

|
Screw |

|
Bolt |

|
Protective Tape |
Apply protective tape as shown in the illustration.
Remove the 3 screws and bolt.
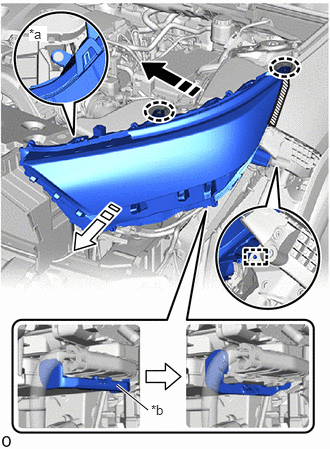
| *a | Lower Bracket |
| *b | Connector Lock Lever |

|
Place Hands Here |

|
Remove in this Direction (1) |

|
Remove in this Direction (2) |
Place your hand on 2 brackets of the headlight assembly LH to disconnect them from the screw seats.
- NOTICE:
-
Be careful not to break the bracket.
Slide the headlight assembly LH in the direction indicated by the arrow (1) and detach the guide and lower bracket.
Slide the headlight assembly LH in the direction indicated by the arrow (2) to remove it.
Release the connector lock lever and disconnect the connector under the headlight assembly LH.