NAVIGATION / MULTI INFO DISPLAY NAVIGATION SYSTEM B157D DAB Tuner Antenna Disconnected
DESCRIPTION
This DTC is stored when a malfunction occurs in the DAB tuner antenna which is connected to the radio and display receiver assembly.
| DTC No. | Detection Item | DTC Detection Condition | Trouble Area |
|---|---|---|---|
| B157D | DAB Tuner Antenna Disconnected | The DAB tuner antenna is not connected | ·
Back Window Glass (Window glass Antenna Wire) ·
No. 5 antenna cord sub-assembly ·
No. 4 antenna cord sub-assembly ·
No. 3 Antenna cord sub-assembly ·
Antenna cord sub-assembly ·
Radio and display receiver assembly |
WIRING DIAGRAM
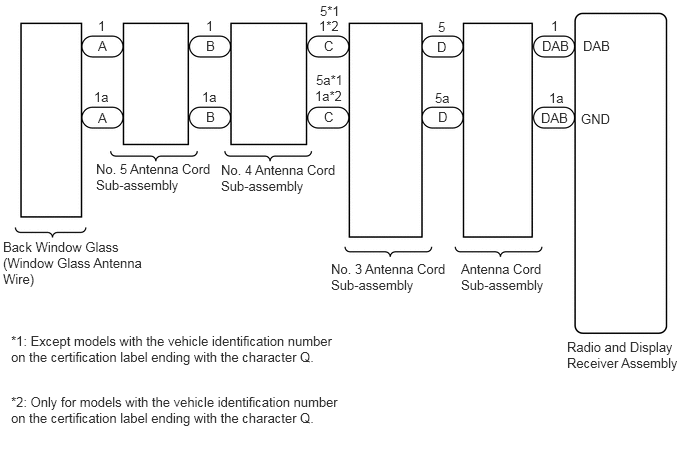
CAUTION / NOTICE / HINT
- NOTICE:
- ·
Check that the wire harness is properly installed and does not have any sharp bends, pinching or loose connections.
Click hereGeneral>INTRODUCTION>HOW TO TROUBLESHOOT ECU CONTROLLED SYSTEMS>HOW TO PROCEED WITH TROUBLESHOOTING
·When replacing the radio and display receiver assembly, always replace it with a new one. If a radio and display receiver assembly which was installed to another vehicle is used, the following may occur:
-A communication malfunction DTC may be stored.
-The radio and display receiver assembly may not operate normally.
- HINT:
-
Depending on the parts that are replaced during vehicle inspection or maintenance, performing initialization, registration or calibration may be needed. Refer to Precaution for Navigation System.
-
Click hereAudio / Visual / Telematics>NAVIGATION / MULTI INFO DISPLAY>NAVIGATION SYSTEM>PRECAUTION
PROCEDURE
Clear the DTCs.
Click hereAudio / Visual / Telematics>NAVIGATION / MULTI INFO DISPLAY>NAVIGATION SYSTEM>DTC CHECK / CLEAR
- Body Electrical > Navigation System > Clear DTCs
- 50002 212
Check for DTCs.
Click hereAudio / Visual / Telematics>NAVIGATION / MULTI INFO DISPLAY>NAVIGATION SYSTEM>DTC CHECK / CLEAR
- Body Electrical > Navigation System > Trouble Codes
- 50001 212
- OK:
No DTCs are output.
- Result:
Proceed to OK NG
OK
Click hereGeneral>INTRODUCTION>HOW TO TROUBLESHOOT ECU CONTROLLED SYSTEMS>HOW TO PROCEED WITH TROUBLESHOOTING
NG
Check if any optional components that may decrease reception capacity, such as a telephone antenna, are installed.
- OK:
Optional components are installed.
- NOTICE:
-
Do not remove optional components without permission of the customer.
- Result:
Proceed to OK NG
OK
NG
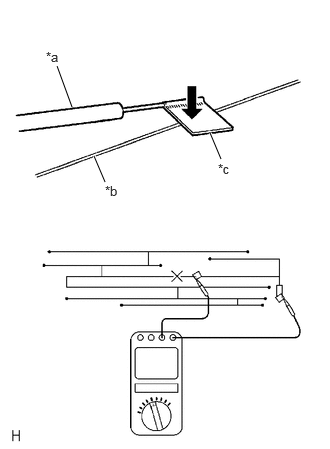
| *a | Tester Probe |
| *b | Antenna Wire |
| *c | Tin Foil |
Check for continuity in the window glass antenna wire.
- NOTICE:
-
When cleaning the glass, wipe it in the direction of the wire with a soft dry cloth. Take care not to damage the wire. Do not use detergents or glass cleaners with abrasive ingredients. When measuring resistance, wrap a piece of tin foil around the tip of each probe and press the foil against the wire with your finger as shown in the illustration.
- HINT:
-
Check for continuity at the center of each antenna wire as shown in the illustration.
- OK:
There is continuity in the window glass antenna wire.
- Result:
Proceed to OK NG
OK
NG
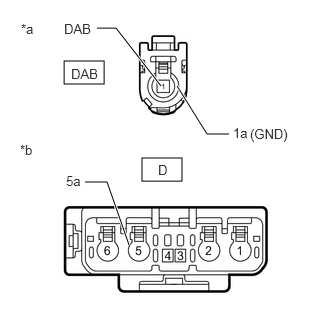
| *a | Front view of wire harness connector
(to Radio and Display Receiver Assembly) |
| *b | Front view of wire harness connector
(to No. 3 Antenna Cord Sub-assembly) |
Disconnect the antenna connector from the radio and display receiver assembly.
Disconnect the antenna connector from the No. 3 antenna cord sub-assembly.
Measure the resistance according to the value(s) in the table below.
- Standard Resistance:
Tester Connection Condition Specified Condition DAB-1 (DAB) - D-5 Always Below 1 Ω DAB-1a (GND) - D-5a Always Below 1 Ω DAB-1 (DAB) - Body ground Always 10 kΩ or higher
- Result:
Proceed to OK NG
OK
NG
Click hereAudio / Visual / Telematics>AUDIO / VIDEO>RADIO ANTENNA CORD (for Instrument Panel)>REMOVAL
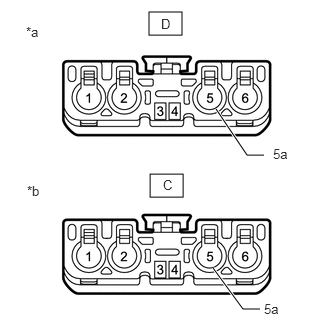
| *a | Front view of wire harness connector
(to Antenna Cord Sub-assembly) |
| *b | Front view of wire harness connector
(to No. 4 Antenna Cord Sub-assembly) |
Disconnect the antenna connector from the antenna cord sub-assembly.
Disconnect the antenna connector from the No. 4 antenna cord sub-assembly.
Measure the resistance according to the value(s) in the table below.
- Standard Resistance:
Tester Connection Condition Specified Condition D-5 - C-5 Always Below 1 Ω D-5a - C-5a Always Below 1 Ω D-5 - Body ground Always 10 kΩ or higher
- Result:
Proceed to OK NG
OK
NG
Choose the model to be inspected.
- Result:
Result Proceed to Except models with the vehicle identification number on the certification label ending with the character Q. A Only for models with the vehicle identification number on the certification label ending with the character Q. B
A
B
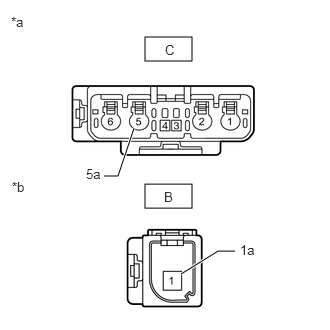
| *a | Front view of wire harness connector
(to No. 3 Antenna Cord Sub-assembly) |
| *b | Front view of wire harness connector
(to No. 5 Antenna Cord Sub-assembly) |
Disconnect the antenna connector from the No. 3 antenna cord sub-assembly.
Disconnect the antenna connector from the No. 5 antenna cord sub-assembly.
Measure the resistance according to the value(s) in the table below.
- Standard Resistance:
Tester Connection Condition Specified Condition C-5 - B-1 Always Below 1 Ω C-5a - B-1a Always Below 1 Ω C-5 - Body ground Always 10 kΩ or higher
- Result:
Proceed to OK NG
OK
NG
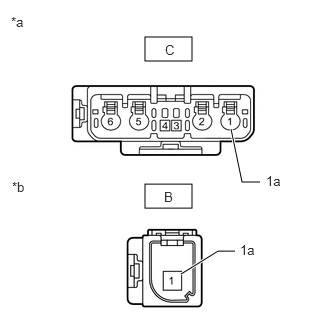
| *a | Front view of wire harness connector
(to No. 3 Antenna Cord Sub-assembly) |
| *b | Front view of wire harness connector
(to No. 5 Antenna Cord Sub-assembly) |
Disconnect the antenna connector from the No. 3 antenna cord sub-assembly.
Disconnect the antenna connector from the No. 5 antenna cord sub-assembly.
Measure the resistance according to the value(s) in the table below.
- Standard Resistance:
Tester Connection Condition Specified Condition C-1 - B-1 Always Below 1 Ω C-1a - B-1a Always Below 1 Ω C-1 - Body ground Always 10 kΩ or higher
- Result:
Proceed to OK NG
OK
NG
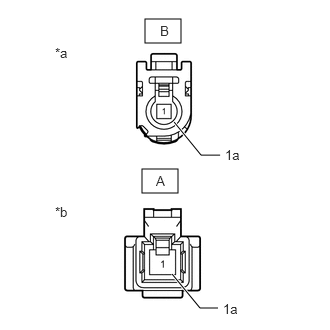
| *a | Front view of wire harness connector
(to No. 4 Antenna Cord Sub-assembly) |
| *b | Front view of wire harness connector
(to Back Window Glass [Window Glass Antenna Wire]) |
Disconnect the antenna connector from the No. 4 antenna cord sub-assembly.
Disconnect the antenna connector from the back window glass (window glass antenna wire).
Measure the resistance according to the value(s) in the table below.
- Standard Resistance:
Tester Connection Condition Specified Condition B-1 - A-1 Always Below 1 Ω B-1a - A-1a Always Below 1 Ω B-1 - Body ground Always 10 kΩ or higher
- Result:
Proceed to OK NG
OK
NG
Replace the back window glass (Window Glass Antenna Wire) with a new or known good one.
Click hereVehicle Exterior>WINDOW / GLASS>BACK DOOR GLASS>REMOVAL
Clear the DTCs.
Click hereAudio / Visual / Telematics>NAVIGATION / MULTI INFO DISPLAY>NAVIGATION SYSTEM>DTC CHECK / CLEAR
- Body Electrical > Navigation System > Clear DTCs
- 50002 212
Recheck for DTCs and check that no DTCs are output.
Click hereAudio / Visual / Telematics>NAVIGATION / MULTI INFO DISPLAY>NAVIGATION SYSTEM>DTC CHECK / CLEAR
- Body Electrical > Navigation System > Trouble Codes
- 50001 212
- OK:
No DTCs are output.
- Result:
Proceed to OK NG
OK
NG