Q610 HYBRID TRANSMISSION / TRANSAXLE HYBRID TRANSAXLE FLUID ON-VEHICLE INSPECTION
CAUTION / NOTICE / HINT
- NOTICE:
-
For the hybrid transaxle fluid, use Toyota Genuine ATF WS.
PROCEDURE

 58398F
1.REMOVE NO. 1 FLOOR UNDER COVER (w/ No. 1 Floor Under Cover)
2.INSPECT HYBRID TRANSAXLE FLUID
Make sure that the vehicle will remain level, and lift the vehicle.
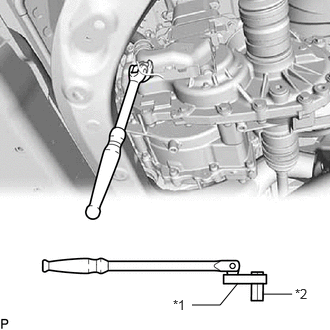
| *1 | 10 mm Union Nut Wrench |
| *2 | 10 mm Straight Hexagon |
Using a 10 mm union nut wrench and 10 mm straight hexagon, remove the filler plug and gasket from the rear traction motor with transaxle assembly.
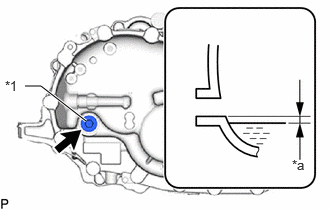
| *1 | Filler Plug |
| *a | 0 to 5 mm (0 to 0.196 in.) |
Check that the hybrid transaxle fluid level is between 0 to 5 mm (0 to 0.196 in.) from the bottom lip of the filler plug opening. (If the hybrid transaxle fluid level is too low, return to the Add Hybrid Transaxle Fluid procedure.)
- NOTICE:
- ·
Stop the vehicle on a level surface.
·Be sure to directly check that the hybrid transaxle fluid level is within the specified range.
·An insufficient or excessive amount of hybrid transaxle fluid may damage the rear traction motor with transaxle assembly.
·If the hybrid transaxle fluid was replaced or hybrid transaxle fluid was added, make sure to recheck the hybrid transaxle fluid level after driving the vehicle.
Check for leaks if the hybrid transaxle fluid level is low. (If there are no hybrid transaxle fluid leaks but the amount of the hybrid transaxle fluid is insufficient, add hybrid transaxle fluid.)
Click hereDrivetrain>Q610 (HYBRID TRANSMISSION / TRANSAXLE)>HYBRID TRANSAXLE FLUID>ADJUSTMENT
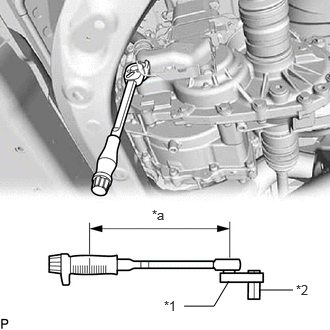
| *1 | 10 mm Union Nut Wrench |
| *2 | 10 mm Straight Hexagon |
| *a | Torque Wrench Fulcrum Length |
Using a 10 mm union nut wrench and 10 mm straight hexagon, install the filler plug and a new gasket to the rear traction motor with transaxle assembly.
- Torque:
- Specified tightening torque : 39 N*m (398 kgf*cm, 29 ft.*lbf)
- HINT:
- ·
Calculate the torque wrench reading when changing the fulcrum length of the torque wrench.
Click hereGeneral>INTRODUCTION>REPAIR INSTRUCTION>PRECAUTION
·When using a union nut wrench (fulcrum length of 22 mm (0.8661 in.)) + torque wrench (fulcrum length of 180 mm (7.0866 in.)): 34.8 N*m (355 kgf*cm, 26 ft.*lbf)
3.INSPECT FOR HYBRID TRANSAXLE FLUID LEAK
58398F
4.INSTALL NO. 1 FLOOR UNDER COVER (w/ No. 1 Floor Under Cover)