REAR SUSPENSION REAR SUSPENSION MEMBER(for HV Model 4WD/AWD) INSTALLATION
PROCEDURE

 1.INSTALL HOLE PLUG
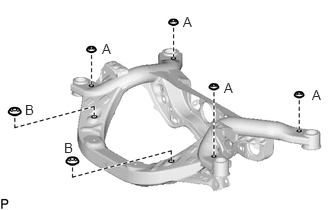
Install the 6 hole plugs to the rear suspension member sub-assembly.
- HINT:
-
There are 2 different shapes of hole plug.
41651G
2.INSTALL DIFFERENTIAL MOUNT CUSHION
Using SST, install a new differential mount cushion.
- SST
- 09316-12010
09570-24011
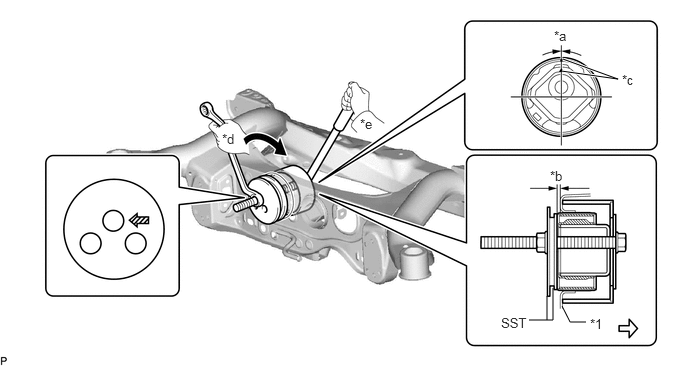
| *1 | Rear Suspension Member Sub-assembly | - | - |
| *a | -3° to 3° | *b | 3.1 to 4.1 mm (0.1220 to 0.1614 in.) |
| *c | Protrusion | *d | Turn |
| *e | Hold | - | - |

|
Turning Direction | 
|
Front of Vehicle |

|
SST Bolt Position | - | - |
- NOTICE:
- ·
Make sure that the differential mount cushion is aligned within 3° from the center.
·Install the differential mount cushion so that the protrusion is positioned as shown in the illustration.
·Be sure to use the correct combination of SST.
·Before using SST, apply grease to SST bolt.
·Temporarily install the differential mount cushion to the rear suspension member sub-assembly in order to prevent it from tilting, and then install SST.
·Make sure that SST contacts the entire circumference of the differential mount cushion.
·Do not tilt the bolts of SST.
52271D
3.INSTALL REAR SUSPENSION MEMBER FRONT BODY MOUNTING CUSHION (for LH Side)
52271D
4.INSTALL REAR SUSPENSION MEMBER FRONT BODY MOUNTING CUSHION (for RH Side)
52276A
5.INSTALL REAR SUSPENSION MEMBER REAR BODY MOUNT CUSHION LH
52275B
6.INSTALL REAR SUSPENSION MEMBER REAR BODY MOUNT CUSHION RH
48790
7.INSTALL REAR UPPER CONTROL ARM ASSEMBLY LH
48770A
8.INSTALL REAR UPPER CONTROL ARM ASSEMBLY RH
- HINT:
-
Perform the same procedure as for the LH side.
G1050
9.INSTALL REAR TRACTION MOTOR WITH TRANSAXLE ASSEMBLY
10.CONNECT WIRE HARNESS
51206A
11.INSTALL REAR SUSPENSION MEMBER SUB-ASSEMBLY
Install the 4 rear suspension member cushions to the rear suspension member sub-assembly.
- HINT:
-
When reusing the rear suspension member cushion, make sure to check its identification mark and install it to the correct position.
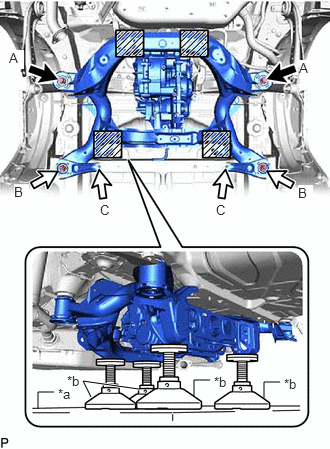
| *a | Engine Lifter |
| *b | Attachment |

|
Attachment and Wooden Block Placement Location |
Using an engine lifter and 4 attachments or equivalent tools, support the rear suspension member sub-assembly as shown in the illustration.
- CAUTION:
-
- ·
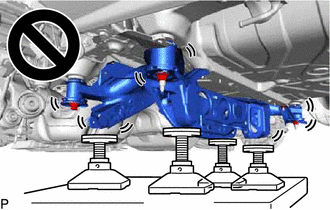
The rear suspension member sub-assembly is a very heavy component. Make sure that it is supported securely.
·If the rear suspension member sub-assembly is not securely supported, it may drop, resulting in serious injury.
- NOTICE:
- ·
Use attachments or equivalent tools to keep the rear suspension member sub-assembly level.
·Keep supporting the rear suspension member sub-assembly until the installation has been completed.
Raise the rear suspension member sub-assembly until there is no clearance between the rear suspension member sub-assembly and vehicle.
Install the rear suspension member sub-assembly with the 2 rear suspension member lower stoppers, rear suspension member lower brace LH and rear suspension member lower brace RH, 2 bolts and 4 nuts.
- Torque:
- Bolt A : 158 N*m (1611 kgf*cm, 117 ft.*lbf)
- Nut B : 158 N*m (1611 kgf*cm, 117 ft.*lbf)
- Nut C : 18 N*m (184 kgf*cm, 13 ft.*lbf)
Engage the 5 clamps to install the wire harness.
Pass the connector through the hole to the inside of the vehicle and install the grommet of the wire harness.
Connect the 2 connectors.
821H1
12.INSTALL HV FLOOR UNDER WIRE
- CAUTION:
-
Be sure to wear insulated gloves.
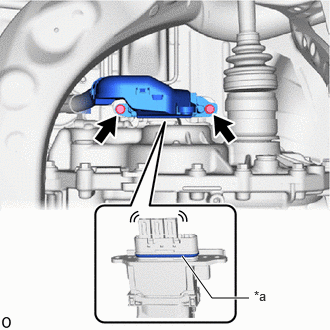
| *a | Waterproof Seal |
Install the HV floor under wire to the rear traction motor with transaxle assembly with the 2 bolts.
- Torque:
- 8.0 N*m (82 kgf*cm, 71 in.*lbf)
- NOTICE:
- ·
Make sure that the connector is fully engaged.
·Do not damage the terminals, interlock connector or rear traction motor with transaxle assembly during installation.
·Do not touch the waterproof seal or terminals of the connector.
·Do not allow any foreign matter or water to enter the rear traction motor with transaxle assembly.
·Although the connector may feel loose, this is not due to a malfunction.
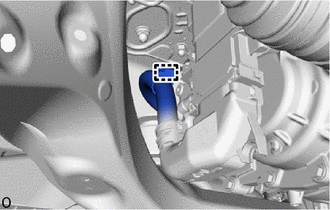
Engage the clamp.
48720A
13.TEMPORARILY INSTALL REAR NO. 1 SUSPENSION ARM ASSEMBLY LH
Temporarily install the rear No. 1 suspension arm assembly to the rear suspension member sub-assembly with the bolt and nut.
- NOTICE:
- ·
Because the nut has its own stopper, do not turn the nut. Tighten the bolt with the nut secured.
·Insert the bolt with the threaded end facing the rear of the vehicle.
48710A
14.TEMPORARILY INSTALL REAR NO. 1 SUSPENSION ARM ASSEMBLY RH
- HINT:
-
Perform the same procedure as for the LH side.
48740F
15.TEMPORARILY INSTALL REAR NO. 2 SUSPENSION ARM ASSEMBLY LH
48730F
16.TEMPORARILY INSTALL REAR NO. 2 SUSPENSION ARM ASSEMBLY RH
- HINT:
-
Perform the same procedure as for the LH side.
17.INSTALL REAR DRIVE SHAFT ASSEMBLY LH
18.INSTALL REAR DRIVE SHAFT ASSEMBLY RH
- HINT:
-
Perform the same procedure as for the LH side.
48812
19.INSTALL REAR STABILIZER BAR
64740E
20.INSTALL DECK TRIM SIDE PANEL ASSEMBLY LH
58460D
21.INSTALL LUGGAGE HOLD BELT STRIKER ASSEMBLY
73708A
22.INSTALL TETHER ANCHOR BRACKET SET
62552F
23.INSTALL REAR SEAT SIDE GARNISH LH
62332C
24.INSTALL REAR DOOR OPENING TRIM WEATHERSTRIP LH
67918E
25.INSTALL REAR DOOR SCUFF PLATE LH
58577E
26.INSTALL REAR NO. 1 FLOOR MAT SUPPORT SIDE PLATE
58386
27.INSTALL REAR FLOOR FINISH PLATE
58417H
28.INSTALL REAR NO. 3 FLOOR BOARD
64993
29.INSTALL REAR DECK FLOOR BOX (w/o Spare Tire)
58410B
30.INSTALL DECK BOARD ASSEMBLY
64910N
31.INSTALL TONNEAU COVER ASSEMBLY (w/ Tonneau Cover)
73706
32.INSTALL CHILD RESTRAINT SEAT ANCHOR BRACKET SUB-ASSEMBLY LH
33.INSTALL REAR SEAT ASSEMBLY
34.STABILIZE SUSPENSION
48720A
35.INSTALL REAR NO. 1 SUSPENSION ARM ASSEMBLY LH
48710A
36.INSTALL REAR NO. 1 SUSPENSION ARM ASSEMBLY RH
- HINT:
-
Perform the same procedure as for the LH side.
58398F
37.INSTALL NO. 1 FLOOR UNDER COVER (w/ NO. 1 FLOOR UNDER COVER)
Install the No. 1 floor under cover to the rear suspension member sub-assembly with the 3 bolts and 3 clips.
- Torque:
- Bolt : 7.5 N*m (76 kgf*cm, 66 in.*lbf)
G3834
38.INSTALL SERVICE PLUG GRIP
39.INSTALL REAR WHEEL
40.INSPECT AND ADJUST REAR WHEEL ALIGNMENT
41.PERFORM INITIALIZATION
| Parking Support Brake System (for HV model) | ( ) |
| Parking Assist Monitor System | ()
|
| Panoramic View Monitor System (for HV model) | ()
|
| Lighting System (EXT) | ()
|