STEERING GEAR / LINKAGE STEERING GEAR INSTALLATION
PROCEDURE

 45319
1.INSTALL STEERING GEAR HEAT INSULATOR (for RHD)
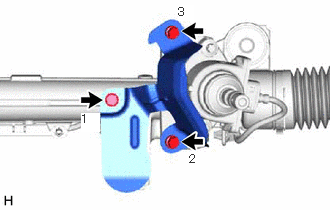
Install the steering gear heat insulator to the rack and pinion power steering gear assembly with the 3 bolts in the order shown in the illustration.
- Torque:
- 8.0 N*m (82 kgf*cm, 71 in.*lbf)
45470
2.TEMPORARILY INSTALL TIE ROD ASSEMBLY LH
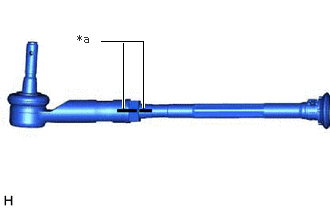
| *a | Matchmark |
Install the lock nut and tie rod assembly LH to the rack and pinion power steering gear assembly until the matchmarks are aligned.
- HINT:
-
After adjusting the toe-in, tighten the lock nut.
45460
3.TEMPORARILY INSTALL TIE ROD ASSEMBLY RH
- HINT:
-
Perform the same procedure as for the LH side.
44250
4.INSTALL RACK AND PINION POWER STEERING GEAR ASSEMBLY
Install the rack and pinion power steering gear assembly to the front frame assembly with the 4 bolts and 4 new nuts.
- Torque:
- 88 N*m (897 kgf*cm, 65 ft.*lbf)
- NOTICE:
-
Because the nut has its own stopper, do not turn the nut. Tighten the bolt with the nut secured.
5.INSTALL FRONT STABILIZER BAR WITH BRACKET
Install the front stabilizer bar with 2 front stabilizer links, front No. 1 stabilizer bracket LH, front No. 1 stabilizer bracket RH and 2 front No. 1 stabilizer bar bushings to the front frame assembly.
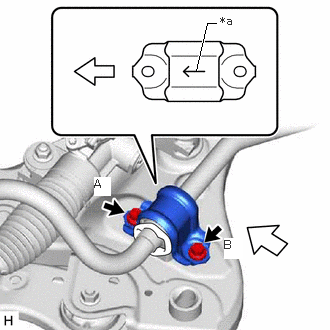
| *a | Arrow |

|
Front of the Vehicle |
Install the front No. 1 stabilizer bracket LH to the front frame assembly with the 2 bolts.
- Torque:
- 44 N*m (449 kgf*cm, 32 ft.*lbf)
- NOTICE:
- ·
Make sure to install the front No. 1 stabilizer bracket LH with its arrow facing the front of the vehicle.
·Temporarily install the bolt (B) and then tighten the 2 bolts in the order of (A) and (B).
Install the front No. 1 stabilizer bracket RH to the front frame assembly with the 2 bolts.
- HINT:
-
Perform the same procedure as for the LH side.
6.INSTALL FRONT FRAME ASSEMBLY
7.CONNECT WIRE HARNESS (for LHD)
Install the wire harness to the rack and pinion power steering gear assembly with the 2 bolts.
- Torque:
- 10 N*m (102 kgf*cm, 7 ft.*lbf)
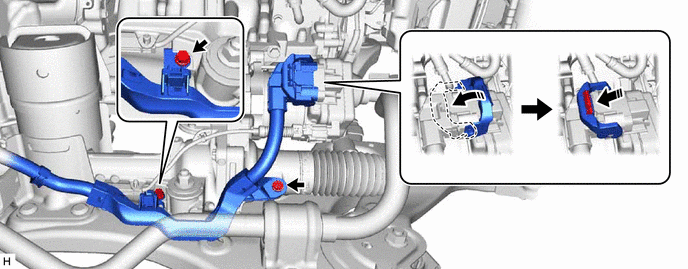
Connect the wire harness connector to the rack and pinion power steering gear assembly.
- HINT:
-
Make sure that the connector is fully inserted before rotating the lock lever to engage the lock.
8.CONNECT WIRE HARNESS (for RHD)
Install the wire harness to the rack and pinion power steering gear assembly with the bolt.
- Torque:
- 10 N*m (102 kgf*cm, 7 ft.*lbf)
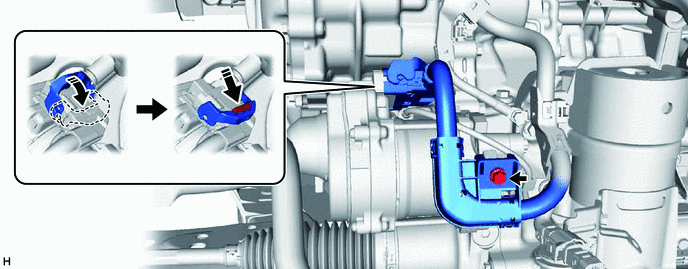
Connect the wire harness connector to the rack and pinion power steering gear assembly.
- HINT:
-
Make sure that the connector is fully inserted before rotating the lock lever to engage the lock.
45319
9.INSTALL STEERING GEAR HEAT INSULATOR (for LHD)
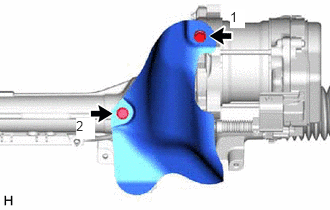
Install the steering gear heat insulator to the rack and pinion power steering gear assembly with the 2 bolts in the order shown in the illustration.
- Torque:
- 8.0 N*m (82 kgf*cm, 71 in.*lbf)
10.INSTALL ENGINE ASSEMBLY WITH TRANSAXLE
for A25A-FKS: Click hereEngine / Hybrid System>A25A-FKS (ENGINE MECHANICAL)>ENGINE ASSEMBLY>INSTALLATION
for M20A-FKS: Click hereEngine / Hybrid System>M20A-FKS (ENGINE MECHANICAL)>ENGINE ASSEMBLY>INSTALLATION
for A25A-FXS: Click hereEngine / Hybrid System>A25A-FXS (ENGINE MECHANICAL)>ENGINE ASSEMBLY>INSTALLATION
for A25B-FXS: Click hereEngine / Hybrid System>A25B-FXS (ENGINE MECHANICAL)>ENGINE ASSEMBLY>INSTALLATION
45470
11.CONNECT TIE ROD ASSEMBLY LH
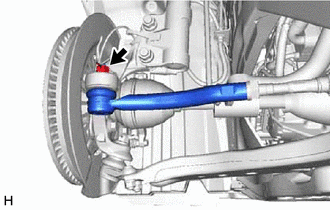
Connect the tie rod assembly LH to the steering knuckle LH with the nut.
- Torque:
- 49 N*m (500 kgf*cm, 36 ft.*lbf)
- NOTICE:
- ·
Do not damage the ball joint dust cover.
·Further tighten the nut up to 60° if the holes for the cotter pin are not aligned.
Install a new cotter pin.
45460
12.CONNECT TIE ROD ASSEMBLY RH
- HINT:
-
Perform the same procedure as for the LH side.
45220
13.CONNECT STEERING INTERMEDIATE SHAFT ASSEMBLY
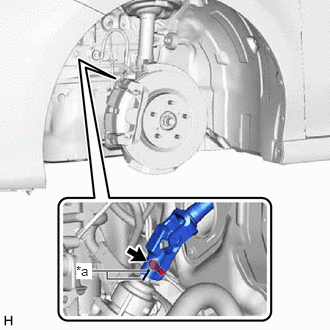
| *a | Matchmark |
Align the matchmarks on the steering intermediate shaft assembly and rack and pinion power steering gear assembly.
Connect the steering intermediate shaft assembly to the rack and pinion power steering gear assembly.
Install the bolt.
- Torque:
- 35 N*m (357 kgf*cm, 26 ft.*lbf)
14.INSTALL FRONT WHEELS
15.INSPECT AND ADJUST FRONT WHEEL ALIGNMENT
45047
16.FULLY TIGHTEN TIE ROD END SUB-ASSEMBLY LH
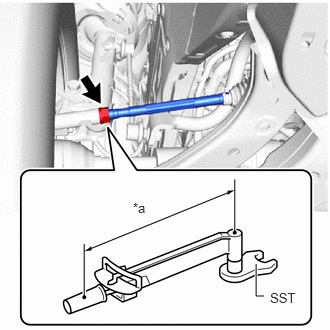
| *a | Torque Wrench Fulcrum Length |
Using SST, tighten the tie rod end sub-assembly lock nuts.
- SST
- 09612-24014 (09617-24011)
- Torque:
- Specified Tightening Torque : 88 N*m (897 kgf*cm, 65 ft.*lbf)
- NOTICE:
-
Make sure that the boots are not twisted.
- HINT:
- ·
Calculate the torque wrench reading when changing the fulcrum length of the torque wrench.
Click hereGeneral>INTRODUCTION>REPAIR INSTRUCTION>PRECAUTION
·When using SST (fulcrum length of 52 mm (2.0472 in.)) + torque wrench (fulcrum length of 380 mm (14.9606 in.)):
77.4 N*m (789 kgf*cm, 57 ft.*lbf)
45046
17.FULLY TIGHTEN TIE ROD END SUB-ASSEMBLY RH
- HINT:
-
Perform the same procedure as for the LH side.
18. TORQUE SENSOR ZERO POINT CALIBRATION