FRONT SUSPENSION FRONT LOWER BALL JOINT REMOVAL
CAUTION / NOTICE / HINT
The necessary procedures (adjustment, calibration, initialization, or registration) that must be performed after parts are removed and installed, or replaced during front lower ball joint assembly removal/installation are shown below.
| Replaced Part or Performed Procedure | Necessary Procedure | Effect/Inoperative Function when Necessary Procedure not Performed | Link |
|---|---|---|---|
|
*: When performing learning using the GTS. Click here( |
|||
| Disconnect cable from negative (-) auxiliary battery terminal | Perform steering sensor zero point calibration | Lane control system | ( ) |
| Parking support brake system (for HV model)* | |||
| Pre-collision system | |||
| Memorize steering angle neutral point | Parking Assist Monitor System | ()
|
|
| Panoramic View Monitor System (for HV model) | ()
|
||
| Reset back door close position | Power Back Door System (for HV model) | ()
|
|
| Power back door initialization | Power Door Lock Control System | ()
|
|
| Front wheel alignment adjustment | 1.
Clear zero point calibration data. 2.
Perform yaw rate and acceleration sensor zero point calibration. |
·
DTCs are stored ·
ABS warning light illuminates ·
Brake warning light / yellow (minor malfunction) illuminates ·
Slip indicator light illuminates ·
VSC disabled or malfunctions |
()
|
| Replaced Part or Performed Procedure | Necessary Procedure | Effect/Inoperative Function when Necessary Procedure not Performed | Link |
|---|---|---|---|
| Front wheel alignment adjustment | ·
Perform reset memory ·
Perform acceleration sensor zero point calibration and store system information memorization. |
·
VSC is disabled or malfunctions ·
DTCs are output ·
Slip indicator light illuminates ·
ABS warning light illuminates |
()
|
- NOTICE:
- for HV Model:
- ·
When removing or installing the front disc brake caliper assembly, pushing back the disc brake piston may cause a large clearance between the brake pads and brake disc. When the brake pedal is depressed with a large clearance between the brake pads and the brake disc, DTC C1214 related to abnormal brake fluid pressure may be stored. Make sure to clear any DTCs after performing this procedure.
·While the auxiliary battery is connected, even if the power switch is off, the brake control system activates when the brake pedal is depressed or any door courtesy switch turns on. Therefore, when servicing the brake system components, do not operate the brake pedal or open/close the doors while the auxiliary battery is connected.
- HINT:
- ·
Use the same procedure for the RH side and LH side.
·The following procedure is for the LH side.
PROCEDURE

 1.REMOVE FRONT AXLE ASSEMBLY
43340A
2.REMOVE FRONT LOWER BALL JOINT ASSEMBLY (for Steel Steering Knuckle)
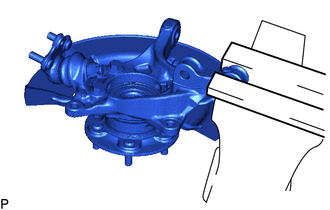
Secure the front axle assembly in a vise using aluminum plates.
- NOTICE:
-
Do not overtighten the vise.
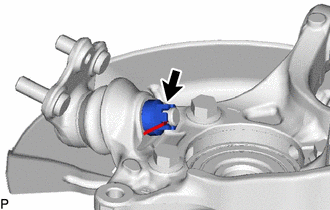
Remove the cotter pin.
Remove the nut.
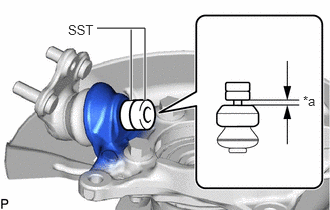
| *a | 1 mm (0.0394 in.) |
Install SST to the front lower ball joint assembly as shown in the illustration.
- SST
- 09960-20010 (09961-02050)
- NOTICE:
-
Check that the clearance measurement between SST and the front axle assembly is 1 mm (0.0394 in.).
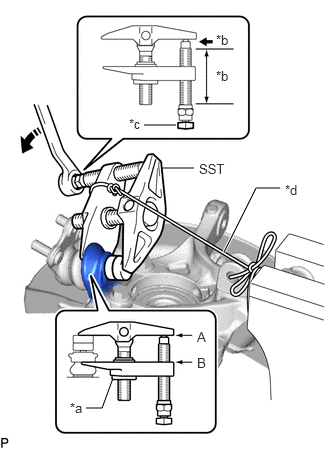
| *a | Center Nut |
| *b | Molybdenum Grease Application Area |
| *c | Place wrench here |
| *d | String |

|
Turn |
Using SST, remove the front lower ball joint assembly from the front axle assembly as shown in the illustration.
- SST
- 09960-20010 (09961-02010, 09961-02050)
- CAUTION:
-
Apply molybdenum grease to the threads and end of the SST bolt.
- NOTICE:
- ·
Be sure to tighten the string firmly to secure SST to the front axle assembly to prevent SST from falling off.
·Install SST with the center nut so that (A) and (B) shown in the illustration are parallel. Otherwise, the front lower ball joint dust cover may be damaged.
·Be sure to place a wrench on the part shown in the illustration.
·Do not damage the front lower ball joint dust cover.
·Do not damage the steering knuckle.
·Do not damage the front disc brake dust cover.
43340A
3.REMOVE FRONT LOWER BALL JOINT ASSEMBLY (for Aluminum Steering Knuckle)
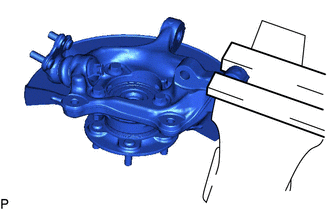
Secure the front axle assembly in a vise using aluminum plates.
- NOTICE:
-
Do not overtighten the vise.
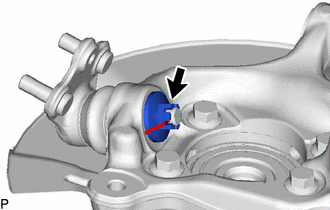
Remove the cotter pin.
Remove the nut.
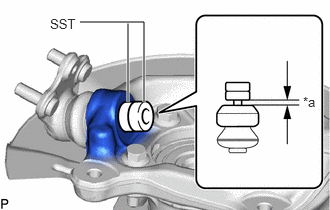
| *a | 1 mm (0.0394 in.) |
Install SST to the front lower ball joint assembly as shown in the illustration.
- SST
- 09960-20010 (09961-02050)
- NOTICE:
- ·
Make sure to install the spacers (SST) as the steering knuckle spacer may shift.
·Check that the clearance measurement between SST and the front axle assembly is 1 mm (0.0394 in.).
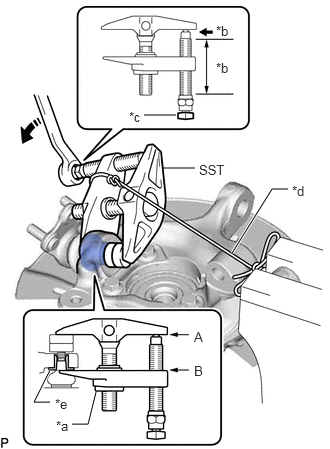
| *a | Center Nut |
| *b | Molybdenum Grease Application Area |
| *c | Place wrench here |
| *d | String |
| *e | Spacer |
|
|
Turn |
Using SST, remove the front lower ball joint assembly from the front axle assembly as shown in the illustration.
- SST
- 09960-20010 (09961-02010, 09961-02050)
- CAUTION:
-
Apply molybdenum grease to the threads and end of the SST bolt.
- NOTICE:
- ·
Be sure to tighten the string firmly to secure SST to the front axle assembly to prevent SST from falling off.
·Install SST with the center nut so that (A) and (B) shown in the illustration are parallel. Otherwise, the front lower ball joint dust cover may be damaged.
·Be sure to place a wrench on the part shown in the illustration.
·Do not damage the front lower ball joint dust cover.
·Do not damage the steering knuckle.
·Do not damage the front disc brake dust cover.
·Make sure that SST is securely positioned on the spacer.
- HINT:
- ·
If the steering knuckle spacer has come off, replace the steering knuckle with a new one.