M20A-FKS ENGINE MECHANICAL CYLINDER BLOCK DISASSEMBLY
CAUTION / NOTICE / HINT
The necessary procedures (adjustment, calibration, initialization, or registration) that must be performed after parts are removed and installed, or replaced during cylinder block removal/installation are shown below.
| Replaced Part or Performed Procedure | Necessary Procedure | Effect/Inoperative Function when Necessary Procedure not Performed | Link |
|---|---|---|---|
|
*1: When performing learning using the GTS. Click here( *2: w/ Gasoline Particulate Filter |
|||
| Battery terminal is disconnected/reconnected | Drive the vehicle until stop and start control is permitted (approximately 5 to 60 minutes) | Stop and start system | ( ) |
| Perform steering sensor zero point calibration | Lane control system | ()
|
|
| Parking support brake system (for Gasoline model)*1 | |||
| Pre-collision system | |||
| Memorize steering angle neutral point | Parking assist monitor system | ()
|
|
| Panoramic view monitor system (for Gasoline model) | ()
|
||
| Reset back door close position | Power back door system (for Gasoline model) | ()
|
|
| Power back door initialization | Power door lock control system | ()
|
|
| Replacement of ECM | Perform Vehicle Identification Number (VIN) or frame number registration | DTC P063051 is output | ()
|
| ECU communication ID registration | Engine start function | See Service Bulletin for the registration method. | |
for M20A-FKS:
GPF Deposition Values*2 -
GPF deposition values save -
GPF deposition values write |
·
MIL comes on ·
Deterioration of fuel efficiency |
()
|
|
for K120:
·
Perform reset memory ·
Perform road test to allow TCM to learn |
·
Large shift shock ·
Deterioration of fuel efficiency |
()
|
|
for K120F:
·
Perform reset memory ·
Perform road test to allow TCM to learn |
·
Large shift shock ·
Deterioration of fuel efficiency |
()
|
|
·
Throttle body with motor assembly ·
Cam timing control motor with EDU assembly (Including removal and installation) ·
Camshaft timing gear assembly (Including removal and installation) ·
Cylinder head sub-assembly ·
Camshaft (for intake or exhaust camshaft) ·
Camshaft timing exhaust gear assembly ·
Piston or piston ring ·
Mass air flow meter sub-assembly ·
Port fuel injector assembly ·
Direct fuel injector assembly ·
Fuel pump (for low pressure side) ·
Fuel pump assembly (for high pressure side) ·
Fuel pressure sensor (for low pressure side) ·
Fuel pressure sensor (for high pressure side) ·
Air fuel ratio sensor (sensor 1) ·
Air fuel ratio sensor (sensor 2) ·
Engine coolant temperature sensor ·
Spark plug ·
Ignition coil assembly ·
EGR valve assembly ·
Air intake system parts ·
Gas leaks from exhaust system ·
Knock control sensor |
Inspection after repair | ·
Poor idle, etc. ·
Engine start function, etc. |
()
|
| Replacement of continuously variable transaxle assembly | Air bleed oil pump with motor assembly | Stop and start system | ()
|
for K120, K120F:
·
Input transaxle compensation code into TCM ·
Perform reset memory ·
Deceleration sensor zero point calibration ·
CVT oil pressure calibration ·
Perform road test to allow TCM to learn |
·
Large shift shock ·
Deterioration of fuel efficiency |
for K120:()
for K120F:( )
|
|
| Suspension, tires, etc. | ·
Ultrasonic sensor detection angle ·
Ultrasonic sensor detection angle registration |
Parking support brake system (for Gasoline model) | ()
|
| Television camera assembly optical axis (Back camera position setting) | Parking assist monitor system | ()
|
|
·
Parking assist ECU initialization ·
Adjust steering angle |
Panoramic view monitor system (for Gasoline model) | ()
|
|
| Front wheel alignment adjustment | 1.
Perform reset memory 2.
Perform acceleration sensor zero point calibration and store system information memorization. |
·
VSC is disabled or malfunctions ·
DTCs are output ·
Slip indicator light illuminates ·
ABS warning light illuminates |
()
|
| Front bumper assembly (Including removal and installation) | ·
Ultrasonic sensor detection angle ·
Ultrasonic sensor detection angle registration |
Parking support brake system (for Gasoline model) | ()
|
| Front television camera view adjustment | Panoramic view monitor system (for Gasoline model) | ()
|
|
- NOTICE:
-
After the ignition switch is turned off, the navigation system requires approximately a minute to record various types of memory and settings. As a result, after turning the ignition switch off, wait a minute or more before disconnecting the cable from the negative (-) battery terminal.
PROCEDURE

 12211
1.REMOVE NO. 1 VENTILATION CASE
- CAUTION:
-
Do not disassembly except if the No. 1 ventilation case to be damaged.
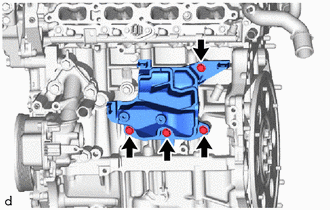
Remove the 4 bolts and No. 1 ventilation case from the cylinder block sub-assembly.
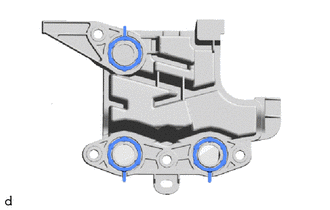
Remove the 3 oil separator gaskets from the No. 1 ventilation case.
11432R
2.REMOVE CYLINDER BLOCK WITH HEAD STRAIGHT SCREW PLUG (w/o Oil Cooler)
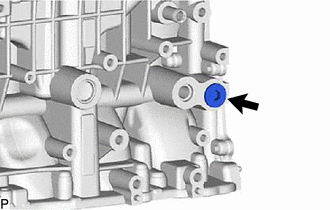
Using a 10 mm hexagon socket wrench, remove the cylinder block with head straight screw plug and gasket from the cylinder block sub-assembly.
3.INSPECT CONNECTING ROD THRUST CLEARANCE
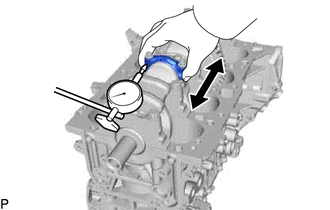
Using a dial indicator, measure the thrust clearance while moving the connecting rod sub-assembly back and forth.
- Standard Thrust Clearance:
0.160 to 0.512 mm (0.00630 to 0.0202 in.)
- Maximum Thrust Clearance:
0.512 mm (0.0202 in.)
- HINT:
-
If the thrust clearance is more than the maximum, replace the connecting rod. If necessary, replace the crankshaft.
4.INSPECT CONNECTING ROD OIL CLEARANCE
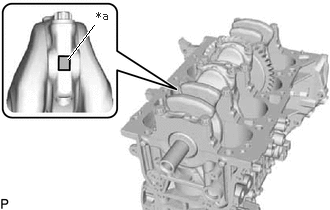
| *a | Alignment Mark |
Note the alignment marks on the connecting rod and connecting rod cap so that they can be reinstalled to their original locations.
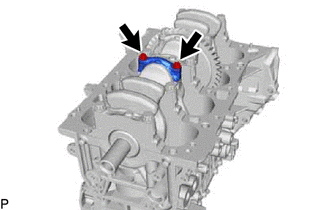
Using an E12 "TORX" socket wrench, remove the 2 connecting rod bolts and connecting rod cap.
- HINT:
-
Keep the connecting rod bearing and connecting rod cap together.
Clean the crank pin and connecting rod bearing.
Check the crank pin and connecting rod bearing for pitting and scratches.
- HINT:
-
If the crank pin or connecting rod bearing is damaged, replace the connecting rod bearings. If necessary, replace the crankshaft.
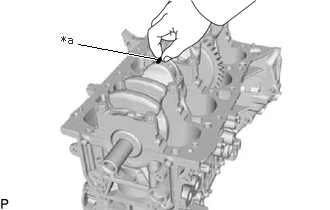
| *a | Plastigage |
Lay a strip of Plastigage on the crank pin.
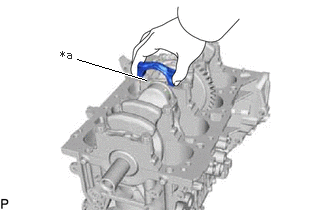
| *a | Front Mark |
Check that the front mark of the connecting rod cap is facing the correct direction, and install the connecting rod cap to the connecting rod.
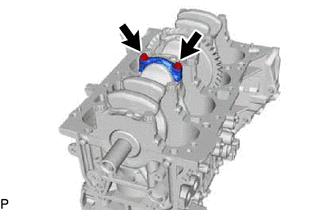
Apply a light coat of engine oil to the threads and under the heads of the 2 connecting rod bolts.
Using an E12 "TORX" socket wrench, install and alternately tighten the 2 connecting rod bolts in several steps.
- Torque:
- 38 N*m (387 kgf*cm, 28 ft.*lbf)
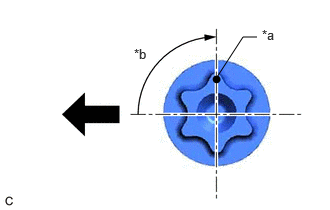
| *a | Paint Mark |
| *b | 90° |

|
Front of Engine |
Mark the front of each connecting rod bolt with paint.
Tighten the connecting rod bolts 90° as shown in the illustration.
- NOTICE:
-
Do not turn the crankshaft during the measurement.
Remove the 2 connecting rod bolts and connecting rod cap.
- HINT:
-
Keep the connecting rod bearing and connecting rod cap together.
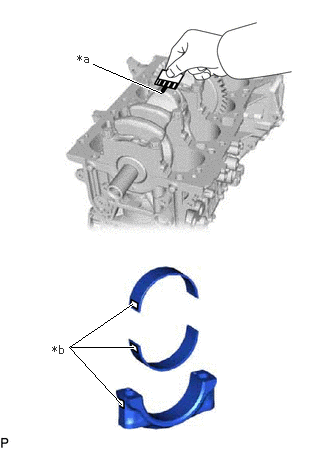
| *a | Plastigage |
| *b | 1, 2 or 3 Mark |
Measure the Plastigage at its widest point.
- Standard Oil Clearance:
0.032 to 0.065 mm (0.00126 to 0.00256 in.)
- Maximum Oil Clearance:
0.065 mm (0.00256 in.)
- HINT:
- ·
If the oil clearance is more than the maximum, replace the connecting rod bearings. If necessary, replace the crankshaft.
·If replacing a connecting rod bearing, select a new one with the same number as marked on the connecting rod cap. There are 3 sizes of standard connecting rod bearings, marked "1", "2" or "3" accordingly.
- Standard Connecting Rod Big End Inside Diameter:
Mark Specified Condition 1 51.000 to 51.008 mm (2.00787 to 2.00818 in.) 2 51.008 to 51.016 mm (2.00818 to 2.00850 in.) 3 51.016 to 51.024 mm (2.00850 to 2.00881 in.)
- Standard Connecting Rod Bearing Center Wall Thickness:
Mark Specified Condition 1 1.483 to 1.487 mm (0.058386 to 0.058543 in.) 2 1.487 to 1.491 mm (0.058543 to 0.058701 in.) 3 1.491 to 1.495 mm (0.058701 to 0.058858 in.)
- Standard Crank Pin Diameter:
47.992 to 48.000 mm (1.88945 to 1.88976 in.)
- NOTICE:
-
Remove the Plastigage completely after the measurement.
Perform the inspection above for each cylinder.
5.REMOVE PISTON WITH CONNECTING ROD
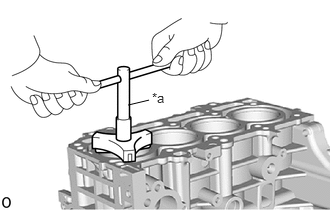
| *a | Ridge Reamer |
Using a ridge reamer, remove all the carbon from the top of each cylinder.
Remove the 8 connecting rod bolts, 4 connecting rod caps and 4 connecting rod bearings.
Push the 4 pistons, 4 connecting rods and 4 connecting rod bearings out through the top of the cylinder block sub-assembly.
- HINT:
- ·
Keep the connecting rod bearings, connecting rods and connecting rod caps together.
·Arrange the removed parts in such a way that they can be reinstalled to their original locations.
6.REMOVE CONNECTING ROD BEARING
Remove the 8 connecting rod bearings from the 4 connecting rods and 4 connecting rod caps.
- HINT:
-
Arrange the removed parts in such a way that they can be reinstalled to their original locations.
7.INSPECT CRANKSHAFT THRUST CLEARANCE
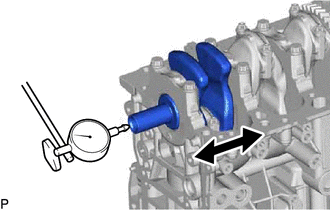
Using a dial indicator, measure the crankshaft thrust clearance while prying the crankshaft back and forth with a screwdriver.
- Standard Thrust Clearance:
0.02 to 0.22 mm (0.000787 to 0.00866 in.)
- Maximum Thrust Clearance:
0.22 mm (0.00866 in.)
- HINT:
-
If the thrust clearance is more than the maximum, replace the crankshaft thrust washers as a set. If necessary, replace the crankshaft.
- Standard Thrust Washer Thickness:
2.415 to 2.470 mm (0.0951 to 0.0972 in.)
13411
8.REMOVE CRANKSHAFT
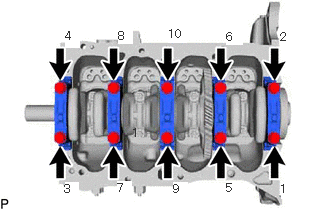
Uniformly loosen and remove the 10 crankshaft bearing cap set bolts in several steps in the order shown in the illustration.
Remove the 5 crankshaft bearing caps from the cylinder block sub-assembly.
- HINT:
- ·
Keep the No. 2 crankshaft bearings and crankshaft bearing caps together.
·Arrange the removed parts in such a way that they can be reinstalled to their original locations.
Remove the crankshaft from the cylinder block sub-assembly.
- HINT:
-
Keep the crankshaft bearings and crankshaft thrust washers together with the cylinder block sub-assembly.
Check each crankshaft journal and crankshaft bearing for pitting and scratches.
If the journal or crankshaft bearing is damaged, replace the crankshaft bearings. If necessary, replace the crankshaft.
11791
9.REMOVE CRANKSHAFT THRUST WASHER
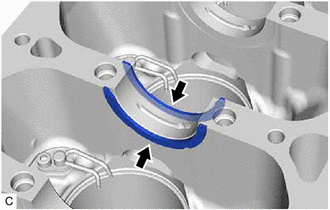
Remove the 2 crankshaft thrust washers from the No. 3 journal position of the cylinder block sub-assembly.
10.REMOVE CRANKSHAFT BEARING
Remove the 5 No. 1 crankshaft bearings and 5 No. 2 crankshaft bearings from the cylinder block sub-assembly and 5 crankshaft bearing caps.
- HINT:
-
Arrange the removed parts in such a way that they can be reinstalled to their original locations.
13011
11.REMOVE PISTON RING SET
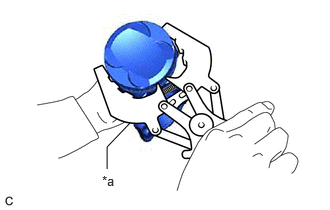
| *a | Piston Ring Expander |
Using a piston ring expander, remove the No. 1 compression ring and No. 2 compression ring from the piston.
Remove the oil ring expander, upper side rail and lower side rail from the piston by hand.
- HINT:
-
Arrange the removed parts in such a way that they can be reinstalled to their original locations.
13101A
12.REMOVE PISTON PIN HOLE SNAP RING
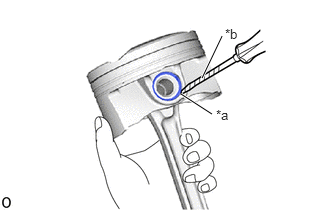
| *a | Front Mark Cutout Portion |
| *b | Protective Tape |
Using a screwdriver, pry out the 2 piston pin hole snap rings from the piston.
- HINT:
-
Tape the screwdriver tip before use.
13.REMOVE PISTON
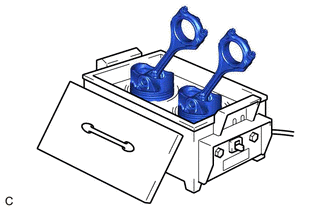
Gradually heat each piston to between 80 and 90°C (176 to 194°F).
- CAUTION:
-
Be sure to wear protective gloves.
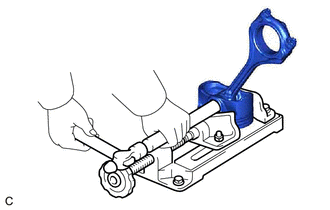
Using a brass bar and a hammer, lightly tap out the piston pin and remove the connecting rod.
- HINT:
- ·
The piston and piston pin are a matched set.
·Arrange the removed parts in such a way that they can be reinstalled to their original locations.
15708
14.REMOVE NO. 1 OIL NOZZLE SUB-ASSEMBLY
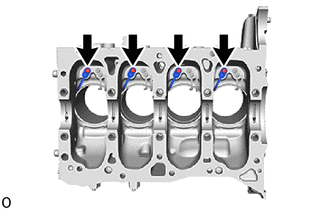
Using a 5 mm hexagon wrench, remove the 4 bolts and 4 No. 1 oil nozzle sub-assemblies from the cylinder block sub-assembly.
15709
15.REMOVE NO. 2 OIL NOZZLE SUB-ASSEMBLY
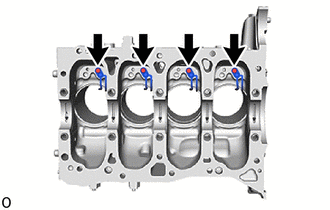
Using a 5 mm hexagon wrench, remove the 4 bolts and 4 No. 2 oil nozzle sub-assemblies from the cylinder block sub-assembly.