 |
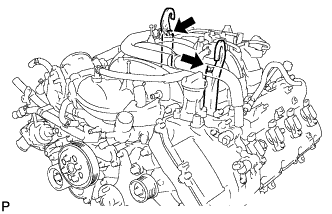
Install the 2 engine hangers with the 2 bolts as shown in the illustration.
- Engine Hanger Part No.:
Item Part No. Engine hanger 12281-38060 Bolt 90119-A0166
- Torque:
- 43 N*m{ 438 kgf*cm , 32 ft.*lbf }
ENGINE ASSEMBLY > INSTALLATION |
| 1. REMOVE ENGINE STAND |
|
Install the 2 engine hangers with the 2 bolts as shown in the illustration.
| Item | Part No. |
| Engine hanger | 12281-38060 |
| Bolt | 90119-A0166 |
Attach an engine sling device and hang the engine with a chain block.
Remove the bolts and engine assembly from the engine stand.
| 2. INSTALL ENGINE ASSEMBLY |
Slowly lower the engine assembly into the engine compartment.
Attach the engine mounting insulators to the vehicle.
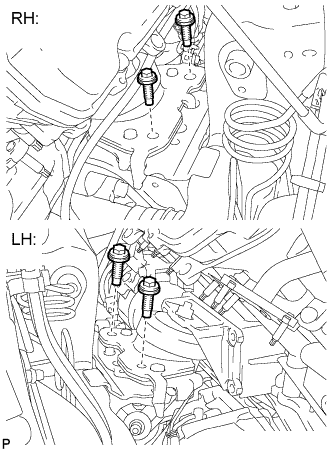 |
Install the 4 engine mounting insulator bolts.
Remove the 2 bolts and 2 engine hangers.
| 3. INSTALL OIL COOLER TUBE |
Install the oil cooler tube with the bolt.
| 4. INSTALL NO. 1 WATER BY-PASS PIPE |
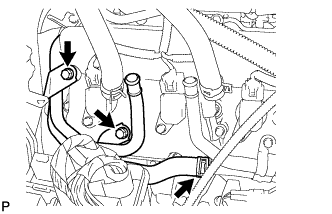 |
Connect the hose and install the water by-pass pipe with the 2 bolts.
| 5. INSTALL DRIVE PLATE AND RING GEAR SUB-ASSEMBLY |
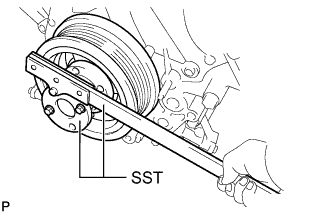 |
Using SST, hold the crankshaft.
Install the crankshaft angle sensor plate, drive gear and rear drive plate spacer to the crankshaft.
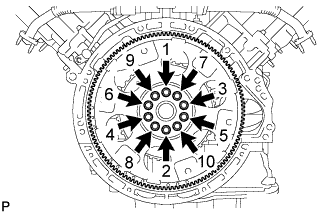 |
Install and uniformly tighten 10 new bolts in the sequence shown in the illustration.
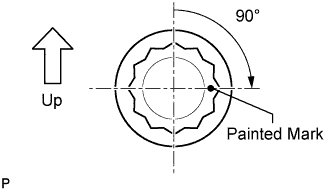 |
Mark the upside of each flywheel installation bolt with paint.
Tighten the flywheel installation bolts another 90° as shown.
Check that the painted marks are now at a 90° angle to the upside.
| 6. INSTALL EXHAUST MANIFOLD |
Install the exhaust manifold (Click here).
| 7. INSTALL GENERATOR ASSEMBLY |
Install the generator assembly (Click here).
| 8. INSTALL COOLER COMPRESSOR ASSEMBLY |
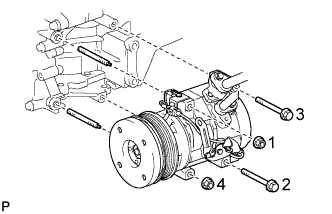 |
Install the cooler compressor with the 2 stud bolts.
Install the 2 bolts and 2 nuts.
Tighten the bolts and nuts in the order shown in the illustration to install the cooler compressor.
| 9. CONNECT NO. 2 AIR INJECTION SYSTEM HOSE |
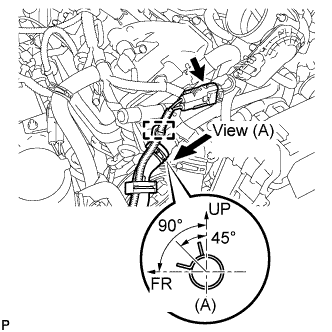 |
Connect the No. 2 air injection hose.
Attach the wire harness clamp.
Connect the air pump connector.
| 10. CONNECT NO. 3 AIR INJECTION SYSTEM HOSE |
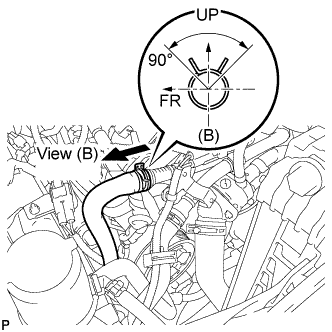 |
Connect the No. 3 air injection hose.
| 11. INSTALL ENGINE WIRE |
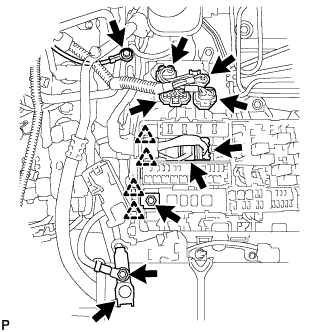 |
Connect the 2 connectors and 2 clips to the engine room junction block.
Install the engine wire with the nut. Then connect the 2 clips.
Connect the 4 air injection control driver connectors.
Install the ground wire with the bolt.
Connect the cable to the positive (+) battery terminal.
Install the wire to the positive (+) battery cable with the nut.
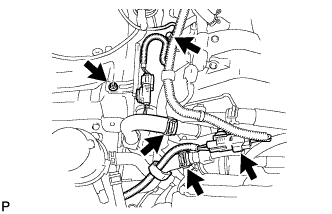 |
Connect the 2 air injection system hoses.
Install the ground wire with the bolt.
Connect the 2 air pump connectors and install the connector bracket with the nut.
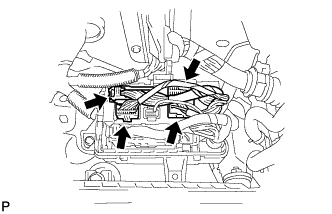 |
Connect the 4 connectors to the connector holder block.
Connect the heater hoses.
| 12. INSTALL ECM |
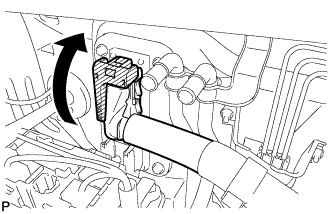 |
Connect the ECM connector and clamp.
| 13. CONNECT FUEL MAIN AND RETURN HOSE |
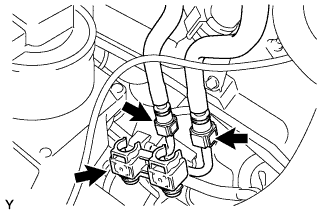 |
Connect the fuel main and return hoses (Click here).
Install the fuel pipe clamp.
| 14. CONNECT FUEL VAPOR FEED HOSE ASSEMBLY |
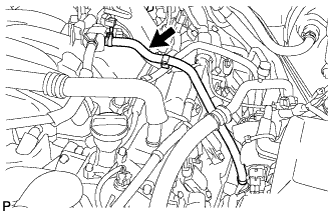 |
Connect the purge line hose.
| 15. CONNECT VACUUM HOSE ASSEMBLY |
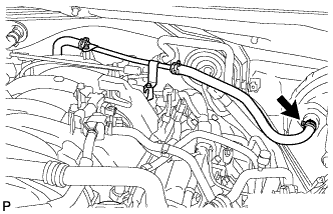 |
Connect the union to check valve hose.
| 16. CONNECT OUTLET HEATER WATER HOSE C |
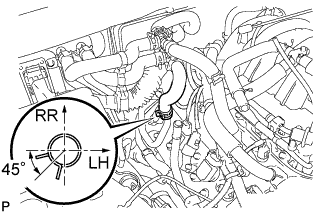 |
Connect the outlet heater water hose to the No. 1 water by-pass pipe.
| 17. CONNECT INLET HEATER WATER HOSE C |
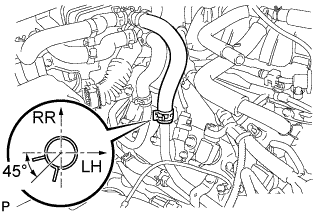 |
Connect the inlet heater water hose to the water by-pass pipe.
| 18. INSTALL AIR CLEANER HOSE ASSEMBLY |
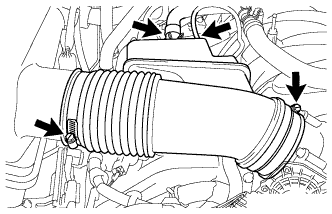 |
Install the air cleaner hose with the 2 clamps.
Connect the vacuum hose.
Connect the ventilation hose.
| 19. INSTALL AIR CLEANER ASSEMBLY |
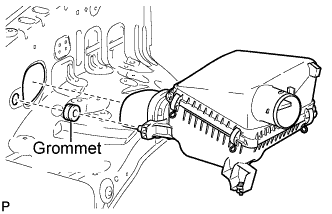 |
Attach grommet to air cleaner before mounting the air cleaner.
Insert the air cleaner into the fender apron hole, and fully insert pin to grommet.
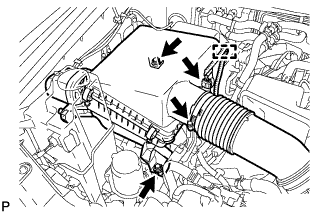 |
Install the air cleaner with the 2 bolts.
Connect the connector and install the clamp and wire harness.
Connect the air cleaner hose and tighten the clamp.
| 20. INSTALL AUTOMATIC TRANSMISSION ASSEMBLY |
Install the transmission assembly (Click here).
| 21. INSTALL RADIATOR ASSEMBLY |
Install the radiator assembly (Click here).
| 22. ADD ENGINE OIL |
Add fresh oil.
| Oil Grade | Oil Viscosity (SAE) |
| ILSAC multigrade engine oil | 0W-20 5W-20 (0W-20 is best choice for fuel economy and good starting in cold weather.) |
| Item | Specified Condition |
| Drain and refill with oil filter change | 7.0 liters (7.4 US qts., 6.2 Imp. qts.) |
| Drain and refill without oil filter change | 6.6 liters (7.0 US qts., 5.8 Imp. qts.) |
| Dry fill | 8.4 liters (8.9 US qts., 7.4 Imp. qts.) |
Install the oil filler cap.
| 23. ADD ENGINE COOLANT |
Add engine coolant.
| Item | Specified Condition |
| w/ Trailer Towing System | 14.6 liters (15.4 US qts., 12.8 Imp. qts.) |
| w/o Trailer Towing System | 13.6 liters (14.4 US qts., 12.0 Imp. qts.) |
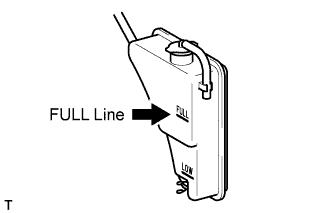 |
Slowly pour coolant into the radiator reservoir until it reaches the FULL line.
Install the reservoir cap.
Press the inlet and outlet radiator hoses several times by hand, and then check the coolant level. If the coolant level is low, add coolant.
Install the radiator cap.
Start the engine and warm it up until the thermostat opens.
Maintain the engine speed at 2000 to 2500 rpm.
Press the inlet and outlet radiator hoses several times by hand to bleed air.
Stop the engine, and wait until the engine coolant cools down to ambient temperature.
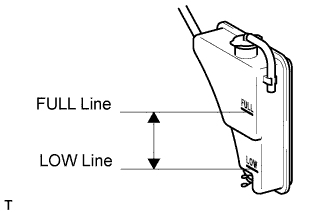 |
Check that the coolant level is between the FULL and LOW lines.
If the coolant level is below the LOW line, repeat all of the procedures above.
If the coolant level is above the FULL line, drain coolant so that the coolant level is between the FULL and LOW lines.
| 24. CONNECT CABLE TO NEGATIVE BATTERY TERMINAL |
| 25. INSPECT FOR OIL LEAK |
Start the engine. Make sure that there are no oil leaks from the area that was worked on.
| 26. INSPECT FOR COOLANT LEAK |
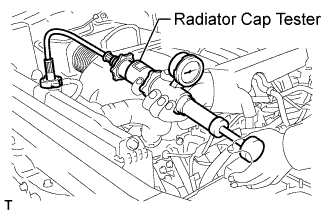 |
Fill the radiator with coolant and attach a radiator cap tester.
Warm up the engine.
Using the radiator cap tester, increase the pressure inside the radiator to 118 kPa (1.2 kgf/cm2, 17 psi), and check that the pressure does not drop.
If the pressure drops, check the hoses, radiator and water pump for leaks. If no external leaks are found, check the heater core, cylinder block and head.
| 27. INSPECT FOR EXHAUST GAS LEAK |
| 28. INSPECT FOR FUEL LEAK |
Connect the Techstream to the DLC3.
Turn the ignition switch to ON.
Turn the Techstream main switch on.
Enter the following menus: Powertrain / Engine and ECT / Active Test / Control the Fuel Pump / Speed.
Check that there are no fuel leaks after doing maintenance anywhere on the fuel system.
| 29. INSTALL COWL TOP OUTER PANEL SUB-ASSEMBLY |
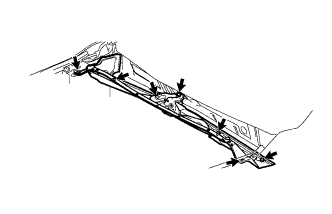 |
Install the outer panel with the 7 bolts.
Connect the 2 washer hoses.
| 30. INSTALL WINDSHIELD WIPER MOTOR ASSEMBLY |
Install the windshield wiper motor (Click here).
| 31. INSTALL HOOD SUB-ASSEMBLY |
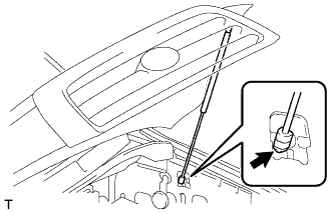 |
Install the hood with the 4 bolts.
Attach the lower part of the 2 hood supports to the hood support bolt ball joints.
Attach the hood support clips.
| 32. ADJUST HOOD SUB-ASSEMBLY |
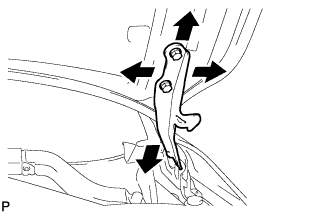 |
Loosen the 4 hood side hinge bolts.
Move the hood to adjust the clearance to within the standard range.
Tighten the 4 hood side hinge bolts after the adjustment.
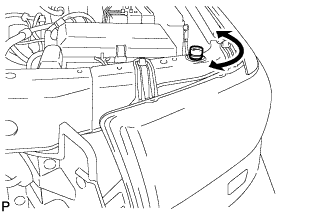 |
Adjust the height of the hood front end by turning the cushion rubber.
Adjust the hood lock.
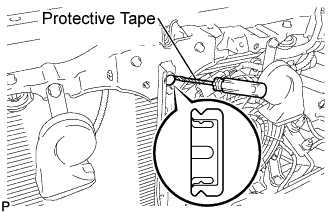 |
Remove the hood lock nut cap.
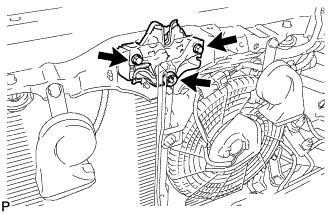 |
Loosen the 2 bolts and nut.
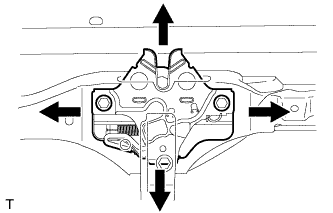 |
Adjust the hood lock position so that the striker can enter it smoothly.
|
Tighten the 2 bolts and nut after the adjustment.
| 33. ALCOHOL DENSITY LEARNING INITIALIZATION |
Clear DTCs (Click here).
| 34. ALCOHOL DENSITY LEARNING |
Connect the Techstream to the DLC3.
Start the engine and allow it to idle for approximately 10 minutes.
Turn the Techstream main switch ON.
Enter the following menus: Powertrain / Engine and ECT / Data List / Alcohol Density Learning
Check that "Compl" is displayed for "Alcohol Density Learning".
If "Compl" is not displayed, drive the vehicle for approximately 15 minutes, and then check "Alcohol Density Learning" again.
| 35. INSPECT IGNITION TIMING |
Warm up and stop the engine.
Allow the engine to warm up to a normal operating temperature.
When using the Techstream:
Connect the Techstream to the DLC3.
Start the engine and idle it.
Turn the Techstream main switch on.
Enter the following menus: Select: Powertrain / Engine and ECT / Data List / IGN Advance.
Disconnect the Techstream from the DLC3.
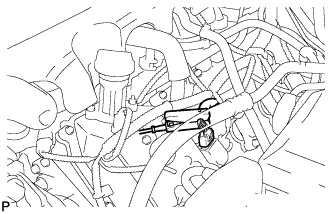 |
When not using the Techstream:
Connect the tester probe of a timing light to the wire of the ignition coil connector for the No. 1 cylinder.
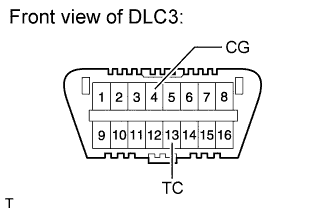 |
Using SST, connect terminals 13 (TC) and 4 (CG) of the DLC3.
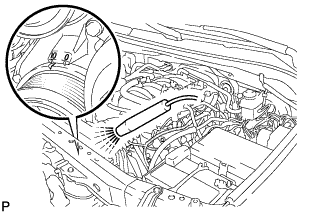 |
Using the timing light, check the ignition timing.
Remove SST from the DLC3.
Check the ignition timing.
Disconnect the timing light from the engine.
| 36. INSPECT ENGINE IDLE SPEED |
Warm up and stop the engine.
Allow the engine to warm up to a normal operating temperature.
When using the Techstream:
Connect the Techstream to the DLC3.
Race the engine at 2500 rpm for approximately 90 seconds.
Turn the Techstream main switch on.
Enter the following menus: Select: Powertrain / Engine and ECT / Data List / Engine Speed.
Disconnect the Techstream from the DLC3.
 |
When not using the Techstream:
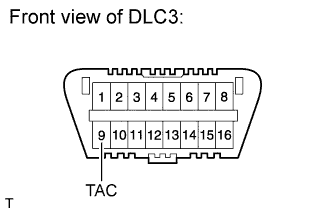
Using SST, connect the tachometer probe to terminal 9 (TAC) of the DLC3.
Race the engine at 2500 rpm for approximately 90 seconds.
Check the idle speed.
Disconnect the tachometer from the DLC3.
| 37. INSPECT CO/HC |
Start the engine.
Keep the engine speed at 2500 rpm for approximately 180 seconds.
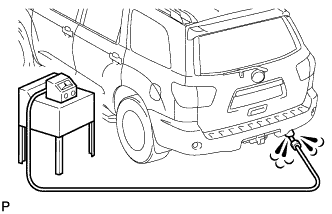 |
Insert the CO/HC meter testing probe at least 40 cm (1.31 ft.) into the tailpipe during idling.
Immediately check CO/HC concentration at idle and/or 2500 rpm.
If the CO/HC concentration does not comply with the regulations, troubleshoot in the order given below.
Check the A/F sensor and heated oxygen sensor operation.
See the table below for possible causes, and then inspect and correct the applicable causes if necessary.
| CO | HC | Symptom | Cause |
| Normal | High | Rough idle |
|
| Low | High | Rough idle (Fluctuating HC reading) |
|
| High | High | Rough idle (Black smoke from exhaust) |
|
| 38. INSPECT FOR ENGINE OIL LEVEL |
Warm up the engine, and then stop the engine and wait for 5 minutes.
Check that the engine oil level is between the low level and full level marks on the dipstick.
If low, check for leakage and add oil up to the full level mark.
| 39. INSPECT FOR ENGINE COOLANT LEVEL |
|
Check that the engine coolant level is between the LOW and FULL lines when the engine is cold.
If the engine coolant is low, check for leaks and add "TOYOTA Super Long Life Coolant" or similar high quality ethylene glycol based non-silicate, non-amine, non-nitrite and non-borate coolant with long-life hybrid organic acid technology to the FULL line.
| 40. INSPECT SRS WARNING LIGHT |