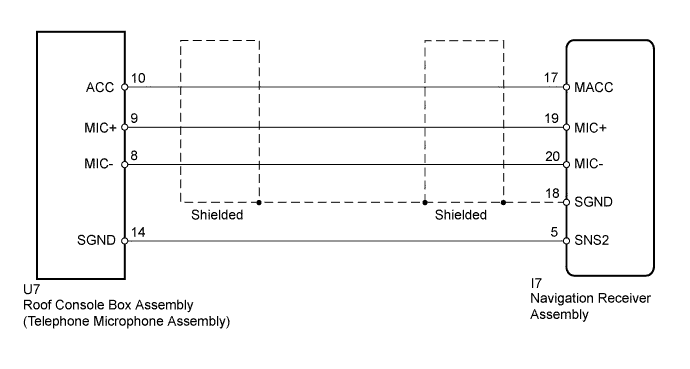
NAVIGATION SYSTEM (for DVD) > Microphone Circuit between Microphone and Navigation Receiver Assembly |
| 1.CHECK NAVIGATION RECEIVER ASSEMBLY |
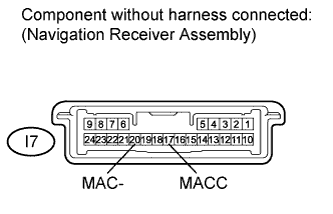 |
Disconnect the I7 navigation receiver assembly connector.
Measure the resistance according to the value(s) in the table below.
| Tester Connection | Condition | Specified Condition |
| 20 (MIC-) - Body ground | Always | Below 1 Ω |
Measure the voltage according to the value(s) in the table below.
| Tester Connection | Switch Condition | Specified Condition |
| 17 (MACC) - Body ground | Ignition switch ACC | 4.75 to 5.25 V |
|
| ||||
| OK | |
 |
| 2.CHECK HARNESS AND CONNECTOR (NAVIGATION RECEIVER - ROOF CONSOLE BOX) |
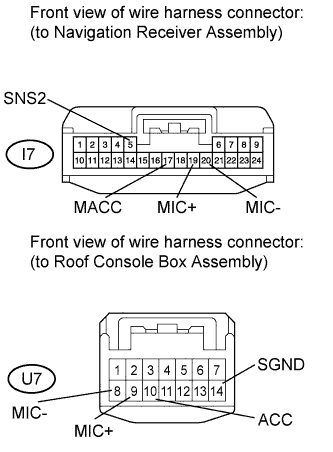 |
Disconnect the I7 navigation receiver assembly connector.
Disconnect the U7 roof console box assembly connector.
Measure the resistance according to the value(s) in the table below.
| Tester Connection | Condition | Specified Condition |
| I7-17 (MACC) - U7-10 (ACC) | Always | Below 1 Ω |
| I7-19 (MIC+) - U7-9 (MIC+) | Always | Below 1 Ω |
| I7-20 (MIC-) - U7-8 (MIC-) | Always | Below 1 Ω |
| I7-5 (SNS2) - U7-14 (SGND) | Always | Below 1 Ω |
| I7-17 (MACC) - Body ground | Always | 10 kΩ or higher |
| I7-19 (MIC+) - Body ground | Always | 10 kΩ or higher |
| I7-20 (MIC-) - Body ground | Always | 10 kΩ or higher |
| I7-5 (SNS2) - Body ground | Always | 10 kΩ or higher |
|
| ||||
| OK | |
|
| 3.REPLACE TELEPHONE MICROPHONE WITH ANOTHER CHECK |
Replace the telephone microphone assembly with a normal one (Click here).
Check if the same problem occurs again.
|
| ||||
| OK | ||
 | ||
| ||
