AB60F AUTOMATIC TRANSMISSION / TRANSAXLE AUTOMATIC TRANSMISSION UNIT REASSEMBLY
PROCEDURE

 1. BEARING POSITION
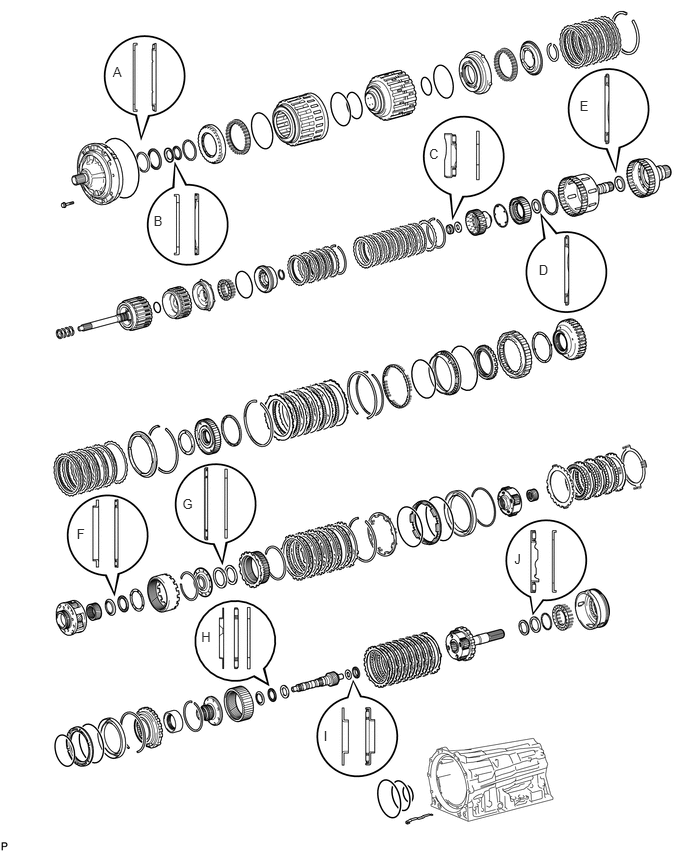
- Bearing and Race Diameter:
Mark Front Race Diameter Inside/Outside Thrust Bearing Diameter Inside/Outside Rear Race Diameter Inside/Outside A 74.3 to 74.6 mm (2.93 to 2.94 in.)
/87.4 to 87.7 mm (3.44 to 3.45 in.)71.96 to 72.26 mm (2.83 to 2.85 in.)
/85.25 to 85.6 mm (3.36 to 3.37 in.)- B 38.0 to 38.3 mm (1.50 to 1.51 in.)
/53.9 to 54.1 mm (2.12 to 2.13 in.)36.45 to 36.7 mm (1.435 to 1.445 in.)
/52.96 to 53.26 mm (2.08 to 2.09 in.)- C - 21.05 to 21.3 mm (0.828 to 0.839 in.)
/39.63 to 39.88 mm (1.56 to 1.57 in.)22.8 to 23.1 mm (0.898 to 0.909 in.)
/44.5 to 44.75 mm (1.75 to 1.76 in.)D - 39.45 to 39.7 mm (1.553 to 1.563 in.)
/60.5 to 60.75 mm (2.38 to 2.39 in.)- E - 46.45 to 46.7 mm (1.83 to 1.84 in.)
/64.3 to 64.7 mm (2.535 to 2.543 in.)- F 55.0 to 55.2 mm (2.165 to 2.173 in.)
/68.8 to 69.3 mm (2.71 to 2.73 in.)54.55 to 54.8 mm (2.15 to 2.16 in.)
/70.0 to 70.5 mm (2.76 to 2.78 in.)- G - 65.35 to 65.6 mm (2.57 to 2.58 in.)
/85.6 to 85.95 mm (3.37 to 3.39 in.)62.85 to 63.1 mm (2.476 to 2.484 in.)
/82.3 to 82.6 mm (3.24 to 3.25 in.)H 39.67 to 39.87 mm (1.56 to 1.57 in.)
/56.5 to 57.0 mm (2.22 to 2.24 in.)36.5 to 36.6 mm (1.437 to 1.441 in.)
/56.62 to 56.92 mm (2.23 to 2.24 in.)36.45 to 36.7 mm (1.436 to 1.445 in.)
/56.5 to 57.0 mm (2.22 to 2.24 in.)I 21.05 to 21.3 mm (0.828 to 0.839 in.)
/39.5 to 39.8 mm (1.56 to 1.57 in.)23.2 to 23.4 mm (0.913 to 0.921 in.)
/43.9 to 44.15 mm (1.73 to 1.74 in.)- J - 43.6 to 43.9 mm (1.72 to 1.73 in.)
/62.3 to 62.8 mm (2.45 to 2.47 in.)47.15 to 47.4 mm (1.86 to 1.87 in.)
/66.9 to 67.1 mm (2.63 to 2.64 in.)
35623H
2.INSTALL 1ST AND REVERSE BRAKE PISTON
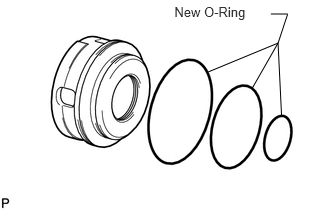
Coat 3 new O-rings with ATF, and install them to the 1st and reverse brake piston.
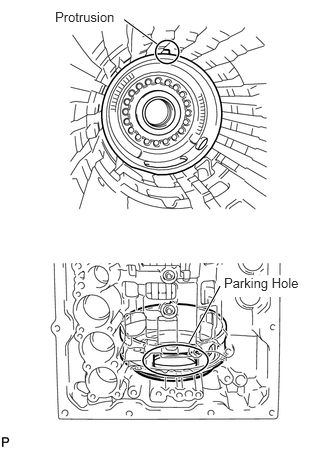
Install the 1st and reverse brake piston to the transmission case.
- NOTICE:
- ·
Be careful not to damage the O-ring.
·Make sure that the parking hole of the brake piston is on the bottom side by engaging the brake piston's protrusion to the transmission case's spline grooves.
35068
3.INSTALL 1ST AND REVERSE BRAKE RETURN SPRING SUB-ASSEMBLY
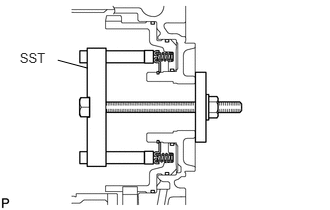
Place the brake return spring onto the 1st and reverse brake piston.
- SST
- 09380-60010 (09381-06030, 09381-06040, 09381-06080, 09381-06120, 09381-06130, 09381-05040, 09381-05050)
Place SST on the spring retainer, and compress the return spring.
Using SST, install the snap ring.
- SST
- 09350-30020 (09350-07070)
35689
4.SELECT NO. 4 BRAKE FLANGE
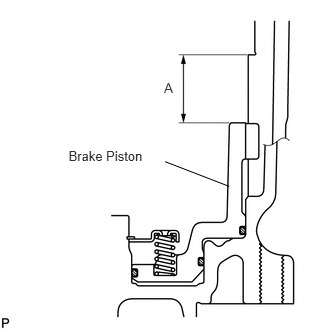
Measure distance A (from the tip of the 1st and reverse brake piston to the step in the transmission case) in the illustration.*1
- HINT:
-
Standard distance A: 27.82 to 28.42 mm (1.09 to 1.12 in.)
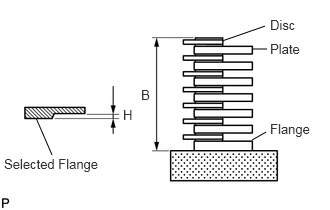
Assemble the No. 4 brake flange, 7 No. 4 brake discs and 6 No. 4 brake plates, and measure distance B in the illustration.*2
- HINT:
-
Standard distance B: 25.98 to 27.01 mm (1.02 to 1.06 in.)
Measure length H of the No. 4 brake selective flange in the illustration.
Apply the A and B measurements taken in *1 and *2 to the graph below. Use A for the X axis and B for the Y axis, and then choose the flange indicated by the graph point.
- HINT:
-
Make sure that when the B measurement and selected flange's H dimension are subtracted from the A measurement, the value is 0.961 to 1.261 mm (0.0378 to 0.0495 in.).
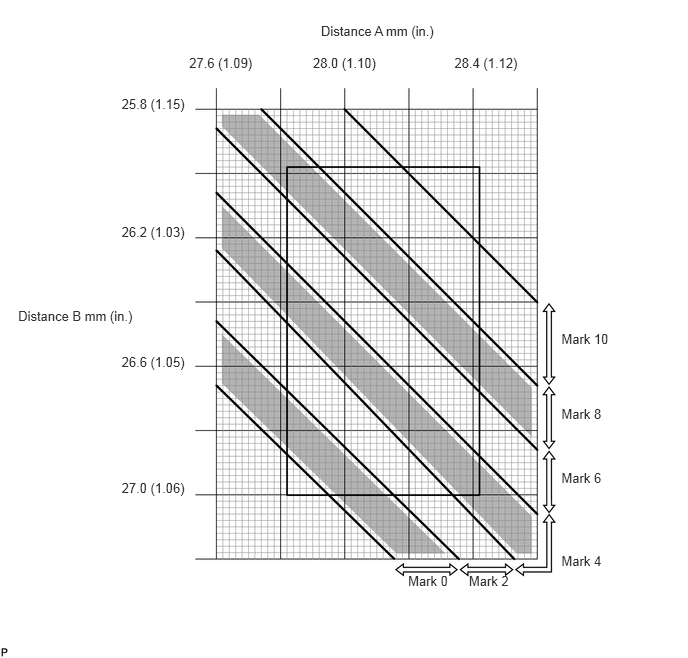
- No. 4 Brake Selective Flange Length H:
Mark Thickness 0 0 mm (0 in.) 2 0.15 to 0.25 mm (0.00590 to 0.00984 in.) 4 0.35 to 0.45 mm (0.0138 to 0.0177 in.) 6 0.55 to 0.65 mm (0.0217 to 0.0256 in.) 8 0.75 to 0.85 mm (0.0295 to 0.0335 in.) 10 0.95 to 1.05 mm (0.0374 to 0.0413 in.)
35760
5.INSTALL REAR PLANETARY GEAR ASSEMBLY
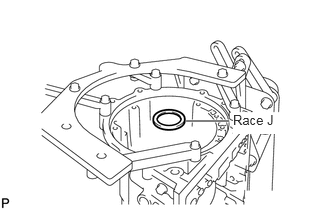
Install the thrust bearing race.
- HINT:
-
Use a small amount of MP grease to make the thrust bearing race stay securely in place.
- Bearing Race Diameter:
Item Inside Outside Race J 47.15 to 47.4 mm (1.86 to 1.87 in.) 66.9 to 67.1 mm (2.63 to 2.64 in.)
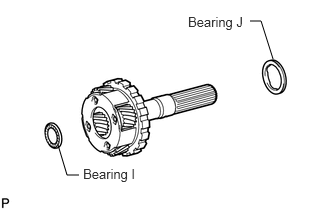
Install the 2 thrust needle roller bearings to the rear planetary gear.
- Bearing Diameter:
Item Inside Outside Bearing I 23.2 to 23.4 mm (0.913 to 0.921 in.) 43.9 to 44.15 mm (1.73 to 1.74 in.) Bearing J 43.6 to 43.9 mm (1.72 to 1.73 in.) 62.3 to 62.8 mm (2.45 to 2.47 in.)
- HINT:
-
Use a small amount of MP grease to make the thrust bearing stay securely in place.
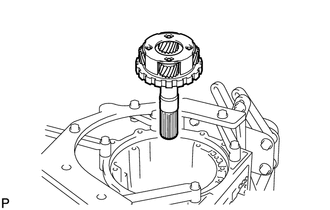
Install the rear planetary gear assembly.
35639B
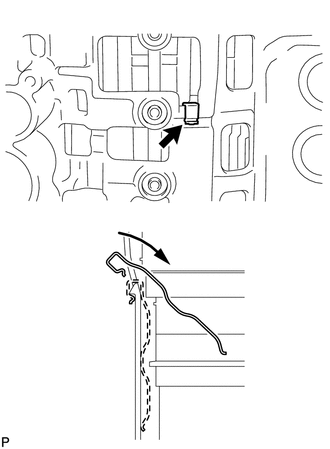
6.INSTALL BRAKE PLATE STOPPER SPRING
35761
7.INSTALL REAR PLANETARY RING GEAR
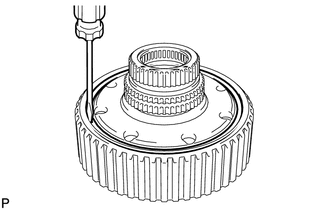
Install the rear planetary ring gear flange on the rear planetary ring gear.
Using a screwdriver, install the snap ring.
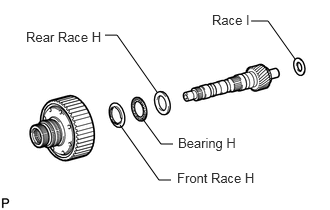
Install the 3 thrust bearing races, thrust needle roller bearing and planetary ring gear with the rear planetary ring gear flange to the intermediate shaft.
- HINT:
-
Use a small amount of MP grease to make the thrust bearing and race stay securely in place.
- Bearing and Race Diameter:
Item Inside Outside Front race H 39.67 to 39.87 mm (1.56 to 1.57 in.) 56.5 to 57.0 mm (2.22 to 2.24 in.) Bearing H 36.5 to 36.6 mm (1.437 to 1.441 in.) 56.62 to 56.92 mm (2.23 to 2.24 in.) Rear race H 36.45 to 36.7 mm (1.436 to 1.445 in.) 56.5 to 57.0 mm (2.22 to 2.24 in.) Race I 21.05 to 21.3 mm (0.828 to 0.839 in.) 39.5 to 39.8 mm (1.56 to 1.57 in.)
35713
8.INSTALL INTERMEDIATE SHAFT WITH REAR PLANETARY RING GEAR FLANGE AND REAR PLANETARY RING GEAR
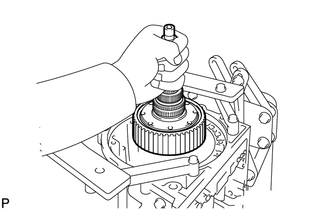
Install the intermediate shaft with rear planetary ring gear flange and rear planetary ring gear to the transmission case.
35684
9.INSTALL NO. 4 BRAKE DISC
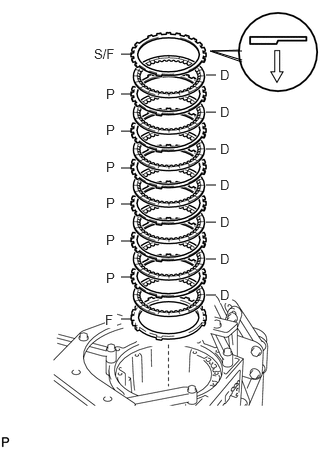
Install the flange, 7 discs, 6 plates and selected flange.
- Install in order:
F - D - P - D - P - D - P - D - P - D - P - D - P - D - S/F
- HINT:
-
F = Flange
-
D = Disc
-
P = Plate
-
S/F = Selected flange
- NOTICE:
-
Before assembling new discs, soak them in ATF for at least 2 hours.
35797B
10.INSTALL NO. 3 1-WAY CLUTCH INNER RACE
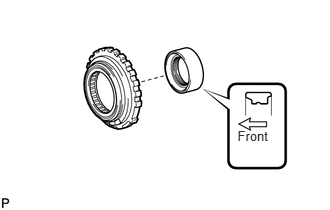
Install the 1-way clutch inner race to the No. 3 1-way clutch assembly.
- NOTICE:
-
Do not mistake the direction of the 1-way clutch inner race.
35770C
11.INSPECT NO. 3 1-WAY CLUTCH ASSEMBLY
35770C
12.INSTALL NO. 3 1-WAY CLUTCH ASSEMBLY
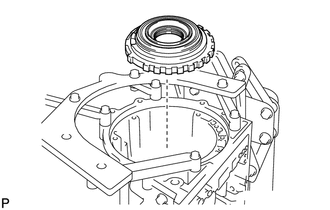
Install the 1-way clutch assembly to the transmission case.
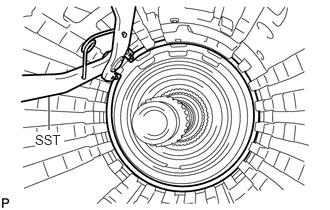
Using SST, install the snap ring.
- SST
- 09350-30020 (09350-07060)
35622G
13.INSTALL NO. 2 BRAKE PISTON
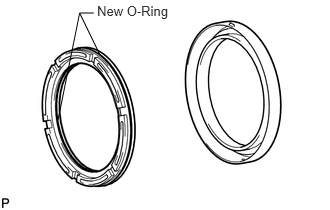
Coat 2 new O-rings with ATF, and install them to the brake piston.
Press the brake piston into the brake cylinder with both hands.
- NOTICE:
-
Be careful not to damage the O-rings.
35699
14.INSTALL NO. 2 BRAKE CYLINDER WITH NO. 2 BRAKE PISTON
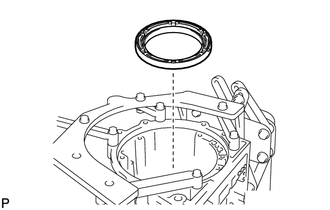
Install the No. 2 brake cylinder with piston to the transmission case.
- NOTICE:
- ·
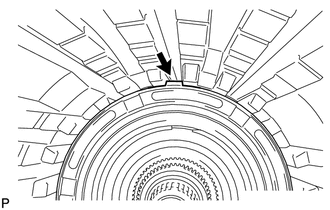
·When installing the No. 2 brake cylinder with piston to the transmission case, align and install the cylinder's claw to the case's top groove.
·Make sure the No. 2 brake cylinder with piston is securely inserted into the transmission case.
35678B
15.SELECT NO. 2 BRAKE FLANGE
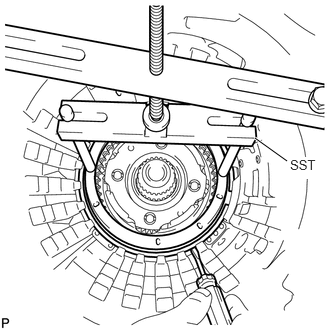
Install the No. 2 brake piston return spring and flange on the No. 2 brake piston.
Place SST on the brake flange and compress the brake return spring.
- SST
- 09380-60010 (09381-06010, 09381-06020, 09381-06050, 09381-06070, 09381-06090, 09381-06120)
Using a screwdriver, install the snap ring to the transmission case.
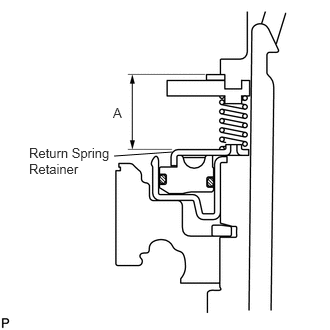
Measure distance A (from the top surface of the snap ring to the bottom surface of the brake piston return spring retainer) in the illustration.*1
- HINT:
-
Standard distance A: 21.00 to 21.76 mm (0.834 to 0.857 in.)
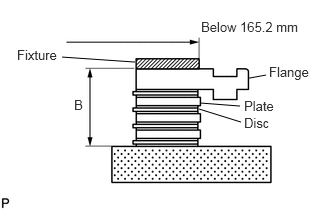
Assemble the 4 discs, 3 plates and flange as shown in the illustration. Then with a fixture of 165.2 mm (6.50 in.) or less placed on the flange, measure distance B.*2
- HINT:
-
Standard distance B: 16.54 to 17.15 mm (0.651 to 0.675 in.)
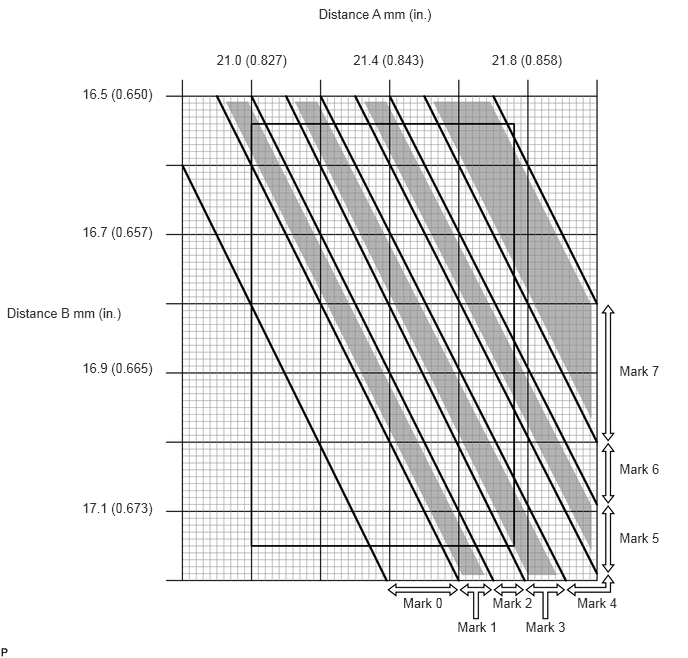
Apply the A and B measurements taken in *1 and *2 to the graph below. Use A for the X axis and B for the Y axis, and then choose the flange indicated by the graph point.
- HINT:
-
Make sure that when the B measurement and selected flange's thickness are subtracted from the A measurement, the value is 2.20 to 2.50 mm (0.0866 to 0.0984 in.).
- Flange Thickness:
Mark Thickness 0 1.95 to 2.05 mm (0.0768 to 0.0807 in.) 1 2.05 to 2.15 mm (0.0807 to 0.0846 in.) 2 2.15 to 2.25 mm (0.0846 to 0.0886 in.) 3 2.25 to 2.35 mm (0.0886 to 0.0925 in.) 4 2.35 to 2.45 mm (0.0925 to 0.0965 in.) 5 2.45 to 2.55 mm (0.0965 to 0.100 in.) 6 2.55 to 2.65 mm (0.100 to 0.104 in.) 7 2.65 to 2.75 mm (0.104 to 0.108 in.)
Remove the snap ring, flange and No. 2 brake piston return spring from the transmission case.
35682A
16.INSTALL NO. 2 BRAKE DISC SET
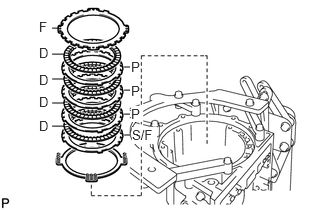
Install the brake piston return spring, selective flange, 4 discs, 3 plates, and flange.
- Install in order:
S/F - D - P - D - P - D - P - D - F
- HINT:
-
S/F = Selective flange
-
D = Disc
-
P = Plate
-
F = Flange
- NOTICE:
-
Before assembling new discs, soak them in ATF for at least 2 hours.
Place SST on the brake flange and compress the brake return spring.
- SST
- 09380-60010 (09381-06010, 09381-06020, 09381-06050, 09381-06070, 09381-06090, 09381-06120)
Using a screwdriver, install the snap ring to the transmission case.
35750
17.INSTALL CENTER PLANETARY GEAR ASSEMBLY
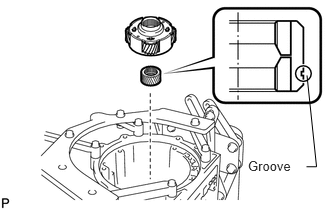
Install the center planetary sun gear and center planetary gear to the transmission case.
- NOTICE:
-
Make sure to install the center planetary sun gear with the groove facing the transmission case.
35621V
18.INSTALL NO. 1 BRAKE PISTON
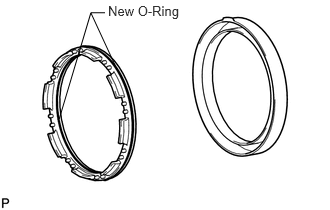
Coat 2 new O-rings with ATF, and install them on the brake piston.
Press the brake piston into the brake cylinder with both hands.
- NOTICE:
-
Be careful not to damage the O-rings.
35698
19.INSTALL NO. 1 BRAKE CYLINDER WITH NO. 1 BRAKE PISTON
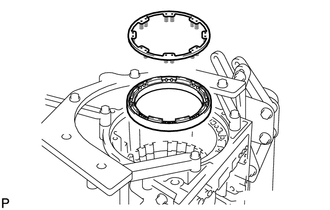
Install the No. 1 brake cylinder with piston and brake piston return spring to the transmission case.
- NOTICE:
- ·
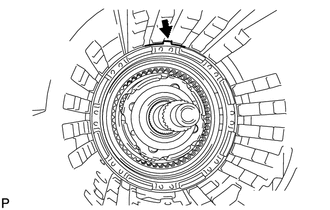 1.725,0.206 1.753,0.225 false 1.785,0.271 1.795,0.278 false 1.699,0.214 1.759,0.254 false 1.705,0.244 1.788,0.299 false 1.711,0.273 1.781,0.32 false 1.697,0.289 1.774,0.341 false 1.686,0.308 1.767,0.362 false 1.74,0.369 1.76,0.383 false
·When installing the No. 1 brake cylinder with piston to the transmission case, align and install the cylinder's claw to the case's top groove.
·Make sure the No. 1 brake cylinder with piston is securely inserted into the transmission case.
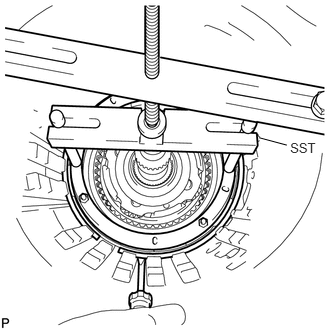
Place SST on the brake return spring and compress the brake return spring.
- SST
- 09380-60010 (09381-06010, 09381-06020, 09381-06050, 09381-06060, 09381-06090, 09381-06100, 09381-06110, 09381-06120)
Using a screwdriver, install the snap ring to the transmission case.
35676B
20.SELECT NO. 1 BRAKE FLANGE
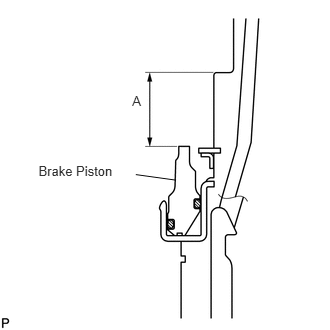
Measure distance A (from the step in the transmission case to the tip of the No. 1 brake piston) in the illustration.*1
- HINT:
-
Standard distance A: 19.74 to 20.22 mm (0.777 to 0.796 in.)
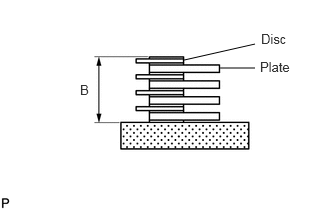
Assemble the 4 plates and 4 discs and measure distance B in the illustration.*2
- HINT:
-
Standard distance B: 16.72 to 17.19 mm (0.658 to 0.677 in.)
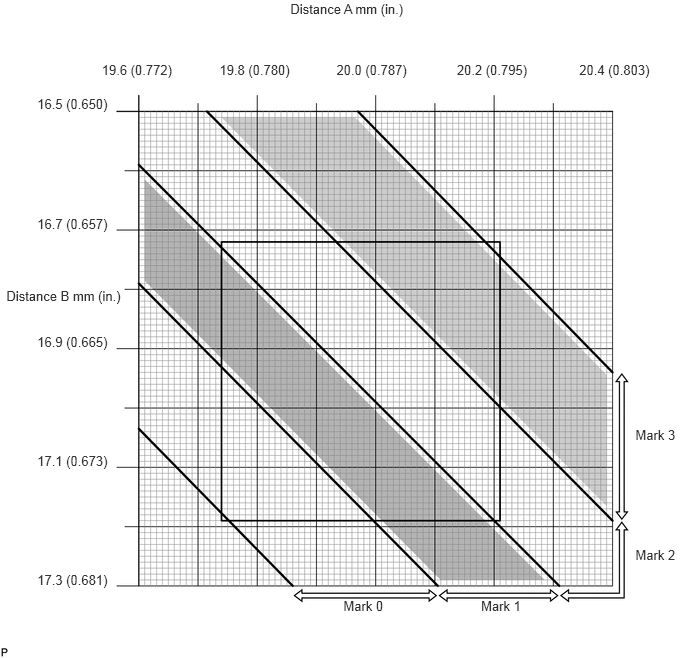
Apply the A and B measurements taken in *1 and *2 to the graph below. Use A for the X axis and B for the Y axis, and then choose the flange indicated by the graph point.
- HINT:
-
Make sure that when the B measurement and selected flange's thickness are subtracted from the A measurement, the value is 0.56 to 0.86 mm (0.0220 to 0.0339 in.).
- Flange Thickness:
Mark Thickness 0 1.95 to 2.05 mm (0.0768 to 0.0807 in.) 1 2.15 to 2.25 mm (0.0846 to 0.0886 in.) 2 2.35 to 2.45 mm (0.0925 to 0.0965 in.) 3 2.55 to 2.65 mm (0.100 to 0.104 in.)
35763
21.INSTALL CENTER PLANETARY RING GEAR
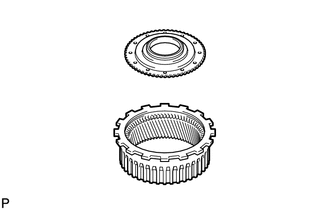
Install the front planetary ring gear flange to the center planetary ring gear.
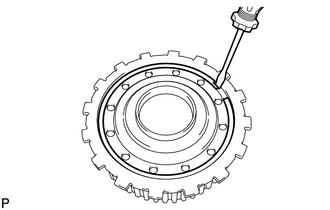
Using a screwdriver, install the snap ring.
35743
22.INSTALL FRONT PLANETARY RING GEAR
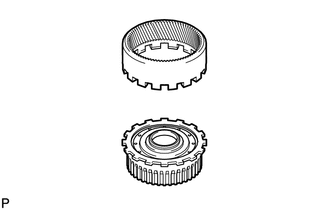
Install the front planetary ring gear to the center planetary ring gear.
35743
23.INSTALL FRONT PLANETARY RING GEAR WITH FRONT PLANETARY RING GEAR FLANGE SUB-ASSEMBLY AND CENTER PLANETARY RING GEAR
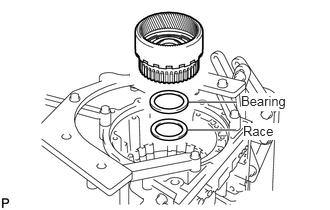
Install the thrust bearing race and thrust needle roller bearing.
- HINT:
-
Use a small amount of MP grease to make the thrust bearing and race stay securely in place.
- Bearing and Race Diameter:
Item Inside Outside Race G 62.85 to 63.1 mm (2.476 to 2.484 in.) 82.3 to 82.6 mm (3.24 to 3.25 in.) Bearing G 65.35 to 65.6 mm (2.57 to 2.58 in.) 85.6 to 85.95 mm (3.37 to 3.39 in.)
Install the front planetary ring gear with the front planetary ring gear flange and center planetary ring gear to the transmission case.
35720
24.INSTALL FRONT PLANETARY GEAR ASSEMBLY
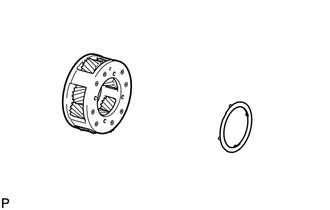
Install the No. 2 planetary carrier thrust washer to the front planetary gear.
- HINT:
-
Use a small amount of MP grease to make the thrust washer stay securely in place.
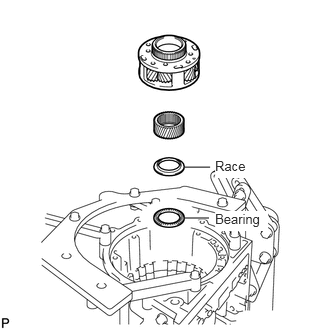
Install the thrust needle roller bearing, thrust bearing race, front planetary sun gear and front planetary gear.
- HINT:
-
Use a small amount of MP grease to make the thrust bearing and race stay securely in place.
- Bearing Diameter:
Item Inside Outside Bearing F 54.55 to 54.8 mm (2.15 to 2.16 in.) 70.0 to 70.5 mm (2.76 to 2.78 in.) Race F 55.0 to 55.2 mm (2.165 to 2.173 in.) 68.8 to 69.3 mm (2.71 to 2.73 in.)
35707C
25.INSTALL 1-WAY CLUTCH INNER RACE SUB-ASSEMBLY
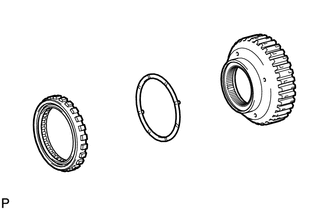
Apply the No. 1 planetary carrier thrust washer to the 1-way clutch inner race, and then install them to the 1-way clutch.
- HINT:
-
Use a small amount of MP grease to make the thrust washer stay securely in place.
35790
26.INSPECT 1-WAY CLUTCH ASSEMBLY
35790
27.INSTALL 1-WAY CLUTCH ASSEMBLY WITH 1-WAY CLUTCH INNER RACE SUB-ASSEMBLY
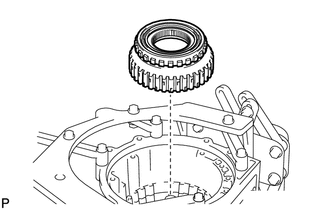
Install the 1-way clutch with 1-way clutch inner race to the transmission case.
35681A
28.INSTALL NO. 1 BRAKE DISC SET
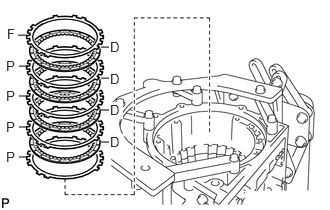
Install the 4 plates, 4 discs and flange.
- Install in order:
P - D - P - D - P - D - P - D - F
- HINT:
-
P = Plate
-
D = Disc
-
F = Flange
- NOTICE:
-
Before assembling new discs, soak them in ATF for at least 2 hours.
35624
29.INSTALL NO. 3 BRAKE PISTON
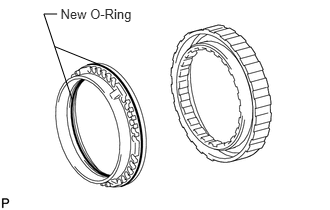
Coat 2 new O-rings with ATF, and install them to the brake piston.
Press the brake piston into the brake cylinder with both hands.
- NOTICE:
-
Be careful not to damage the O-rings.
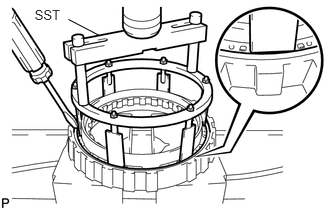
Using SST and a press, compress the return spring and install the snap ring with a screwdriver.
- SST
- 09380-60010 (09381-06020, 09381-06040, 09381-06060, 09381-06100, 09381-06110)
- NOTICE:
-
Be sure the end gap of the snap ring is not aligned with the spring retainer claw.
35664
30.INSTALL NO. 3 BRAKE CYLINDER WITH NO. 3 BRAKE PISTON AND NO. 3 BRAKE PISTON RETURN SPRING SUB-ASSEMBLY
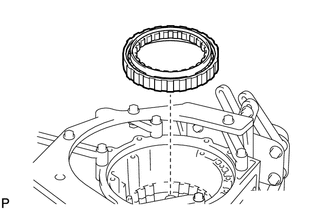
Install the No. 3 brake cylinder with the No. 3 brake piston and No. 3 brake piston return spring to the transmission case.
- NOTICE:
- ·
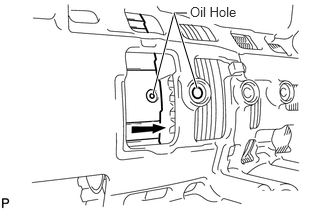 1.594,0.979 1.813,0.135 1.813,0.135 1.948,0.135 true 2.052,0.917 1.813,0.135 true 1.979,0.042 2.542,0.25 0.563,0.208 10 true Oil Hole
Align the oil holes of the No. 3 brake cylinder and transmission case as shown in the illustration.
·Make sure the No. 3 brake piston and cylinder are securely inserted into the transmission case.
35624J
31.INSTALL NO. 3 BRAKE PISTON HOLE SNAP RING
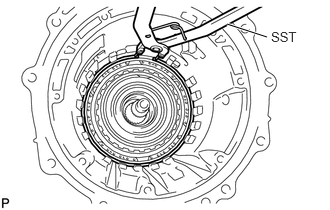
Using SST, install the snap ring.
- SST
- 09350-30020 (09350-07060)
35066
32.INSTALL NO. 3 BRAKE DISC SET
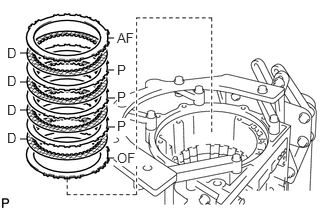
Install the ''O'' mark flange, 4 discs, 3 plates and ''A'' mark flange to the transmission case.
- Install in order:
OF - D - P - D - P - D - P - D - AF
- HINT:
-
OF = ''O'' mark flange
-
P = Plate
-
D = Disc
-
AF = ''A'' mark flange
- NOTICE:
-
Before assembling new discs, soak them in ATF for at least 2 hours.
35679C
33.INSTALL NO. 3 BRAKE SNAP RING
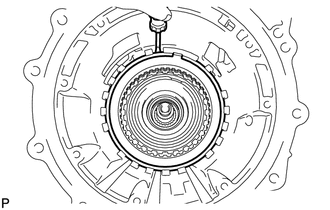
Using a screwdriver, install the snap ring.
35606A
34.INSTALL DIRECT CLUTCH PISTON SUB-ASSEMBLY
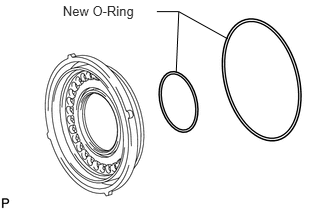
Coat 2 new O-rings with ATF, and install them to the direct clutch piston.
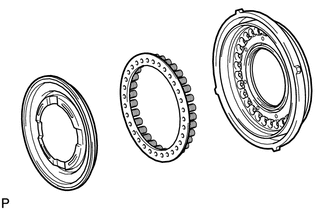
Install the direct clutch return spring and No. 2 clutch balancer to the direct clutch piston.
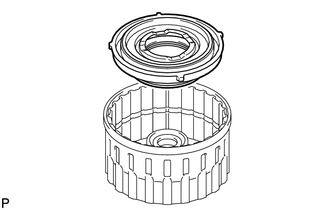
Press the direct clutch piston with clutch return spring and clutch balancer into the reverse clutch piston with both hands.
- NOTICE:
-
Be careful not to damage the O-ring.
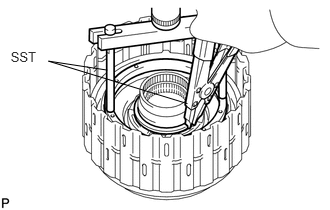
Place SST on the direct clutch balancer, and compress the return spring with a press.
- SST
- 09380-60010 (09381-06030, 09381-06040, 09381-06080)
- NOTICE:
-
Stop pressing when the spring sheet is lowered to a position 1 to 2 mm (0.0394 to 0.0787 in.) from the snap ring groove to prevent the spring sheet from being deformed.
Using SST, install the snap ring.
- SST
- 09350-30020 (09350-07070)
- NOTICE:
-
Do not expand the snap ring excessively.
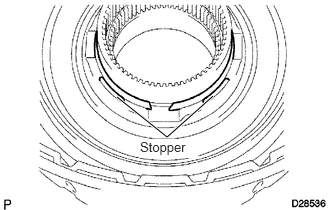
Set the end gap of the snap ring in the balancer as shown in the illustration.
- NOTICE:
-
Be sure the end gap of the snap ring is not aligned with the spring retainer claw.
35048
35.INSTALL REVERSE CLUTCH PISTON SUB-ASSEMBLY
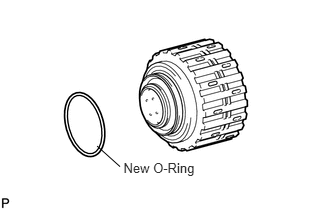
Coat a new O-ring with ATF, and install it to the clutch drum.
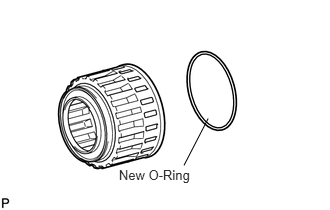
Coat a new O-ring with ATF, and install it on the reverse clutch piston.
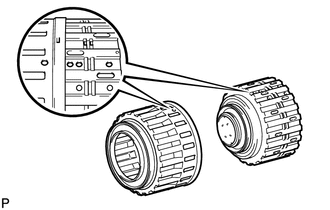
Pass the clutch drum into the reverse clutch piston with both hands.
- NOTICE:
- ·
Be careful not to damage the O-ring.
·Make sure to align the holes of the reverse clutch piston and clutch drum as shown in the illustration.
·Make sure to align the protrusions of the reverse clutch pistons and the cutout of the clutch drum.
35688
36.INSTALL NO. 3 CLUTCH BALANCER
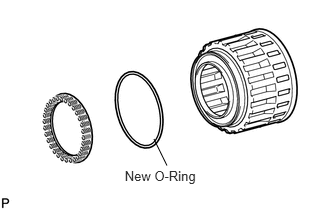
Coat a new O-ring with ATF, and install it to the reverse clutch piston.
Install the reverse clutch return spring and balancer onto the reverse clutch piston.
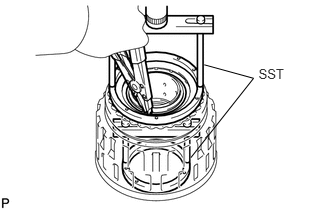
Place SST on the clutch balancer, and compress the clutch balancer with a press.
- SST
- 09380-60010 (09381-06020, 09381-06030, 09381-06040, 09381-06050, 09381-06070, 09381-06080)
- NOTICE:
-
Stop pressing when the spring sheet is lowered to a position 1 to 2 mm (0.0394 to 0.0787 in.) from the snap ring groove to prevent the spring sheet from being deformed.
Using SST, install the snap ring.
- SST
- 09350-30020 (09350-07070)
- NOTICE:
-
Do not expand the snap ring excessively.
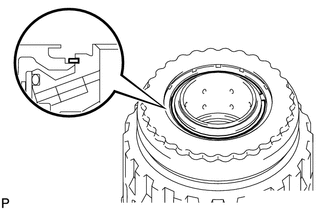
Set the end gap of the snap ring in the piston as shown in the illustration.
- NOTICE:
-
Be sure the end gap of the snap ring is not aligned with the spring retainer claw.
35667A
37.INSTALL DIRECT CLUTCH DISC
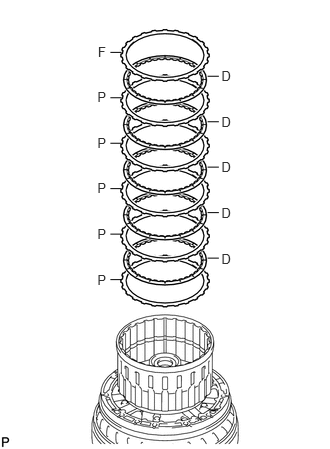
Place the oil pump onto the torque converter clutch, and then place the clutch drum.
Install the 5 plates, 5 discs and reverse clutch flange on the clutch drum.
- Install in order:
P - D - P - D - P - D - P - D - P - D - F
- HINT:
-
P = Plate
-
D = Disc
-
F = Flange
- NOTICE:
-
Before assembling new discs, soak them in ATF for at least 2 hours.
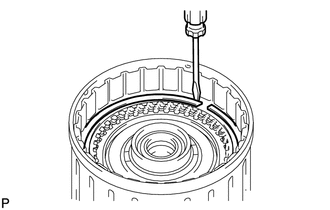
Using a screwdriver, install the snap ring to the clutch drum.
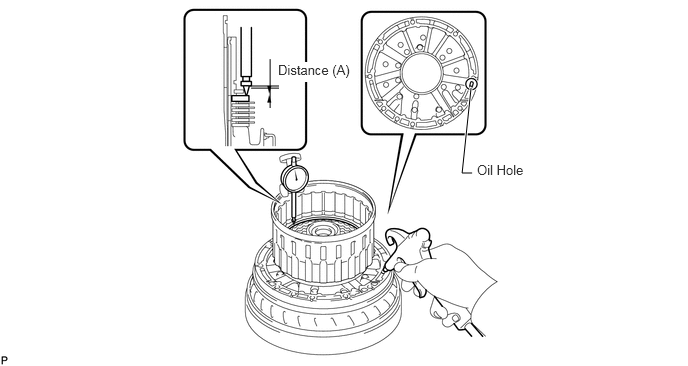
Using a dial indicator, measure the moving distance (A) of the clutch flange at both ends across the diameter while blowing compressed air (392 kPa, 2.0 kgf/cm2, 57 psi) from the oil hole as shown in the illustration. Then choose from the 9 flange thicknesses in the table so that the measured value is within the standard value.
- Standard moving distance (A):
0.72 to 1.02 mm (0.0284 to 0.0401 in.)
- Flange Thickness:
Mark Thickness 0 3.45 to 3.55 mm (0.136 to 0.140 in.) 1 3.55 to 3.65 mm (0.140 to 0.144 in.) 2 3.65 to 3.75 mm (0.144 to 0.148 in.) 3 3.75 to 3.85 mm (0.148 to 0.152 in.) 4 3.85 to 3.95 mm (0.152 to 0.156 in.) 5 3.95 to 4.05 mm (0.156 to 0.159 in.) 6 4.05 to 4.15 mm (0.159 to 0.163 in.) 7 4.15 to 4.25 mm (0.163 to 0.167 in.) 8 4.25 to 4.35 mm (0.167 to 0.171 in.) A 4.35 to 4.45 mm (0.171 to 0.175 in.)
Temporarily remove the snap ring, attach the selected flange and reinstall the snap ring.
35649
38.SELECT REVERSE CLUTCH FLANGE
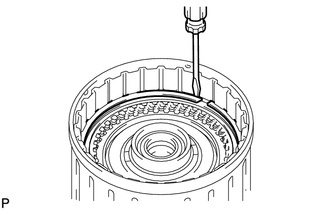
Using a screwdriver, install the snap ring to the clutch drum.
- NOTICE:
-
Make sure to install the direct clutch and reverse clutch snap rings so that their openings face opposite directions.
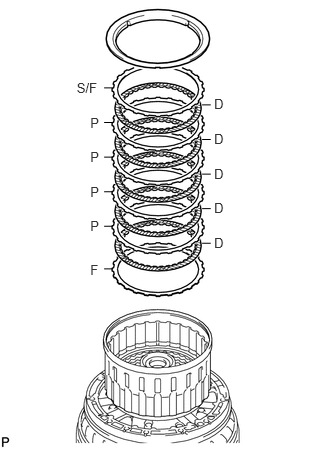
Install the flange, 5 discs, 4 plates, selective flange and reverse clutch reaction sleeve to the clutch drum.
- Install in order:
F - D - P - D - P - D - P - D - P - D - S/F
- HINT:
-
F = Flange
-
D = Disc
-
P = Plate
-
S/F = Selective flange
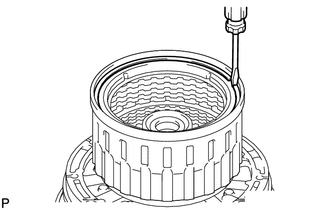
Using a screwdriver, install the hole snap ring.
Using a dial indicator, measure the moving distance (A minus B) of the tip of the reverse clutch piston (A) and clutch flange at both ends across the diameter (B) while blowing compressed air (392 kPa, 2.0 kgf/cm2, 57 psi) from the oil hole as shown in the illustration. Then choose from the 12 flange thicknesses in the table so that the measured value is within the standard value.
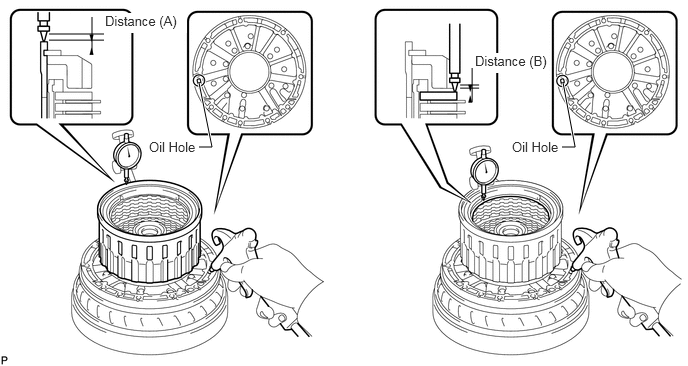
- Standard moving distance (A minus B):
0.46 to 0.76 mm (0.0182 to 0.0299 in.)
- Flange Thickness:
Mark Thickness 0 2.35 to 2.45 mm (0.0925 to 0.0965 in.) 1 2.45 to 2.55 mm (0.0965 to 0.100 in.) 2 2.55 to 2.65 mm (0.100 to 0.104 in.) 3 2.65 to 2.75 mm (0.104 to 0.108 in.) 4 2.75 to 2.85 mm (0.108 to 0.112 in.) 5 2.85 to 2.95 mm (0.112 to 0.116 in.) 6 2.95 to 3.05 mm (0.116 to 0.120 in.) 7 3.05 to 3.15 mm (0.120 to 0.124 in.) 8 3.15 to 3.25 mm (0.124 to 0.128 in.) A 3.25 to 3.35 mm (0.128 to 0.132 in.) B 3.35 to 3.45 mm (0.132 to 0.136 in.) C 3.45 to 3.55 mm (0.136 to 0.140 in.)
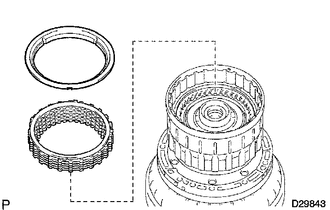
Remove the snap ring, reverse clutch reaction sleeve and rear clutch disc set from the clutch drum.
35602A
39.INSTALL FORWARD CLUTCH PISTON SUB-ASSEMBLY AND COAST CLUTCH PISTON
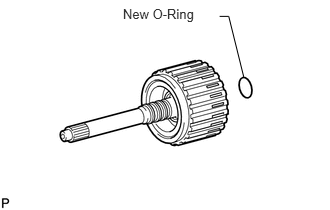
Coat a new O-ring with ATF, and install it to the input shaft.
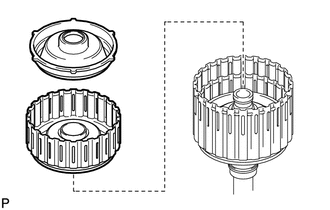
Install the forward clutch piston and coast clutch piston to the input shaft.
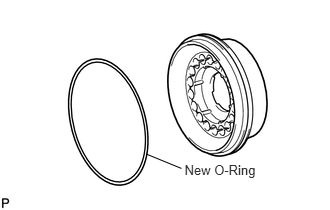
Coat a new O-ring with ATF, and install it to the No. 1 clutch balancer.
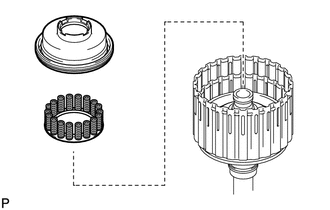
Install the forward clutch return spring and No. 1 clutch balancer to the input shaft.
- NOTICE:
-
Be careful not to damage the O-rings.
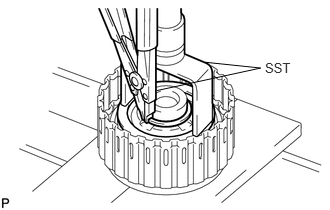
Place SST on the No. 1 clutch balancer, and compress the return spring with a press.
- SST
- 09350-30020 (09350-07040)
- NOTICE:
-
Stop pressing when the spring sheet is lowered to a position 1 to 2 mm (0.0394 to 0.0787 in.) from the snap ring groove to prevent the spring sheet from being deformed.
Using SST, install the snap ring.
- SST
- 09350-30020 (09350-07070)
- NOTICE:
-
Do not expand the snap ring excessively.
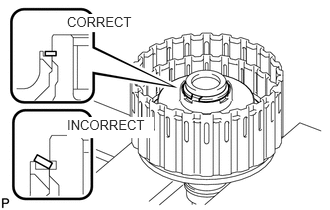
Set the end gap of the snap ring in the balancer as shown in the illustration.
- NOTICE:
-
Be sure the end gap of the snap ring is not aligned with the spring retainer claw.
35685
40.INSTALL COAST CLUTCH DISC SET
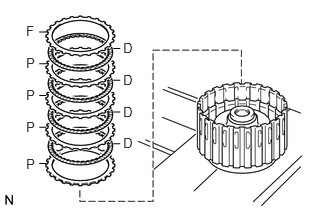
Install the 4 plates, 4 discs and flange.
- Install in order:
P - D - P - D - P - D - P - D - F
- HINT:
-
P = Plate
-
D = Disc
-
F = Flange
- NOTICE:
-
Before assembling new discs, soak them in ATF for at least 2 hours.
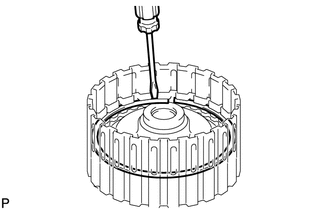
Temporarily install the snap ring.
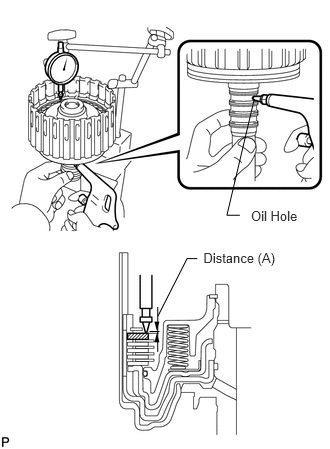
Using a dial indicator, measure the moving distance (A) of the clutch flange at both ends across the diameter while blowing compressed air (196 kPa, 2.0 kgf/cm2, 28 psi) from the oil hole as shown in the illustration. Then choose from the 11 flange thicknesses in the table so that the measured value is within the standard value.
- Standard moving distance (A):
0.51 to 0.81 mm (0.0201 to 0.0318 in.)
- Flange Thickness:
Mark Thickness 0 2.95 to 3.05 mm (0.116 to 0.120 in.) 1 3.05 to 3.15 mm (0.120 to 0.124 in.) 2 3.15 to 3.25 mm (0.124 to 0.128 in.) 3 3.25 to 3.35 mm (0.128 to 0.132 in.) 4 3.35 to 3.45 mm (0.132 to 0.136 in.) 5 3.45 to 3.55 mm (0.136 to 0.140 in.) 6 3.55 to 3.65 mm (0.140 to 0.144 in.) 7 3.65 to 3.75 mm (0.144 to 0.148 in.) 8 3.75 to 3.85 mm (0.148 to 0.152 in.) A 3.85 to 3.95 mm (0.152 to 0.156 in.) B 3.95 to 4.05 mm (0.156 to 0.159 in.)
Temporarily remove the snap ring, attach the selected flange and reinstall the snap ring.
35790H
41.INSTALL NO. 4 1-WAY CLUTCH ASSEMBLY
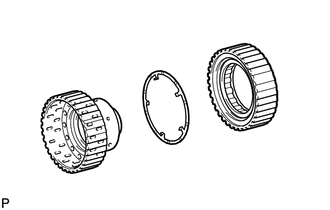
Install the No. 1 clutch hub thrust washer to the coast clutch hub.
- HINT:
-
Use a small amount of MP grease to make the thrust washer stay securely in place.
Install the 1-way clutch to the coast clutch hub.
35790H
42.INSPECT NO. 4 1-WAY CLUTCH ASSEMBLY
35064
43.INSTALL COAST CLUTCH HUB SUB-ASSEMBLY WITH NO. 4 1-WAY CLUTCH ASSEMBLY
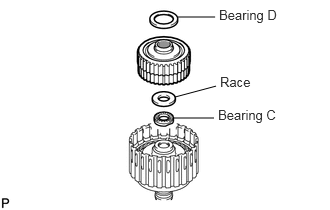
Install the 2 thrust needle roller bearings, thrust bearing race and coast clutch hub with the No. 4 1-way clutch to the clutch drum.
- HINT:
-
Use a small amount of MP grease to make the thrust bearing and race stay securely in place.
- Bearing and Race Diameter:
Item Inside Outside Bearing C 21.05 to 21.3 mm (0.828 to 0.839 in.) 39.63 to 39.88 mm (1.56 to 1.57 in.) Race C 22.8 to 23.1 mm (0.898 to 0.909 in.) 44.5 to 44.75 mm (1.75 to 1.76 in.) Bearing D 39.45 to 39.7 mm (1.553 to 1.563 in.) 60.5 to 60.75 mm (2.38 to 2.39 in.)
35633B
44.INSTALL FORWARD MULTIPLE DISC CLUTCH DISC SET
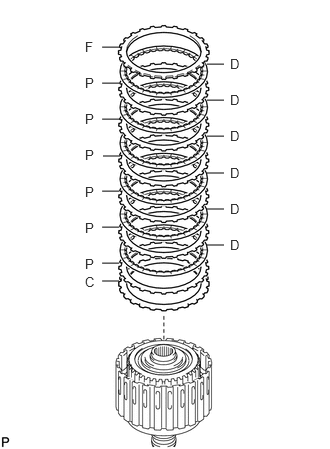
Install the cushion, 6 plates, 6 discs and flange to the input shaft.
- Install in order:
C - P - D - P - D - P - D - P - D - P - D - P - D - F
- HINT:
-
C = Cushion
-
P = Plate
-
D = Disc
-
F = Flange
- NOTICE:
-
Before assembling new discs, soak them in ATF for at least 2 hours.
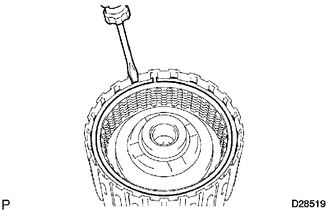
Temporarily install the snap ring.
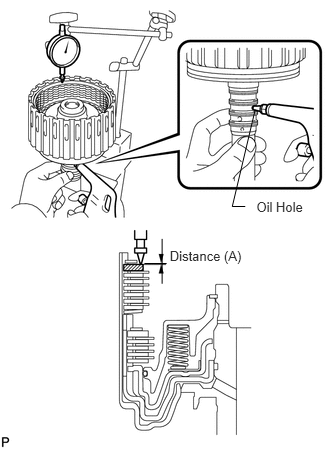
Using a dial indicator, measure the moving distance (A) of the clutch flange at both ends across the diameter while blowing compressed air (196 kPa, 2.0 kgf/cm2, 28 psi) from the oil hole as shown in the illustration. Then choose from the 12 flange thicknesses in the table so that the measured value is within the standard value.
- Standard moving distance (A):
0.85 to 1.15 mm (0.0335 to 0.0453 in.)
- Flange Thickness:
Mark Thickness 0 2.95 to 3.05 mm (0.116 to 0.120 in.) 1 3.05 to 3.15 mm (0.120 to 0.124 in.) 2 3.15 to 3.25 mm (0.124 to 0.128 in.) 3 3.25 to 3.35 mm (0.128 to 0.132 in.) 4 3.35 to 3.45 mm (0.132 to 0.136 in.) 5 3.45 to 3.55 mm (0.136 to 0.140 in.) 6 3.55 to 3.65 mm (0.140 to 0.144 in.) 7 3.65 to 3.75 mm (0.144 to 0.148 in.) 8 3.75 to 3.85 mm (0.148 to 0.152 in.) A 3.85 to 3.95 mm (0.152 to 0.156 in.) B 3.95 to 4.05 mm (0.156 to 0.159 in.) C 4.05 to 4.15 mm (0.159 to 0.163 in.)
Temporarily remove the snap ring, attach the selected flange and reinstall the snap ring.
35712A
45.INSTALL INPUT SHAFT OIL SEAL RING
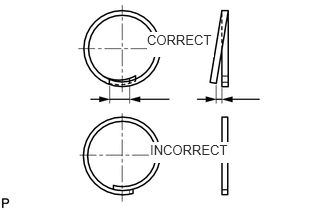
Overlap the seal ring edges in the axial direction.
- NOTICE:
- ·
Overlapping the seal ring edges in the axial direction prevents damage to the seal ring.
·Do not overlap the seal ring edges in the radial direction, as this may damage the seal ring.
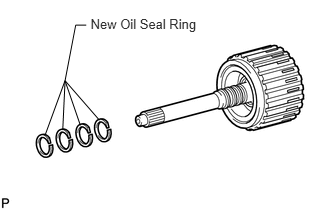
Coat 4 new oil seal rings with ATF.
Squeeze the ends of the 4 oil seal rings together, and then install them to the input shaft groove.
- NOTICE:
-
Do not excessively widen the rings.
- HINT:
-
After installing the oil seal rings, check that they rotate smoothly.
35701
46.INSTALL INPUT SHAFT ASSEMBLY
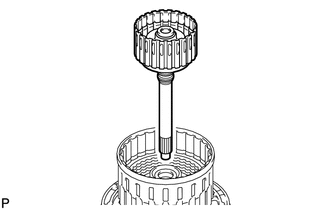
Install the input shaft to the clutch drum.
35061
47.INSTALL FORWARD CLUTCH HUB SUB-ASSEMBLY
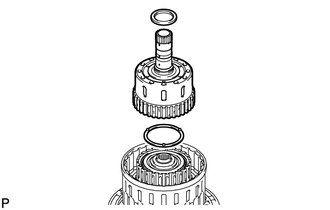
Install the No. 3 clutch hub thrust washer, forward clutch hub and thrust needle roller bearing to the clutch drum.
- NOTICE:
-
Before installing the forward clutch hub, apply ATF to the forward clutch hub bush's sliding surfaces. After the installation, check that the forward clutch hub rotates smoothly.
- HINT:
-
Use a small amount of MP grease to make the thrust bearing and thrust washer stay securely in place.
- Bearing Diameter:
Item Inside Outside Bearing E 46.5 to 46.7 mm (1.83 to 1.84 in.) 64.3 to 64.7 mm (2.535 to 2.543 in.)
35049
48.INSTALL REVERSE CLUTCH HUB SUB-ASSEMBLY
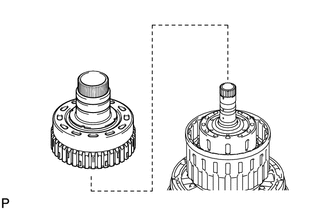
Install the reverse clutch hub to the clutch drum.
- NOTICE:
-
Before installing the reverse clutch hub, apply ATF to the reverse clutch hub bush's sliding surfaces. After the installation, check that the reverse clutch rotates smoothly.
35677C
49.INSTALL REAR CLUTCH DISC SET
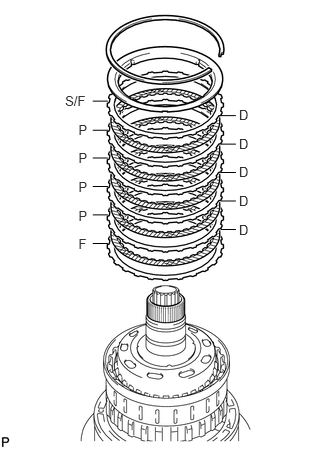
Install the flange, 5 discs, 4 plates, selected flange and reverse clutch reaction sleeve to the clutch drum.
- Install in order:
F - D - P - D - P - D - P - D - P - D - S/F
- HINT:
-
F = Flange
-
D = Disc
-
P = Plate
-
S/F = Selected flange
Using a screwdriver, install the snap ring to the clutch drum.
35780B
50.INSTALL NO. 2 1-WAY CLUTCH ASSEMBLY
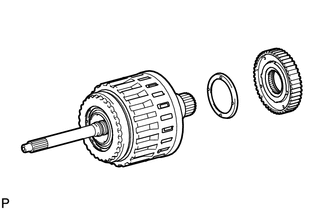
Install the clutch drum thrust washer to the clutch drum.
- HINT:
-
Use a small amount of MP grease to make the thrust washer stay securely in place.
Install the 1-way clutch to the clutch drum.
35780B
51.INSPECT NO. 2 1-WAY CLUTCH ASSEMBLY
52.INSTALL CLUTCH DRUM AND INPUT SHAFT ASSEMBLY
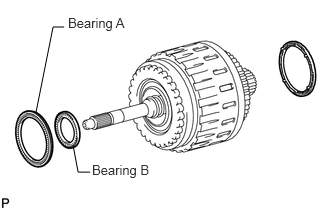
Install the 2 thrust needle roller bearings.
- HINT:
-
Use a small amount of MP grease to make the thrust bearing stay securely in place.
- Bearing Diameter:
Item Inside Outside Bearing A 71.96 to 72.26 mm (2.83 to 2.85 in.) 85.25 to 85.6 mm (3.36 to 3.37 in.) Bearing B 36.45 to 36.7 mm (1.435 to 1.445 in.) 52.96 to 53.26 mm (2.08 to 2.09 in.)
Coat the clutch drum thrust washer with petroleum jelly and install it onto the clutch drum and input shaft assembly.
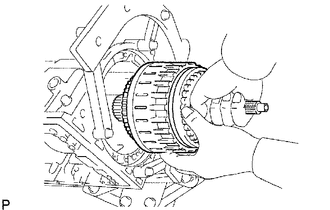
Install the clutch drum and input shaft drum assembly onto the transmission case.
53.INSTALL OIL PUMP ASSEMBLY
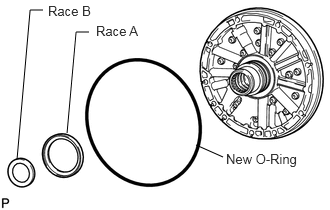
Coat a new O-ring with ATF, and install it to the oil pump.
Install the 2 thrust bearing races to the front oil pump.
- Bearing Race Diameter:
Item Inside Outside Race A 74.3 to 74.6 mm (2.93 to 2.94 in.) 87.4 to 87.7 mm (3.44 to 3.45 in.) Race B 38.0 to 38.3 mm (1.50 to 1.51 in.) 53.9 to 54.1 mm (2.12 to 2.13 in.)
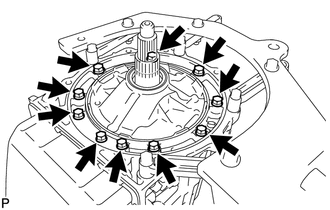
Pass the input shaft through the center hole of the oil pump, and align the bolt holes of the oil pump assembly with the transmission case.
Hold the input shaft, and lightly press the oil pump body to slide the oil seal rings into the overdrive direct clutch drum.
Apply seal packing to the flanges of the bolts.
- Seal packing:
Toyota Genuine Seal Packing 1281, Three Bond 1281 or equivalent
- NOTICE:
-
Do not allow seal packing to contact the bolts' threads.
Install the 10 bolts.
- Torque:
- 21 N*m (214 kgf*cm, 16 ft.*lbf)
- NOTICE:
-
During installation, do not allow oil to contact the bolts or the surface of the oil pump body.
54.INSPECT INDIVIDUAL PISTON OPERATION
35506F
55.INSTALL MANUAL VALVE LEVER SHAFT OIL SEAL
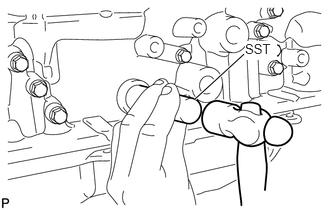
Using SST, tap in 2 new oil seals.
- SST
- 09350-30020 (09350-07110)
Coat the lips of the oil seals with MP grease.
35505
56.INSTALL MANUAL VALVE LEVER SUB-ASSEMBLY
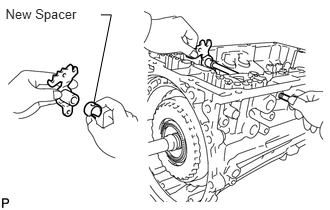
Install a new spacer to the manual valve lever.
Push the manual valve lever shaft through the transmission case, and install the manual valve lever to the shaft.
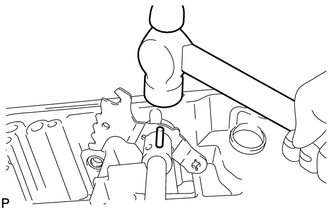
Using a hammer, tap in a new spring pin.
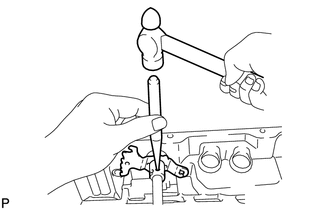
Align the manual valve lever indentation with the spacer hole, and stake them together with the punch.
Check that the shaft rotates smoothly.
35557
57.INSTALL PARKING LOCK PAWL
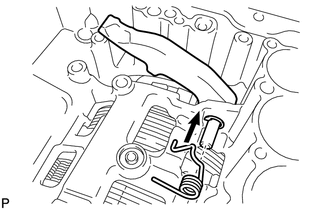
Install a new E-ring to the shaft.
Install the parking lock pawl, shaft and spring.
35501
58.INSTALL PARKING LOCK ROD SUB-ASSEMBLY
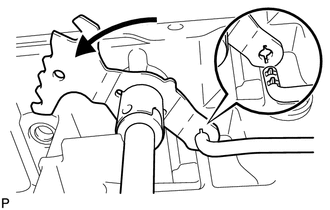
Connect the parking lock rod to the manual valve lever.
35595
59.INSTALL PARKING LOCK PAWL BRACKET
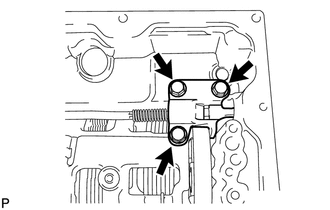
Place the parking lock pawl bracket onto the transmission case and install the 3 bolts.
- Torque:
- 18 N*m (184 kgf*cm, 13 ft.*lbf)
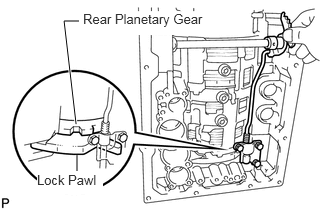
Move the manual valve lever to P, and confirm that the planetary ring gear is correctly locked by the lock pawl.
35424F
60.INSTALL B-1 ACCUMULATOR VALVE
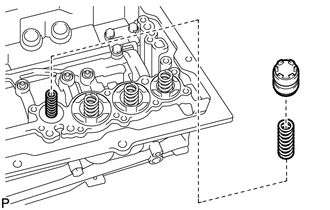
Install the 2 springs and accumulator valve to the hole.
- Spring Diameter:
Spring Free Length
Outer DiameterColor B-1 Inner 44.98 mm (1.77 in.)
11.30 mm (0.445 in.)Natural B-1 Outer 46.36 mm (1.83 in.)
17.10 mm (0.673 in.)Natural
35426D
61.INSTALL C-3 ACCUMULATOR PISTON
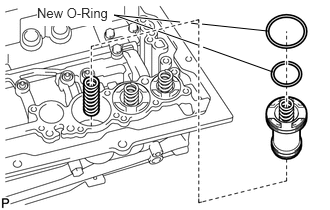
Coat 2 new O-rings with ATF, and install them to the piston.
Install the spring and accumulator piston to the hole.
- Spring Diameter:
Spring Free Length
Outer DiameterColor C-3 76.65 mm (3.02 in.)
20.1 mm (0.791 in.)White
35427K
62.INSTALL B-3 ACCUMULATOR PISTON
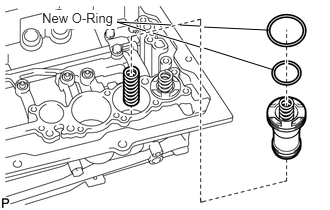
Coat 2 new O-rings with ATF, and install them to the piston.
Install the spring and accumulator piston to the hole.
- Spring Diameter:
Spring Free Length
Outer DiameterColor B-3 64.50 mm (2.54 in.)
19.5 mm (0.768 in.)Orange
35425A
63.INSTALL C-2 ACCUMULATOR PISTON
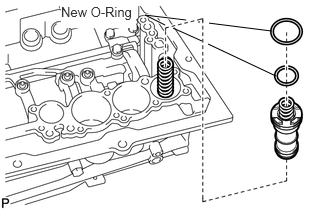
Coat 2 new O-rings with ATF, and install them to the piston.
Install the spring and accumulator piston to the hole.
- Spring Diameter:
Spring Free Length
Outer DiameterColor C-2 68.0 mm (2.68 in.)
16.1 mm (0.634 in.)Blue
35251
64.INSTALL CHECK BALL BODY
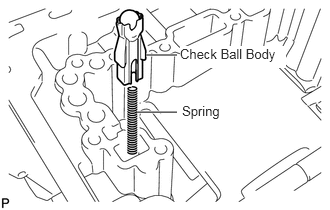
Install the spring and check ball body.
35159
65.INSTALL BRAKE DRUM GASKET
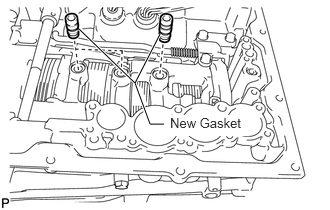
Install 3 new brake drum gaskets.
35145C
66.INSTALL TRANSMISSION CASE GASKET
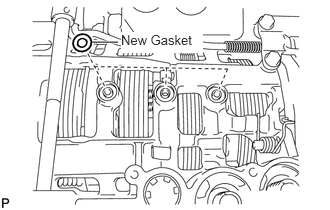
Install 3 new transmission case gaskets.
35410
67.INSTALL TRANSMISSION VALVE BODY ASSEMBLY
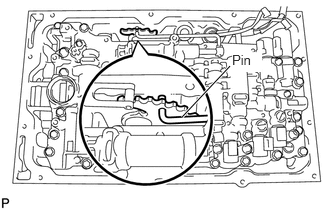
Align the hole of the manual valve with the pin of the lever.
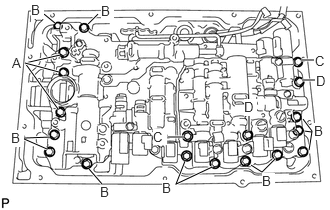
Install the 19 bolts.
- Torque:
- 11 N*m (112 kgf*cm, 8 ft.*lbf)
- HINT:
-
Each bolt length is indicated below.
-
36 mm (1.42 in.) for bolt A
-
25 mm (0.984 in.) for bolt B
-
45 mm (1.77 in.) for bolt C
-
50 mm (1.97 in.) for bolt D
Install the detent spring and detent spring cover with the bolt.
- Torque:
- 10 N*m (102 kgf*cm, 7 ft.*lbf)
82125J
68.INSTALL TRANSMISSION WIRE
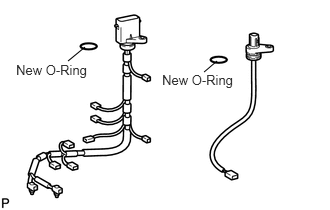
Install 2 new O-rings to the transmission wires.
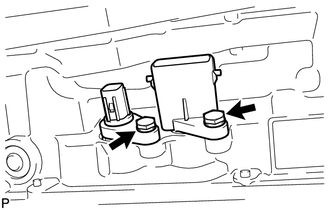
Install the transmission wire harnesses.
Install the bolts.
- Torque:
- 5.4 N*m (55 kgf*cm, 48 in.*lbf)
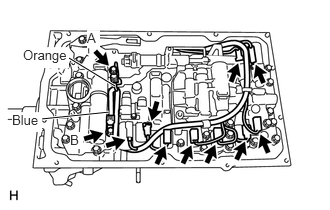
Connect the 9 connectors to the solenoid valves.
Connect the 2 ATF temperature sensors with the 2 clamps and 2 bolts.
for bolt A
- Torque:
- 10 N*m (102 kgf*cm, 7 ft.*lbf)
for bolt B
- Torque:
- 11 N*m (112 kgf*cm, 8 ft.*lbf)
- HINT:
-
Each bolt length is indicated below.
-
12 mm (0.472 in.) for bolt A
-
36 mm (1.42 in.) for bolt B
35330
69.INSTALL VALVE BODY OIL STRAINER ASSEMBLY
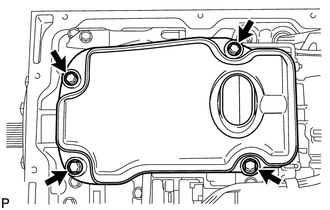
Coat a new O-ring with ATF, and install it to the oil strainer.
Install the oil strainer with the 4 bolts.
- Torque:
- 10 N*m (102 kgf*cm, 7 ft.*lbf)
35106
70.INSTALL AUTOMATIC TRANSMISSION OIL PAN SUB-ASSEMBLY
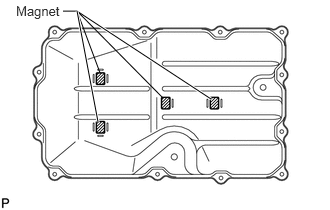
Install the 4 magnets.
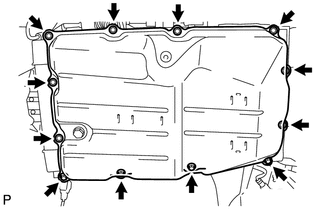
Install a new gasket on the oil pan.
Install the 12 bolts.
- Torque:
- 7.4 N*m (75 kgf*cm, 65 in.*lbf)
- NOTICE:
- ·
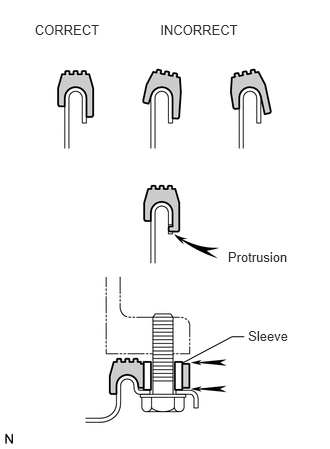 0.362,0.23 1.147,0.423 0.786,0.193 10 CORRECT 1.669,0.23 2.566,0.414 0.897,0.184 10 INCORRECT 2.374,2.599 3.071,2.788 0.698,0.188 10 Protrusion 2.584,3.417 3.087,3.607 0.503,0.191 10 Sleeve 1.899,3.782 2.416,3.507 2.416,3.507 2.544,3.507 false
·Make sure that there is no oil or foreign matter on the gasket seal surface and oil pan contact surface.
·Install the gasket so that there is no slack in the gasket, and make sure the seal surface's entire circumference is level.
·Make sure that the 9 gasket drop prevention protrusions are set on the oil pan.
·When tightening the oil pan, make sure that the gasket is not pinched between the gasket tightening area's sleeve and the transmission's seal surface.
Install the drain plug.
- Torque:
- 20 N*m (204 kgf*cm, 15 ft.*lbf)
35015E
71.INSTALL TRANSFER CASE ADAPTER RADIAL BALL BEARING
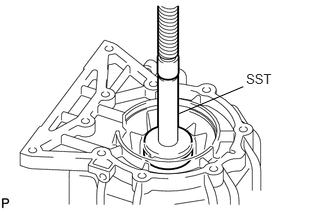
Using SST and a press, press in the bearing.
- SST
- 09950-60010 (09951-00650)
09950-70010 (09951-07150)
Using a screwdriver, install the snap ring.
35015C
72.INSTALL TRANSMISSION CASE ADAPTER OIL SEAL
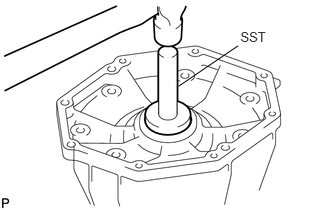
Coat the lip of a new oil seal with ATF.
Using SST and a hammer, tap in the oil seal.
- Standard depth:
0 to 0.1 mm (0 to 0.00394 in.)
- SST
- 09950-60010 (09951-00650)
09950-70010 (09951-07150)
35015G
73.INSTALL TRANSFER ADAPTER REAR
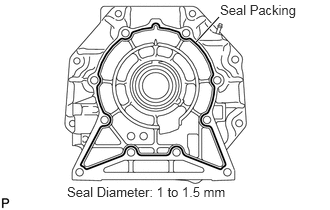
Clean the threads of the bolts and case with non-residue solvent.
Apply seal packing to the rear adaptor transfer.
- Seal packing:
Toyota Genuine Seal Packing 1281,
Three Bond 1281 or equivalent
- Seal diameter:
1.0 to 1.5 mm (0.0394 to 0.0591 in.)
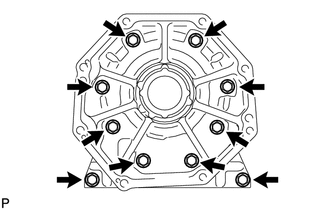
Install the rear adaptor transfer with the 10 bolts.
- Torque:
- 34 N*m (345 kgf*cm, 25 ft.*lbf)
35111
74.INSTALL AUTOMATIC TRANSMISSION HOUSING
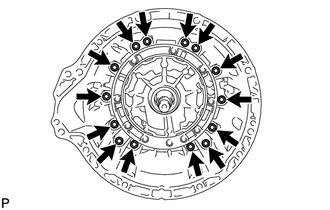
Clean the threads of the bolts and case with non-residue solvent.
Install the transmission housing with the 14 bolts.
- Torque:
- 34 N*m (345 kgf*cm, 25 ft.*lbf)
35122
75.INSTALL AUTOMATIC TRANSMISSION BREATHER TUBE
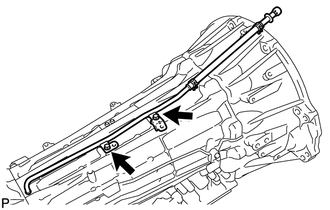
Coat a new O-ring with ATF and install it to the breather tube.
Install the breather tube with the 2 bolts.
- Torque:
- 5.4 N*m (55 kgf*cm, 48 in.*lbf)
33490F
76.INSTALL TRANSMISSION OIL COOLER ASSEMBLY
Coat 4 new O-rings with ATF.
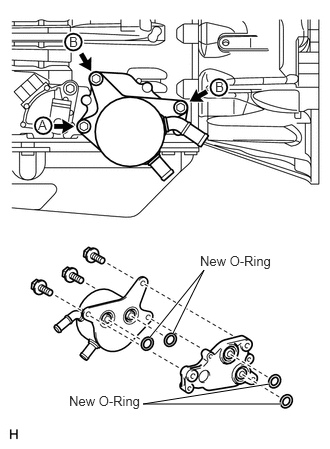
Install the 4 O-rings, transmission oil cooler spacer and transmission oil cooler to the automatic transmission.
Temporarily install the bolt A.
Install the 2 bolts B and tighten them to the specified torque. Then tighten bolt A to the specified torque.
- Torque:
- 21 N*m (214 kgf*cm, 16 ft.*lbf)
89413B
77.INSTALL SPEED SENSOR
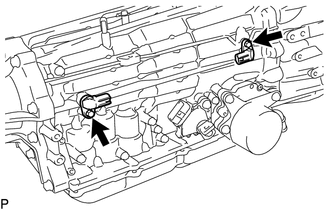
Coat 2 new O-rings with ATF, and install them to the speed sensors.
Install the 2 speed sensors.
Install the 2 bolts.
- Torque:
- 5.4 N*m (55 kgf*cm, 48 in.*lbf)
84540
78.INSTALL PARK/NEUTRAL POSITION SWITCH ASSEMBLY
- HINT:
-
Make sure that the manual valve lever shaft has not been rotated prior to installing the park/neutral position switch as the detent spring may become detached from the manual valve lever shaft.
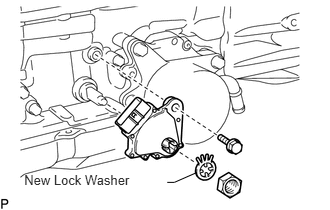
Install the park/neutral position switch to the manual valve lever shaft, and temporarily install the adjusting bolt.
Install a new lock washer and the nut.
- Torque:
- 6.9 N*m (70 kgf*cm, 61 in.*lbf)
Temporarily install the control shaft lever RH.
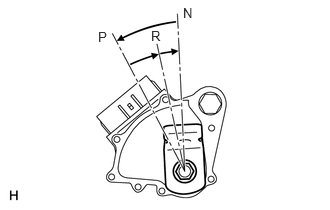
Turn the control shaft lever RH counterclockwise until it stops, and then turn it clockwise 2 notches to set it to the N position.
Remove the control shaft lever RH.
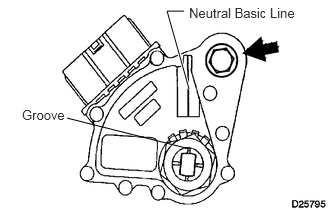
Align the groove with the neutral basic line.
Hold the switch in position and tighten the bolt.
- Torque:
- 13 N*m (133 kgf*cm, 10 ft.*lbf)
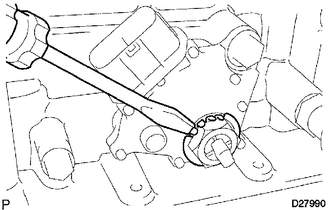
Using a screwdriver, bend the tabs of the lock washer.
35572
79.INSTALL TRANSMISSION CONTROL SHAFT LEVER RH
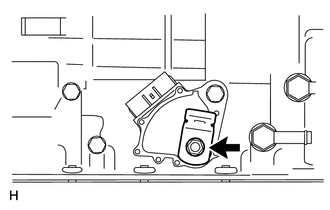
Install the control shaft lever RH with the washer and nut.
- Torque:
- 16 N*m (163 kgf*cm, 12 ft.*lbf)