STEERING COLUMN STEERING COLUMN ASSEMBLY(for Power Tilt and Power Telescopic Steering Column) DISASSEMBLY
CAUTION / NOTICE / HINT
- NOTICE:
-
When using a vise, do not overtighten it.
PROCEDURE

 89227
1.REMOVE MULTIPLEX TILT AND TELESCOPIC ECU
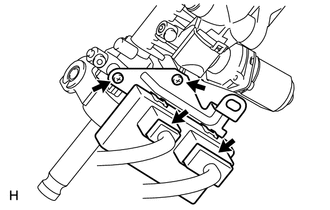
Disconnect the 2 ECU connectors.
Remove the 2 screws and ECU.
89783
2.REMOVE TRANSPONDER KEY COIL
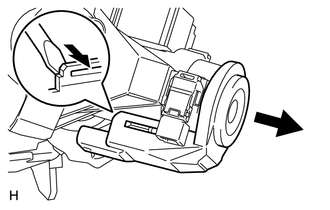
Using a screwdriver, widen the claws attached to the switch bracket by approximately 1.0 mm (0.0394 in.).
Pull out the transponder key coil with the claws open.
- NOTICE:
-
Using excessive force may damage the case.
45271
3.REMOVE UPPER STEERING COLUMN WITH SWITCH BRACKET ASSEMBLY
Secure the steering column in a vise.
Using a center punch, mark the center of the 2 tapered-head bolts.
Using a 3 to 4 mm (0.119 to 0.159 in.) drill, drill a hole in the 2 tapered-head bolts.
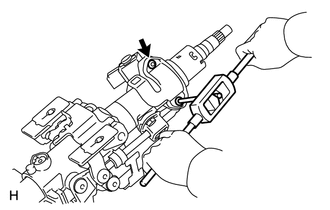
Using a screw extractor, remove the 2 tapered-head bolts, and then remove the upper steering column with switch bracket and the steering lock bracket from the steering column.
69057A
4.REMOVE IGNITION SWITCH LOCK CYLINDER ASSEMBLY
Turn the ignition switch lock cylinder to the ACC position.
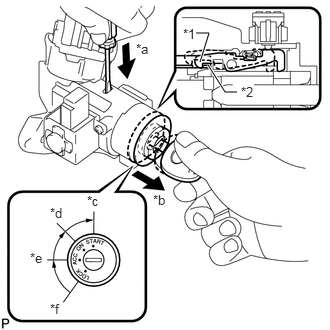
Push a screwdriver into the hole of the steering column upper with switch bracket assembly shown in the illustration and pull the ignition switch lock cylinder assembly until its claw contacts the stopper of the steering column upper with switch bracket assembly.
| *1 | Claw |
| *2 | Stopper |
| *a | Push |
| *b | Pull |
| *c | START |
| *d | ON |
| *e | ACC |
| *f | LOCK |
- HINT:
-
Make sure to pull the ignition switch lock cylinder assembly until its claw contacts the stopper of the steering column bracket assembly upper. Failure to do so will affect later work operations.
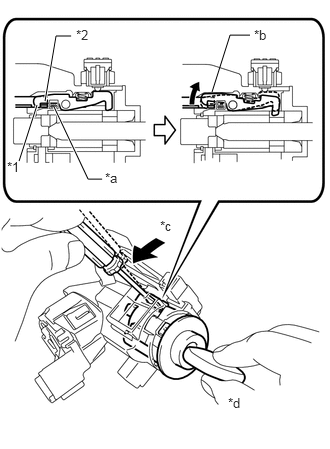
Insert a screwdriver into the hole of the steering column upper with switch bracket assembly. Push the screwdriver downward as shown in the illustration to detach the claw of the ignition switch lock cylinder assembly. Pull out the ignition switch lock cylinder assembly.
| *1 | Claw |
| *2 | Stopper |
| *a | Drive insertion Hole |
| *b | Claw disengaged |
| *c | Tilt |
| *d | Pull Out |
- HINT:
-
When the ignition lock cylinder assembly disengages, a click sound is heard.
84052
5.REMOVE UNLOCK WARNING SWITCH ASSEMBLY
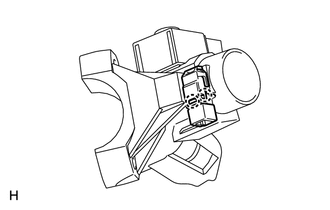
Detach the 2 claws and remove the switch.
85432
6.REMOVE KEY INTERLOCK SOLENOID
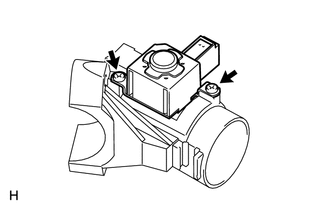
Remove the 2 screws and key interlock solenoid from the switch bracket.
84450
7.REMOVE IGNITION SWITCH ASSEMBLY
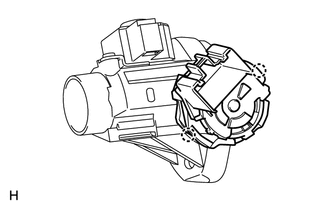
Detach the 2 claws and remove the ignition switch from the switch bracket.