RM27L0U
_58
Vehicle Interior
_049339
METER / GAUGE / DISPLAY
_0235844
METER / GAUGE SYSTEM
J
METER / GAUGE / DISPLAY METER / GAUGE SYSTEM Voltage Meter Malfunction
DESCRIPTION
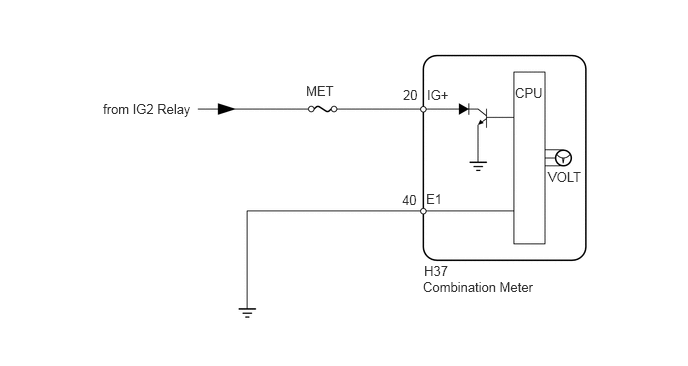
The voltmeter indicates the voltage applied to the IG+ terminal of the combination meter.
WIRING DIAGRAM
4.417,2.74 4.74,2.948
0.323,0.208
10
false
H37
1.073,1.052 2.01,1.271
0.938,0.219
10
false
from IG2 Relay
3.188,0.865 3.552,1.042
0.365,0.177
10
false
MET
4.198,0.906 4.396,1.083
0.198,0.177
10
false
20
4.188,2 4.385,2.177
0.198,0.177
10
false
40
4.448,0.906 4.771,1.083
0.323,0.177
10
false
IG+
5.708,1.76 6.083,1.938
0.375,0.177
10
false
VOLT
5.365,0.885 5.688,1.063
0.323,0.177
10
false
CPU
4.438,1.99 4.76,2.167
0.323,0.177
10
false
E1
4.406,2.906 5.698,3.115
1.292,0.208
10
false
Combination Meter
PROCEDURE
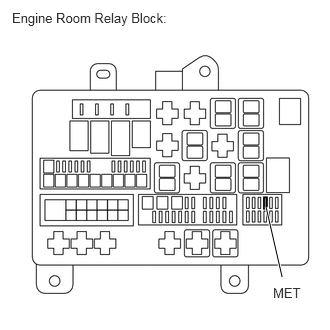
1.INSPECT FUSE (MET)
a.
2.771,2.156 2.938,2.885
true
0.125,0.104 1.802,0.302
1.677,0.198
10
false
Engine Room Relay Block:
2.844,2.969 3.188,3.156
0.344,0.188
10
false
MET
Remove the MET fuse from the engine room relay block.
b.
Measure the resistance according to the value(s) in the table below.
- Standard Resistance:
Tester Connection Condition Specified Condition MET fuse Always Below 1 Ω
OK
2.PERFORM ACTIVE TEST USING TECHSTREAM (VOLTMETER)
NG
CHECK FOR SHORTS IN ALL HARNESSES AND CONNECTORS CONNECTED TO FUSE AND REPLACE FUSE
2.PERFORM ACTIVE TEST USING TECHSTREAM (VOLTMETER)
a.
Connect the Techstream to the DLC3.
b.
Turn the ignition switch to ON.
c.
Turn the Techstream ON.
d.
Enter the following menus: Body Electrical / Combination Meter / Active Test.
e.
According to the display on the Techstream, perform the Active Test.
| Tester Display | Test Part | Control Range | Diagnostic Note |
|---|---|---|---|
| Volt Meter Operation | Voltmeter | 0, 3, 6, 9, 12, 15 or 18 | Perform the test with the vehicle stopped and engine idling |
- OK:
Needle indication is normal.
OK
3.CHECK HARNESS AND CONNECTOR (COMBINATION METER - BATTERY AND BODY GROUND)
NG
REPLACE COMBINATION METER ASSEMBLY
3.CHECK HARNESS AND CONNECTOR (COMBINATION METER - BATTERY AND BODY GROUND)
a.
1.083,1.448 0.844,1.542
true
0.823,1.25 1.083,1.375
true
0.083,0.094 2.354,0.479
2.271,0.385
10
false
Rear view of wire harness connector: (to Combination Meter)
2.646,1.271 2.917,1.438
0.271,0.167
10
false
H37
0.542,1.177 0.781,1.354
0.24,0.177
10
false
IG+
0.635,1.51 0.833,1.698
0.198,0.188
10
false
E1
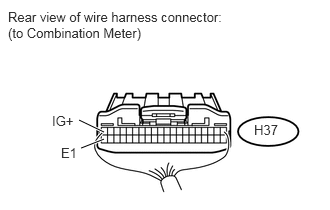
Disconnect the H37 meter connector.
b.
Measure the resistance and voltage according to the value(s) in the table below.
- Standard Resistance:
Tester Connection Condition Specified Condition H37-40 (E1) - Body ground Always Below 1 Ω
- Standard Voltage:
Tester Connection Switch Condition Specified Condition H37-20 (IG+) - Body ground Ignition switch ON 11 to 14 V Ignition switch off Below 1 V
OK
REPLACE COMBINATION METER ASSEMBLY
NG
REPAIR OR REPLACE HARNESS OR CONNECTOR