Home › Vehicle Interior › HEATING / AIR CONDITIONING › AIR CONDITIONING SYSTEM
RM27L0U _58 Vehicle Interior _049344 HEATING / AIR CONDITIONING _0235901 AIR CONDITIONING SYSTEM J

HEATING / AIR CONDITIONING  AIR CONDITIONING SYSTEM  Blower Motor Circuit  


DESCRIPTION

The blower motor is operated by signals from the air conditioning amplifier. Blower motor speed signals are transmitted by changes in the duty ratio.

Duty Ratio:
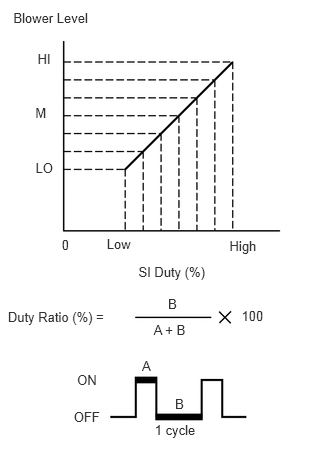
E132503E03
0.139,0.108 1.063,0.281 0.924,0.173 10 Blower Level 0.391,0.53 0.649,0.732 0.258,0.202 10 HI 0.368,1.098 0.640,1.305 0.272,0.207 10 M 0.37,1.671 0.643,1.893 0.273,0.222 10 LO 0.643,2.469 0.799,2.680 0.156,0.211 10 0 1.112,2.461 1.427,2.607 0.315,0.147 10 Low 2.39,2.48 2.767,2.673 0.377,0.193 10 High 1.442,2.75 2.200,2.953 0.758,0.203 10 SI Duty (%) 0.082,3.224 1.130,3.417 1.048,0.193 10 Duty Ratio (%) = 1.601,3.35 2.016,3.515 0.415,0.165 10 A + B 1.75,3.086 1.942,3.279 0.193,0.193 10 B 1.479,3.733 1.672,3.926 0.193,0.193 10 A 1.823,4.129 2.016,4.322 0.193,0.193 10 B 2.516,3.21 2.822,3.378 0.306,0.169 10 100 0.803,3.871 1.088,4.061 0.286,0.191 10 ON 0.768,4.26 1.146,4.444 0.378,0.184 10 OFF 1.611,4.392 2.128,4.533 0.517,0.141 10 1 cycle

The duty ratio is the ratio of the blower motor OFF time (B) to the total of the blower motor ON and OFF time (A + B).

The blower motor controller controls the blower motor speed.

WIRING DIAGRAM
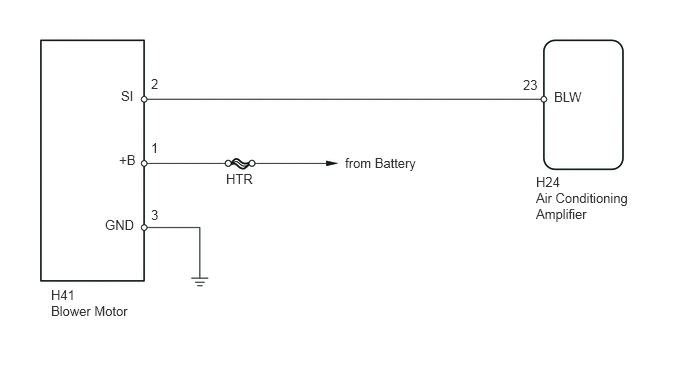
E161569E04
1.26,0.917 1.49,1.073 0.229,0.156 10 false SI 1.24,1.583 1.458,1.75 0.219,0.167 10 false +B 1.094,2.26 1.448,2.417 0.354,0.156 10 false GND 1.573,0.792 1.688,0.958 0.115,0.167 10 false 2 1.573,2.156 1.688,2.302 0.115,0.146 10 false 3 1.573,1.458 1.708,1.615 0.135,0.156 10 false 1 0.531,2.99 0.823,3.156 0.292,0.167 10 false H41 0.531,3.156 1.375,3.333 0.844,0.177 10 false Blower Motor 2.354,1.781 2.99,1.927 0.635,0.146 10 false HTR 3.594,1.615 4.406,1.781 0.813,0.167 10 false from Battery 5.448,0.802 5.677,0.979 0.229,0.177 10 false 23 5.771,0.927 6.115,1.094 0.344,0.167 10 false BLW 5.583,1.813 5.875,1.969 0.292,0.156 10 false H24 5.583,1.979 6.625,2.313 1.042,0.333 10 false Air Conditioning Amplifier

PROCEDURE

1.PERFORM ACTIVE TEST USING TECHSTREAM (BLOWER MOTOR)
a.

Connect the Techstream to DLC3.


b.

Turn the ignition switch to ON.


c.

Turn the Techstream on.


d.

Enter the following menus: Body Electrical / Air Conditioner / Active Test/ Blower Motor


e.

According to the display on the Techstream, check blower motor operation while performing the Active Test.

Air Conditioner
Tester Display Test Part Control Range Diagnostic Note
Blower Motor Blower motor Min.: 0, Max.: 31 -

Result
Result Proceed to
NG (blower motor does not operate) A
NG (blower motor operates but does not change speed) B
OK C


A

2.INSPECT FUSE (HTR)

B

5.CHECK BLOWER MOTOR (SI VOLTAGE)

C

PROCEED TO NEXT CIRCUIT INSPECTION SHOWN IN PROBLEM SYMPTOMS TABLE

2.INSPECT FUSE (HTR)
a.
E161570E12
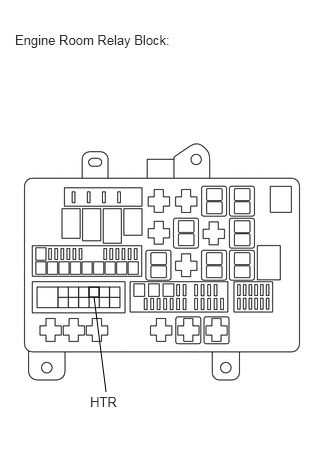
0.927,2.99 1.031,3.094 0.104,0.104 0.979,3.094 1.104,4.083 false 0.156,0.333 1.99,0.563 1.833,0.229 10 false Engine Room Relay Block: 0.938,4.104 1.292,4.26 0.354,0.156 10 false HTR

Remove the HTR fuse from the engine room relay block.


b.

Measure the resistance according to the value(s) in the table below.

Standard Resistance:
Tester Connection Condition Specified Condition
HTR fuse Always Below 1 Ω


c.

Reinstall the HTR fuse.


OK

3.CHECK HARNESS AND CONNECTOR (BLOWER MOTOR - BATTERY AND BODY GROUND)

NG

REPLACE FUSE

3.CHECK HARNESS AND CONNECTOR (BLOWER MOTOR - BATTERY AND BODY GROUND)
U153989E01
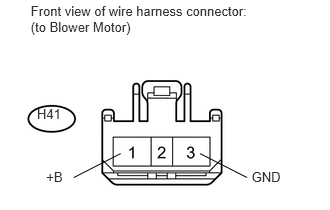
0.32,0.03 2.712,0.463 2.392,0.434 10 Front view of wire harness connector: (to Blower Motor) 0.385,1.107 0.678,1.263 0.293,0.156 10 H41 2.083,1.599 2.573,1.849 false 1.257,1.599 0.768,1.849 false 2.621,1.757 2.958,1.933 0.336,0.177 10 GND 0.481,1.758 0.818,1.935 0.336,0.177 10 +B

a.

Disconnect the H41 blower motor connector.


b.

Measure the resistance and voltage according to the value(s) in the table below.

Standard Resistance:
Tester Connection Condition Specified Condition
H41-3 (GND) - Body ground Always Below 1 Ω


Standard Voltage:
Tester Connection Condition Specified Condition
H41-1 (+B) - Body ground Always 11 to 14 V


c.

Reconnect the blower motor connector.


OK

4.CHECK HARNESS AND CONNECTOR (AIR CONDITIONING AMPLIFIER - BLOWER MOTOR)

NG

REPAIR OR REPLACE HARNESS OR CONNECTOR

4.CHECK HARNESS AND CONNECTOR (AIR CONDITIONING AMPLIFIER - BLOWER MOTOR)
E345210E01
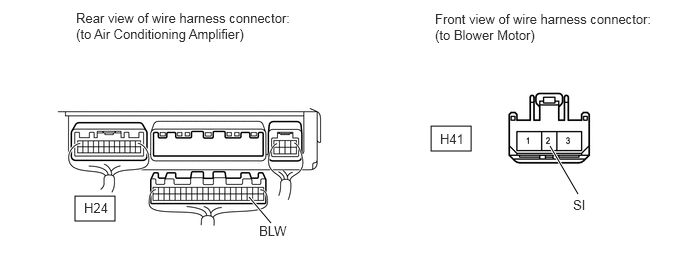
0.781,2.042 1.198,2.302 0.417,0.26 4.49,1.313 4.906,1.573 0.417,0.26 2.823,2.323 2.594,2.052 true 6.021,2.021 5.729,1.521 true 0.792,0.104 3.042,0.854 2.25,0.75 10 false Rear view of wire harness connector: (to Air Conditioning Amplifier) 4.531,0.115 6.781,0.865 2.25,0.75 10 false Front view of wire harness connector: (to Blower Motor) 0.875,2.083 1.333,2.281 0.458,0.198 10 false H24 4.583,1.365 5.042,1.563 0.458,0.198 10 false H41 2.698,2.323 3.156,2.521 0.458,0.198 10 false BLW 5.969,2.052 6.281,2.25 0.313,0.198 10 false SI

a.

Disconnect the H24 air conditioning amplifier connector.


b.

Disconnect the H41 blower motor connector.


c.

Measure the resistance according to the value(s) in the table below.

Standard Resistance:
Tester Connection Condition Specified Condition
H24-23 (BLW) - H41-2 (SI) Always Below 1 Ω
H24-23 (BLW) or H41-2 (SI) - Body ground Always 10 kΩ or higher


d.

Reconnect the blower motor connector.


e.

Reconnect the air conditioning amplifier connector.


OK

5.CHECK BLOWER MOTOR (SI VOLTAGE)

NG

REPAIR OR REPLACE HARNESS OR CONNECTOR

5.CHECK BLOWER MOTOR (SI VOLTAGE)
U153928E01
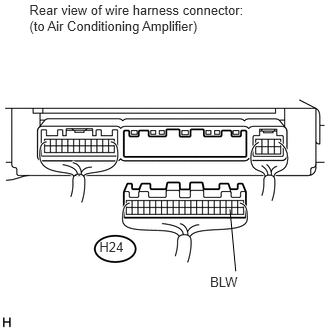
2.188,2.851 2.561,3.010 0.372,0.159 10 BLW 2.395,2.18 2.455,2.825 false 0.306,0.021 2.650,0.345 2.344,0.324 10 Rear view of wire harness connector: (to Air Conditioning Amplifier) 1.035,2.489 1.325,2.647 0.290,0.159 10 H24

a.

Disconnect the H24 air conditioning amplifier connector.


b.

Measure the voltage according to the value(s) in the table below.

Standard Voltage:
Tester Connection Switch Condition Specified Condition
H24-23 (BLW) - Body ground Ignition switch ON 4.5 to 5.5 V


c.

Reconnect the air conditioning amplifier connector.


OK

6.INSPECT AIR CONDITIONING AMPLIFIER (BLW VOLTAGE)

NG

6.INSPECT AIR CONDITIONING AMPLIFIER (BLW VOLTAGE)
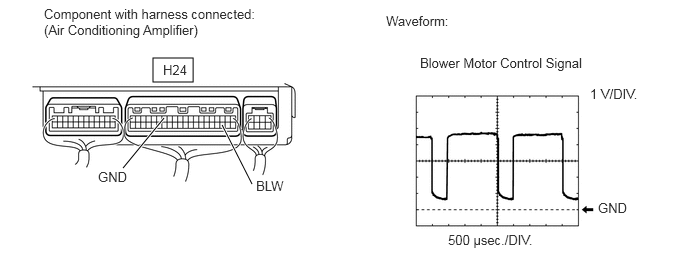
E345211E01
1.594,0.604 2.01,0.854 0.417,0.25 1.281,1.75 1.708,1.229 true 2.625,1.917 2.313,1.302 true 0.458,0.063 2.667,0.615 2.208,0.552 10 false Component with harness connected: (Air Conditioning Amplifier) 1.698,0.646 2.156,0.844 0.458,0.198 10 false H24 1.021,1.76 1.479,1.958 0.458,0.198 10 false GND 2.667,1.854 3.125,2.052 0.458,0.198 10 false BLW 4.021,0.135 5.396,0.333 1.375,0.198 10 false Waveform: 4.375,0.573 6.146,0.833 1.771,0.26 10 false Blower Motor Control Signal 6.146,0.896 6.688,1.125 0.542,0.229 10 false 1 V/DIV. 6.229,2.083 6.771,2.313 0.542,0.229 10 false GND 4.667,2.417 6.229,2.688 1.563,0.271 10 false 500 μsec./DIV.

a.

Remove the air conditioning amplifier with its connectors still connected (See page Vehicle Interior>HEATING / AIR CONDITIONING>AIR CONDITIONING AMPLIFIER>REMOVAL).


b.

Turn the ignition switch to ON.


c.

Turn the blower switch to LO.


d.

Using an oscilloscope, check the waveform.

Blower Motor Control Signal
Terminal Name BLW - GND
Tester Range 1 V/DIV, 500 μsec./DIV
Condition Ignition switch ON
Blower switch LO

HINT:

Waveform varies with the blower level.


e.

Reinstall the air conditioning amplifier.


OK

PROCEED TO NEXT CIRCUIT INSPECTION SHOWN IN PROBLEM SYMPTOMS TABLE

NG