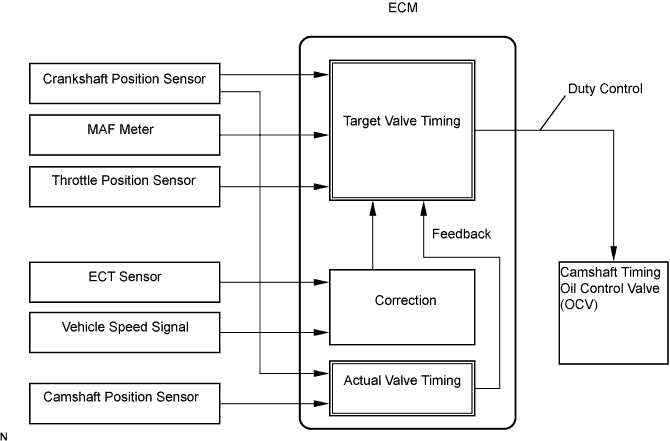
DTC P0013 Camshaft Position "B" Actuator Circuit / Open (Bank 1) |
DTC P0023 Camshaft Position "B" Actuator Circuit / Open (Bank 2) |
| DTC No. | DTC Detection Condition | Trouble Area |
| P0013 | Open or short in OCV for exhaust camshaft (bank 1) circuit (1 trip detection logic) |
|
| P0023 | Open or short in OCV for exhaust camshaft (bank 2) circuit (1 trip detection logic) |
|
| Related DTCs | P0013: VVT OCV (bank 1) range check P0023: VVT OCV (bank 2) range check |
| Required sensors / components (Main) | VVT OCV (Variable Valve Timing oil control valve) |
| Required sensors / components (Sub) | - |
| Frequency of operation | Continuous |
| Duration | 1 second |
| MIL operation | Immediate |
| Sequence of operation | None |
| The monitor will run whenever these DTCs are not present | None |
| All of the following conditions are met: | - |
| Starter | OFF |
| Ignition switch | ON |
| Time after ignition switch off to on | 0.5 seconds or more |
| One of the following conditions is met: | Condition A, B or C |
| A. All of the following conditions are met: | - |
| Battery voltage | 11 to 13 V |
| Target duty ratio | Less than 70% |
| Current cut status | Not cut |
| B. All of the following conditions are met: | - |
| Battery voltage | 13 V or more |
| Target duty ratio | Less than 80% |
| Current cut status | Not cut |
| Exhaust VVT Oil Control Valve condition | Not operation record |
| Exhaust VVT Oil Control Valve condition | Operation record |
| 1.PERFORM ACTIVE TEST USING TECHSTREAM (OPERATE OCV) |
Connect the Techstream to the DLC3.
Start the engine and turn the tester on.
Warm up the engine.
Enter the following menus: Powertrain / Engine and ECT / Active Test / Control the VVT Exhaust Linear (Bank 1) or Control the VVT Exhaust Linear (Bank 2).
Check the engine speed while operating the Oil Control Valve (OCV) using the tester.
| Tester Operation | Specified Condition |
| OCV OFF | Normal engine speed |
| OCV ON | Engine idles roughly or stalls (soon after OCV switched from OFF to ON) |
|
| ||||
| OK | ||
 | ||
| ||
| 2.INSPECT CAMSHAFT TIMING OIL CONTROL VALVE ASSEMBLY (OCV) |
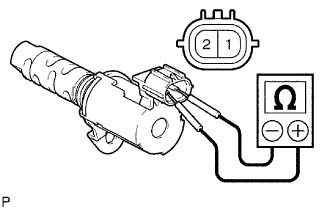 |
Disconnect the C26 or C25 camshaft timing oil control valve (OCV) connector.
Measure the resistance according to the value(s) in the table below.
| Tester Connection | Condition | Specified Condition |
| 1 - 2 | 20°C (68°F) | 6.9 to 7.9 Ω |
Reconnect the OCV connector.
|
| ||||
| NG | ||
| ||
| ||
| 3.CHECK HARNESS AND CONNECTOR (OCV - ECM) |
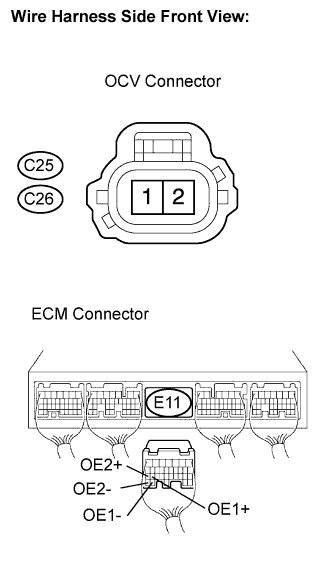 |
Disconnect the C25 or C26 camshaft timing oil control valve (OCV) connector.
Disconnect the E11 ECM connector.
Measure the resistance according to the value(s) in the table below.
| Tester Connection | Specified Condition |
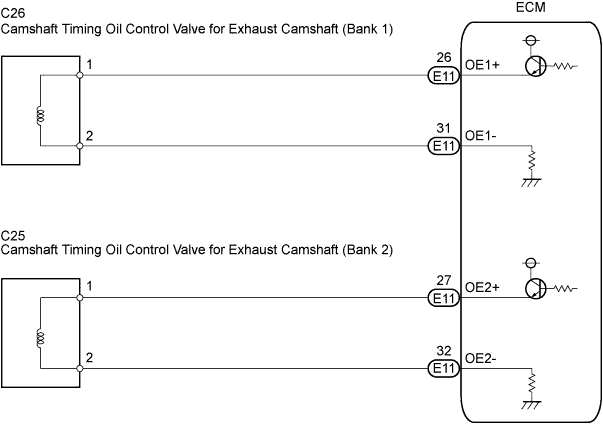
| OE1+ (E11-26) - C26-1 | Below 1 Ω |
| OE1- (E11-31) - C26-2 | Below 1 Ω |
| OE2+ (E11-27) - C25-1 | Below 1 Ω |
| OE2- (E11-32) - C25-2 | Below 1 Ω |
| Tester Connection | Specified Condition |
| OE1+ (E11-26) or C26-1 - Body ground | 10 kΩ or higher |
| OE1- (E11-31) or C26-2 - Body ground | 10 kΩ or higher |
| OE2+ (E11-27) or C25-1 - Body ground | 10 kΩ or higher |
| OE2- (E11-32) or C25-2 - Body ground | 10 kΩ or higher |
Reconnect the ECM connector.
Reconnect the OCV connector.
|
| ||||
| OK | ||
| ||
| ||

