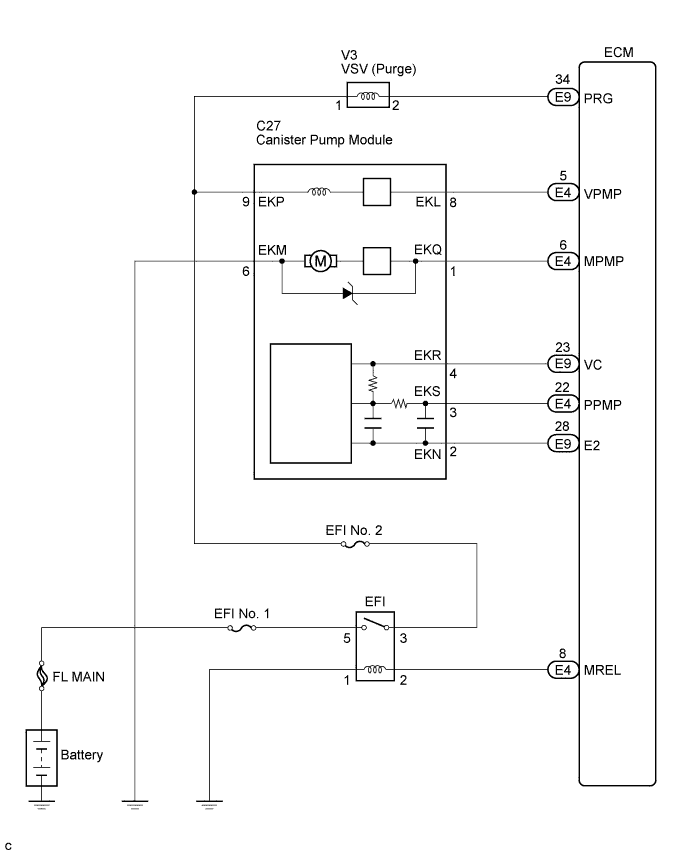
DTC P0450 Evaporative Emission Control System Pressure Sensor / Switch |
DTC P0451 Evaporative Emission Control System Pressure Sensor Range / Performance |
DTC P0452 Evaporative Emission Control System Pressure Sensor / Switch Low Input |
DTC P0453 Evaporative Emission Control System Pressure Sensor / Switch High Input |
| DTCs | Monitoring Item | Malfunction Detection Condition | Trouble Area | Detection Timing | Detection Logic |
| P0450 | Canister pressure sensor abnormal voltage fluctuation | Sensor output voltage rapidly fluctuates beyond upper and lower malfunction thresholds for 0.5 seconds. |
|
| 1 trip |
| P0451 | Canister pressure sensor abnormal voltage fluctuation | Sensor output voltage fluctuates frequently in a certain time period. |
|
| 2 trip |
| P0451 | Canister pressure sensor constant voltage | Sensor output voltage does not vary in a certain time period. | EVAP monitoring (ignition switch OFF) | 2 trip | |
| P0452 | Canister pressure sensor voltage low | Sensor output voltage is less than 0.45 V for 0.5 seconds. |
| 1 trip | |
| P0453 | Canister pressure sensor voltage high | Sensor output voltage is more than 4.9 V for 0.5 seconds. |
| 1 trip |
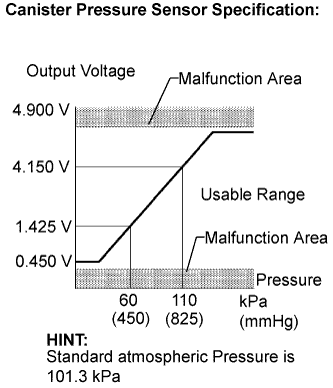
| Related DTCs | P0450: Evaporative emission control system canister pressure sensor/switch chattering P0451: Evaporative emission control system canister pressure sensor noise P0451: Evaporative emission control system canister pressure sensor stuck P0452: Evaporative emission control system canister pressure sensor/switch low input P0453: Evaporative emission control system canister pressure sensor/switch high input |
| Required Sensors / Components | Canister pump module |
| Frequency of Operation | Once per driving cycle: P0451 sensor stuck Continuous: P0451 sensor noising, P0450, P0452 and P0453 |
| Duration | Less than 15 seconds: P0451 (Pressure sensor noise) Within 2 minutes: P0451 (Pressure sensor stuck) 0.5 seconds: P0450, P0452, P0453 |
| MIL Operation | Immediate: P0450, P0452, P0453 2 driving cycles: P0451 |
| Sequence of Operation | None |
| The monitor will run whenever these DTCs are not present | None |
| Atmospheric pressure | 70 to 110 kPa (525 to 825 mmHg) |
| Battery voltage | 10.5 V or more |
| IAT | 4.4 to 35°C (40 to 95°F) |
| Canister pressure sensor malfunction (P0450, P0452, P0453) | Not detected |
| Either of the following conditions 1 or 2 is met | - |
| 1. Engine condition | Running |
| 2. Time after key-off | 5 or 7 or 9.5 hours |
| Battery voltage | 10.5 V or more |
| IAT | 4.4 to 35°C (40 to 95°F) |
| Canister pressure sensor malfunction (P0450, P0452, P0453) | Not detected |
| Atmospheric pressure | 70 to 110 kPa (525 to 825 mmHg) |
| Time after key-off | 5 or 7 or 9.5 hours |
| Ignition switch | ON |
| Battery voltage | 8 V or more |
| Starter | OFF |
| EVAP pressure | Less than 42.11 kPa (316 mmHg), or more than 123.761 kPa (928 mmHg) |
| Frequency that EVAP pressure change is 0.3 kPa (2.25 mmHg) or more | 10 times or more in 10 seconds |
| EVAP pressure change during reference pressure measurement | Less than 0.65 kPa (4.876 mmHg) |
| EVAP pressure | Less than 42.11 kPa (316 mmHg) |
| EVAP pressure | More than 123.761 kPa (928 mmHg) |
| 1.CONFIRM DTC AND EVAP PRESSURE |
Connect the Techstream to the DLC3.
Turn the ignition switch to the ON position (do not start the engine).
Turn the tester on.
Select the following menu items: Powertrain / Engine and ECT / Trouble Code.
Read DTCs.
Select the following menu items: Powertrain / Engine and ECT / Data List / EVAP Vapor Pressure.
Read the EVAP (Evaporative Emission) pressure displayed on the tester.
| Display (DTC Output) | Test Result | Suspected Trouble Area | Proceed to |
| P0451 | - | Canister pressure sensor | C |
| P0452 | Less than 45 kPa-a (336 mmHg-a) |
| A |
| P0453 | More than 120 kPa-a (900 mmHg-a) |
| B |
|
| ||||
|
| ||||
| A | |
 |
| 2.CHECK HARNESS AND CONNECTOR (CANISTER PUMP MODULE - ECM) |
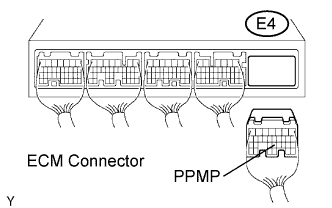 |
Turn the ignition switch off.
Disconnect the E4 ECM connector.
Measure the resistance between the PPMP terminal of the ECM connector and the body ground.
| Test Result | Suspected Trouble Area | Proceed to |
| 10 Ω or less |
| A |
| 10 kΩ or more |
| B |
Reconnect the ECM connector.
|
| ||||
| A | |
|
| 3.CHECK HARNESS AND CONNECTOR (CANISTER PUMP MODULE - ECM) |
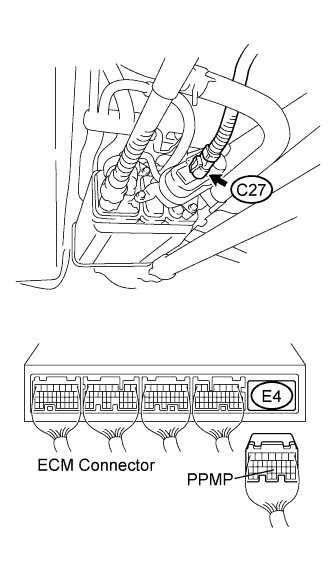 |
Disconnect the C27 canister pump module connector.
Disconnect the E4 ECM connector.
Measure the resistance between the PPMP terminal of the ECM connector and the body ground.
| Test Result | Suspected Trouble Area | Proceed to |
| 10 kΩ or more | Short in canister pressure sensor circuit | A |
| 10 Ω or less | Short in wire harness/connector (ECM - Canister pressure sensor) | B |
Reconnect the canister pump module connector.
Reconnect the ECM connector.
|
| ||||
|
| ||||
| 4.CHECK HARNESS AND CONNECTOR (CANISTER PUMP MODULE - ECM) |
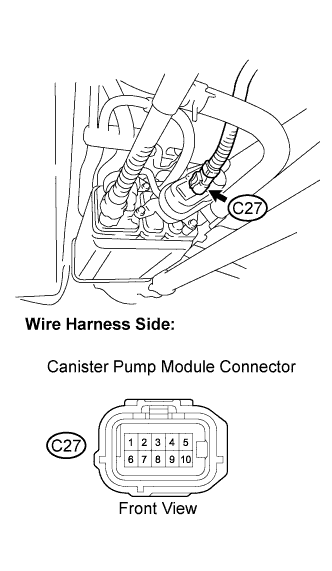 |
Disconnect the C27 canister pump module connector.
Turn the ignition switch to the ON position.
Measure the voltage and resistance of the canister connector.
| Tester Connection | Specified Condition |
| C27-4 - Body ground | 4.5 to 5.5 V |
| C27-3 - Body ground | 4.5 to 5.5 V |
| C27-2 - Body ground | 100 Ω or less |
| Test Result | Suspected Trouble Area | Proceed to |
| Voltage and resistance within standard ranges | Open in canister pressure sensor circuit | A |
| Voltage and resistance outside standard ranges | Open in wire harness/connector (ECM - Canister pressure sensor) | B |
Reconnect the canister pump module connector.
|
| ||||
|
| ||||
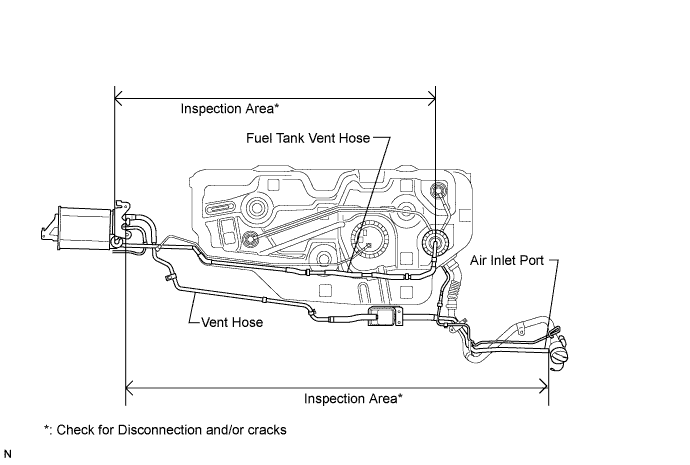
| 5.REPLACE CHARCOAL CANISTER ASSEMBLY |
Replace the canister assembly (Click here).
|
| ||||
| 6.REPAIR OR REPLACE HARNESS OR CONNECTOR (CANISTER PUMP MODULE - ECM) |
|
| ||||
| 7.REPLACE ECM |
Replace the ECM (Click here).
|
| ||||
| 8.CHECK WHETHER DTC OUTPUT RECURS (AFTER REPAIR) |
Connect the Techstream to the DLC3.
Turn the ignition switch to the ON position and turn the tester on.
Wait for at least 60 seconds.
On the tester, select the following menu items: Powertrain / Engine and ECT / Trouble Code / Pending.
| NEXT | ||
 | ||
| ||

