BRAKE (FRONT) FRONT BRAKE(for 4-Pot Caliper) REMOVAL
CAUTION / NOTICE / HINT
- CAUTION:
- ·
Vehicle may slip off the vehicle hoist if the vehicle hoist is handled incorrectly.
Danger! Life-threatening injuries!
-Observe safety information on raising the vehicle using a vehicle hoist.
-For additional information see:
Click hereGeneral>INTRODUCTION>REPAIR INSTRUCTION>VEHICLE LIFT AND SUPPORT LOCATIONS
- NOTICE:
- ·
General information on changing the brake pads:
-For vehicles older than 48 months it is recommended to replace the retaining spring or expanding spring.
-The pad wear indicator wire LH must be replaced once it has been removed because the pad wear indicator wire LH loses its retention capability in the brake pad.
·A CBS reset must be done after every brake pad exchange:
-A CBS reset in the vehicle is possible in the event of a partially ground down pad wear indicator wire LH. The CBS display in the multi-display is active.
-In the event of a pad wear indicator wire LH that is not partially ground down, a CBS reset is only possible with the diagnosis system. No CBS display in the multi-display.
Click hereGeneral>INTRODUCTION>REPAIR INSTRUCTION>CONDITION BASED SERVICE (CBS)
·After a front disc brake pad exchange and before applying the brake pedal:
-Apply the electromechanical parking brake.
-In case of non-compliance, a CC message appears and the brake system switches to the emergency program. The brake power assistance is no longer active.
·When exchanging brake pads, reset the CBS display in accordance with factory specification (CBS reset).
·Carry out test braking while driving at low speed because the effectiveness of the brakes may be reduced during the initial braking operations.
·Exaggerated emergency and continuous braking operations for faster bedding-in are not permitted.
·Advise the customer not to perform intentional emergency braking operations for the first 200 km (124 mile) after the brakes have been replaced.
- HINT:
- ·
The following procedure is for the LH side.
·Use the same procedure for the RH side and LH side.
PROCEDURE

 1.REMOVE FRONT WHEEL
2.REMOVE PAD WEAR INDICATOR WIRE LH (for LH Side)
3.REMOVE FRONT DISC BRAKE PAD
4.REMOVE FRONT DISC BRAKE CYLINDER ASSEMBLY
- NOTICE:
-
Schematic diagram is for example purposes. Some parts may differ in certain details.
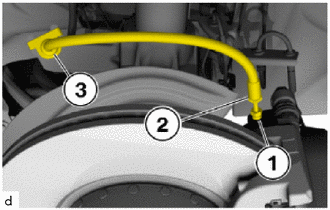
Release 11 mm union nut on the front flexible hose (1), counter support on the knurl (2).
- SST
- 09700-WA070
If necessary, detach front flexible hose (1) from the holder (3).
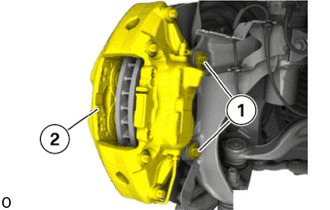
Loosen E16 bolts (1).
Remove the front disc brake cylinder assembly (2).
5.INSPECT FRONT DISC
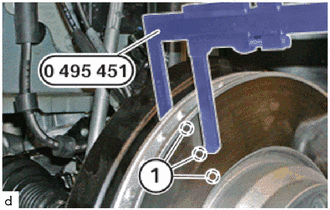
Place the special tool 0 495 451 (34 1 280) at three measuring points in area (1) and measure.
- SST
- 09700-WA090
Compare the measuring results and compare the lowest value with the setpoint value.
- Minimum brake disc thickness (nominal dimension 348x36):
34.4 mm (1.35 in.)
- NOTICE:
-
New front disc brake pads must only be installed if the front disc thickness is greater than the minimum front disc thickness.
6.REMOVE FRONT DISC
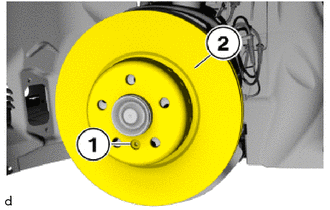
Loosen 5 mm hexagon bolt (1).
- HINT:
- ·
Note the following for the removal of the front disc:
-Do not under any circumstances strike the friction ring with a hammer or similar tool.
-If necessary, carefully tap with a rubber mallet against the front disc chamber.
Remove the front disc (2).