THEFT DETERRENT / KEYLESS ENTRY ELECTRICAL KEY OSCILLATOR(for Console Box Front Side) REMOVAL
CAUTION / NOTICE / HINT
- CAUTION:
- ·
Working on 12 V vehicle electrical system.
Risk of short circuits! Risk of fire!
-Detach the cable from the negative (-) battery terminal.
- NOTICE:
- ·
Electrostatic discharge.
Damage to or destruction of electrical components.
-Only touch the housings of electrical components. Do not touch pins or multi-pin connectors directly.
-For additional information see:
Click hereGeneral>INTRODUCTION>REPAIR INSTRUCTION>PRECAUTION
·Before performing work on electronic components, disconnect the cable from the negative (-) battery terminal to prevent damage to the electrical system or components.
·When disconnecting the cable, turn the START-STOP button (engine switch) and headlight switch off and loosen the cable nut completely. Perform these operations without twisting or prying on the cable. Then disconnect the cable.
·Clock settings, radio settings, audio system memory, DTCs and other data will be cleared when the cable is disconnected from the negative (-) battery terminal. Write down any necessary data before disconnecting the cable.
PROCEDURE

 58801D
1.REMOVE CONSOLE BOX ASSEMBLY
2.REMOVE NO. 1 INDOOR ELECTRICAL KEY ANTENNA ASSEMBLY
- NOTICE:
- ·
Electrostatic discharge.
Damage to or destruction of electrical components.
-Only touch the housings of electrical components. Do not touch pins or multi-pin connectors directly.
-For additional information see:
Click hereGeneral>INTRODUCTION>REPAIR INSTRUCTION>PRECAUTION
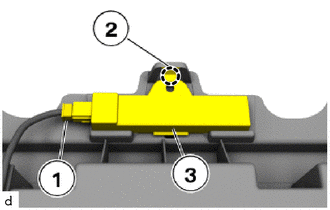
Disconnect the connector (1).
Detach the claw (2) to remove the No. 1 indoor electrical key antenna assembly (3).
- NOTICE:
-
Be careful when removing the No. 1 indoor electrical key antenna assembly. If the No. 1 indoor electrical key antenna assembly is dropped, replace it with a new one.