REAR SUSPENSION REAR SHOCK ABSORBER INSTALLATION
CAUTION / NOTICE / HINT
- HINT:
- ·
Use the same procedure for the RH side and LH side.
·The following procedure is for the LH side.
PROCEDURE

 48341B
1.INSTALL REAR NO. 1 SPRING BUMPER
Mount rear No. 1 spring bumper.
48760B
2.INSTALL REAR SUSPENSION SUPPORT ASSEMBLY
Secure the rear suspension support assembly in a vise using aluminum plates.
- NOTICE:
-
Do not overtighten the vise.
Install the rear suspension support assembly to the rear shock absorber assembly.
Replace the rear support to rear shock absorber nut.
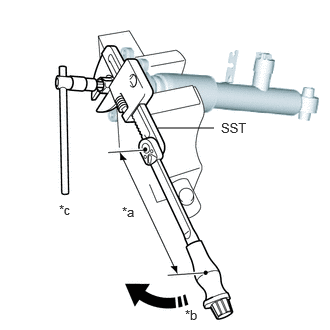
| *a | Torque Wrench Fulcrum Length |
| *b | Turn |
| *c | Hold |
Using SST, hold the rear shock absorber rod and tighten the rear support to rear shock absorber nut.
- SST
- 09700-WA010
09700-WA020
09922-10010
- Torque:
- Specified tightening torque : 41 N*m (418 kgf*cm, 30 ft.*lbf)
- NOTICE:
-
Securely insert SST into the rear shock absorber rod to prevent damage to the rear shock absorber assembly when tightening the rear support to rear shock absorber nut.
- HINT:
- ·
Calculate the torque wrench reading when changing the fulcrum length of the torque wrench.
Click hereGeneral>INTRODUCTION>REPAIR INSTRUCTION>PRECAUTION
·When using SST (fulcrum length of 136 mm (5.35 in.)) + torque wrench (fulcrum length of 180 mm (7.09 in.)):
23.4 N*m (239 kgf*cm, 17 ft.*lbf)
48540
3.INSTALL REAR SHOCK ABSORBER ASSEMBLY
Install the rear No. 1 shock absorber cushion.
Press the rear shock absorber assembly together and guide downwards into the wheel arch.
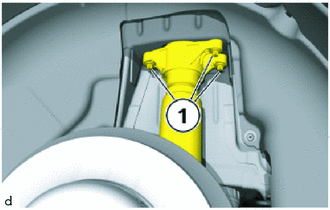
Tighten the E14 bolts (1).
- Torque:
- 28 N*m (286 kgf*cm, 21 ft.*lbf)
Clip in cable into the holder.
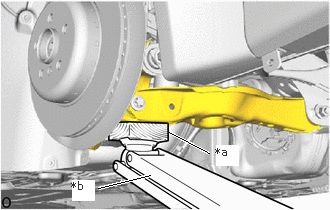
| *a | Wooden Block |
| *b | Jack |
Support the rear axle carrier sub-assembly with the jack and wooden block.
Lift the rear axle carrier sub-assembly with the jack and wooden block to the point where a new E18 bolt can be inserted.
Using an 18 mm deep socket wrench, tighten a new nut.
- Torque:
- 100 N*m (1020 kgf*cm, 74 ft.*lbf)
Using SST and 18 mm deep socket wrench, tighten the nut an additional 90°.
- SST
- 09900-WA010
- HINT:
- ·
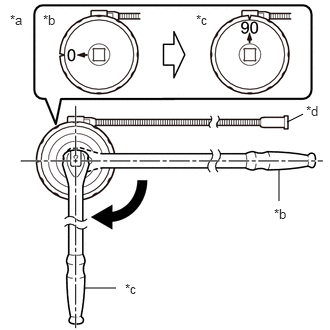 2.99,1.271 3.156,1.188 false 2.906,2.094 2.906,1.76 false 0.875,3 1.208,3 false 0.104,0.125 0.417,0.281 0.313,0.156 10 false *a 0.448,0.125 0.76,0.281 0.313,0.156 10 false *b 2.042,0.125 2.354,0.281 0.313,0.156 10 false *c 3.188,1.073 3.427,1.271 0.24,0.198 10 false *d 2.854,2.146 3.167,2.302 0.313,0.156 10 false *b 1.302,2.927 1.615,3.083 0.313,0.156 10 false *c
*a Example *b Before Tightening *c After Tightening *d Magnetic Portion
·The magnetic portion is used to secure the gauge to the vehicle.
·After first adjusting the needle of the gauge to 0°, tighten to the specified angle.
·Perform the work procedure carefully so that the gauge, etc. does not become tilted.
Remove the jack and wooden block from under the vehicle.
w/ AVS:
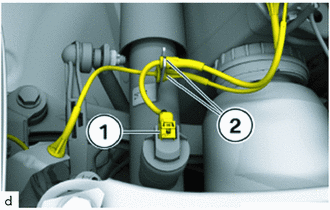
Connect connectors (1) and lock.
Attach the lines (2) to the holder.
48738
4.INSTALL REAR SUSPENSION ARM COVER
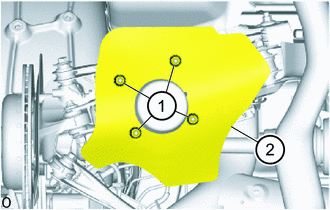
Install the rear suspension arm cover (2).
Replace the nuts (1).
Tighten down nuts (1).
- Torque:
- 6.0 N*m (61 kgf*cm, 53 in.*lbf)
5.INSTALL REAR WHEEL