REAR SUSPENSION REAR STABILIZER BAR REMOVAL
CAUTION / NOTICE / HINT
- CAUTION:
- ·
Vehicle may slip off the vehicle hoist if the vehicle hoist is handled incorrectly.
Danger! Life-threatening injuries!
-Observe safety information on raising the vehicle using a vehicle hoist.
-For additional information see:
Click hereGeneral>INTRODUCTION>REPAIR INSTRUCTION>VEHICLE LIFT AND SUPPORT LOCATIONS
PROCEDURE

 1.REMOVE REAR WHEEL
48840A
2.REMOVE REAR STABILIZER LINK ASSEMBLY LH
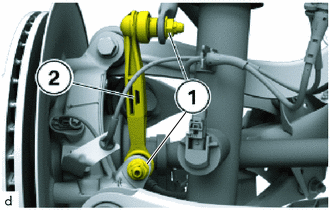
Unscrew the 16 mm nuts (1) and use the T30 "TORX" socket wrench for counter support as needed.
Remove the rear stabilizer link assembly LH (2).
48830D
3.REMOVE REAR STABILIZER LINK ASSEMBLY RH
- HINT:
-
Use the same procedure as for the LH side.
51206A
4.REMOVE REAR SUSPENSION MEMBER SUB-ASSEMBLY
48812
5.REMOVE REAR STABILIZER BAR
- CAUTION:
- ·
The rear suspension member sub-assembly is a very heavy component. Make sure that it is supported securely.
·If the rear suspension member sub-assembly is not securely supported, it may drop, resulting in serious injury.
- NOTICE:
-
Use attachments and wooden blocks to keep the rear suspension member sub-assembly level.
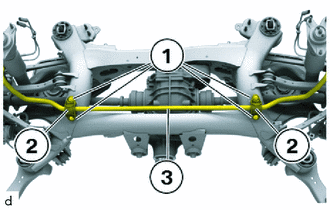
Loosen E12 bolts (1).
Detach both rear No. 1 stabilizer bar brackets (2).
Remove the rear stabilizer bar (3).
- NOTICE:
-
Keep the rear stabilizer bar clean and free of oil and grease.