PARK ASSIST / MONITORING ULTRASONIC SENSOR(for Front) INSTALLATION
PROCEDURE

 89348
1.INSTALL NO. 1 ULTRASONIC SENSOR RETAINER
- HINT:
- ·
Perform this procedure only when replacement of the No. 1 ultrasonic sensor retainer is necessary.
·The illustration is for the LH side.
·The orientation for the RH side is the opposite of the LH side.
for front side:
- HINT:
-
If a No. 1 ultrasonic sensor retainer has been removed, replace it with a new one. Install the front side ultrasonic sensor with a new No. 1 ultrasonic sensor retainer as a set to the front bumper assembly.
Remove any remaining double-sided tape from the front bumper assembly.
Install the ultrasonic sensor O-ring.
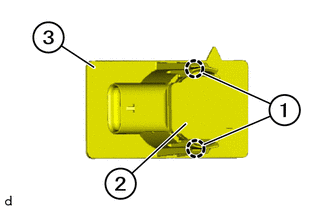
Attach the claws (1) to install the front side ultrasonic sensor (2) to a new No. 1 ultrasonic sensor retainer (3).
- HINT:
-
To align the positions of the front bumper assembly and ultrasonic sensor, assemble the front side ultrasonic sensor (2) and No. 1 ultrasonic sensor retainer (3) as a single part.
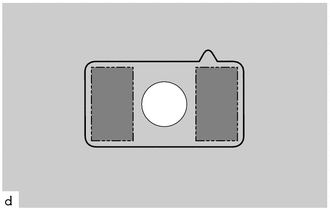

|
No. 1 Ultrasonic Sensor Retainer Installation Surface |
Using sandpaper (#80 is recommended), slightly roughen the installation surfaces of the No. 1 ultrasonic sensor retainer as shown in the illustration.
Using cleaner, clean the areas that were roughened by the sandpaper.
- Cleaner:
Cleaner R2
Peel off the release paper from the No. 1 ultrasonic sensor retainer.
- HINT:
-
After removing the peeling paper, do not touch the surface of the tape with your fingers or cotton work gloves.
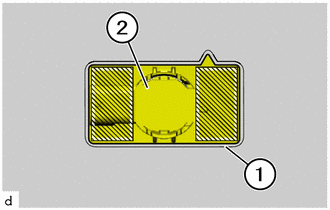

|
Press area |
Align the No. 1 ultrasonic sensor retainer and front side ultrasonic sensor (2) with the scribed line (1) on the front bumper assembly and install it as shown in the illustration.
- NOTICE:
- ·
Make sure that the front bumper assembly and the front side ultrasonic sensor are properly aligned.
·Detaching and reattaching a No. 1 ultrasonic sensor retainer will degrade its adhesive performance, so if reattachment is necessary, make sure to clean the installation surface again and replace the No. 1 ultrasonic sensor retainer with a new one.
- HINT:
-
Press the area shown in the illustration with a force of to securely install the No. 1 ultrasonic sensor retainer to the front bumper assembly. Confirm there is no clearance between the No. 1 ultrasonic sensor retainer and front bumper assembly.
for front corner side:
- HINT:
-
If a No. 1 ultrasonic sensor retainer has been removed, replace it with a new one. Install the front corner ultrasonic sensor with a new No. 1 ultrasonic sensor retainer as a set to the front bumper assembly.
Remove any remaining double-sided tape from the front bumper assembly.
Install the ultrasonic sensor O-ring.
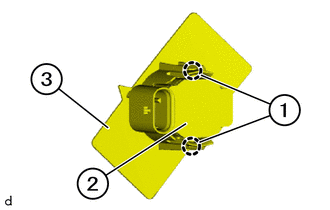
Attach the claws (1) to install the front corner ultrasonic sensor (2) to a new No. 1 ultrasonic sensor retainer (3).
- HINT:
-
To align the positions of the front bumper assembly and ultrasonic sensor, assemble the front corner ultrasonic sensor (2) and No. 1 ultrasonic sensor retainer (3) as a single part.
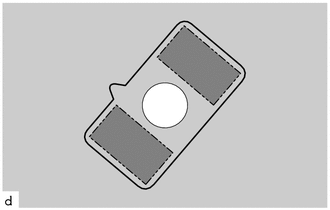
|
|
No. 1 Ultrasonic Sensor Retainer Installation Surface |
Using sandpaper (#80 is recommended), slightly roughen the installation surfaces of the No. 1 ultrasonic sensor retainer as shown in the illustration.
Using cleaner, clean the areas that were roughened by the sandpaper.
- Cleaner:
Cleaner R2
Peel off the release paper from the No. 1 ultrasonic sensor retainer.
- HINT:
-
After removing the peeling paper, do not touch the surface of the tape with your fingers or cotton work gloves.
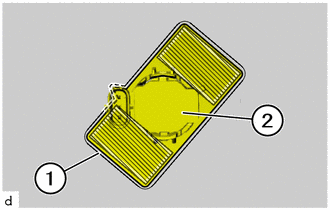
|
|
Press area |
Align the No. 1 ultrasonic sensor retainer and front corner ultrasonic sensor (2) with the scribed line (1) on the front bumper assembly and install it as shown in the illustration.
- NOTICE:
- ·
Make sure that the front bumper assembly and the front corner ultrasonic sensor are properly aligned.
·Detaching and reattaching a No. 1 ultrasonic sensor retainer will degrade its adhesive performance, so if reattachment is necessary, make sure to clean the installation surface again and replace the No. 1 ultrasonic sensor retainer with a new one.
- HINT:
-
Press the area shown in the illustration with a force of to securely install the No. 1 ultrasonic sensor retainer to the front bumper assembly. Confirm there is no clearance between the No. 1 ultrasonic sensor retainer and front bumper assembly.
for front center side:
- HINT:
-
The No. 1 ultrasonic sensor retainer of the front center ultrasonic sensor is welded to the front bumper assembly and cannot be removed.
Install the ultrasonic sensor O-ring.
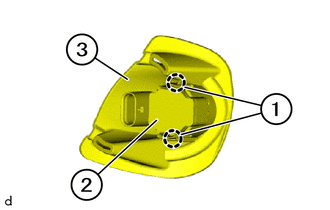
Attach the claws (1) to temporarily install the front center ultrasonic sensor (2) to a new No. 1 ultrasonic sensor retainer (3).
- HINT:
-
To align the positions of the front bumper assembly and ultrasonic sensor, assemble the front center ultrasonic sensor (2) and No. 1 ultrasonic sensor retainer (3) as a single part.
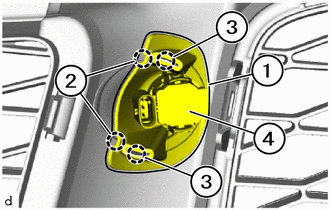
Attach the guides (2) and guides (3).
Align the No. 1 ultrasonic sensor retainer and front center ultrasonic sensor (4) with the scribed line (1) on the front bumper assembly and position it as shown in the illustration.
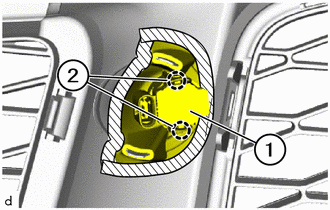
|
|
Adhesive tape |
Apply adhesive tape to temporarily install the No. 1 ultrasonic sensor retainer (1) to the front bumper assembly as shown in the illustration.
- NOTICE:
-
Ensure that the sensor tip is correctly inserted into the sensor installation hole of the front bumper assembly.
Detach the claws (2) to remove the front center ultrasonic sensor.
- NOTICE:
-
When removing the front center ultrasonic sensor, make sure that the temporarily installed No. 1 ultrasonic sensor retainer does not come off.
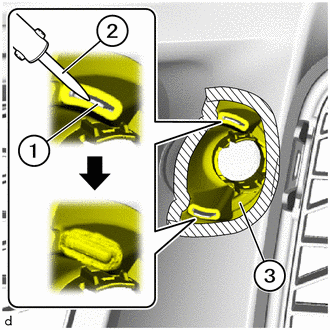
|
|
Adhesive tape |
Using a soldering iron (2), melt the guides (1) of the front bumper assembly to install the No. 1 ultrasonic sensor retainer (3) as shown in the illustration.
- SST
- 54202
- CAUTION:
- ·
Do not touch the soldering iron tip or the melted areas.
·Touching the soldering iron tip or the melted areas can result in burns.
- NOTICE:
-
Do not touch the welded portions until they have cooled down.
Check that there is no gap, lifting or looseness between the front bumper assembly and the No. 1 ultrasonic sensor retainer (3).
Remove the adhesive tape.
52536
2.INSTALL FRONT BUMPER SIDE RETAINER LH
52535
3.INSTALL FRONT BUMPER SIDE RETAINER RH
- HINT:
-
Use the same procedure as for the LH side.
89341K
4.INSTALL FRONT CORNER ULTRASONIC SENSOR
- HINT:
- ·
The illustration is for the LH side.
·orientation for the RH side is the opposite of the LH side.
When removing or replacing the front corner ultrasonic sensor:
Install the ultrasonic sensor O-ring.
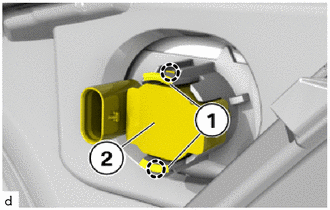
Attach the claws (1) to install the front corner ultrasonic sensor (2).
Connect connector and lock.
89341L
5.INSTALL FRONT CENTER ULTRASONIC SENSOR
- HINT:
-
Use the same procedure as for the front corner ultrasonic sensor.
89341M
6.INSTALL FRONT SIDE ULTRASONIC SENSOR
- HINT:
- ·
The illustration is for the LH side.
·orientation for the RH side is the opposite of the LH side.
When removing or replacing the front side ultrasonic sensor:
Install the ultrasonic sensor O-ring.
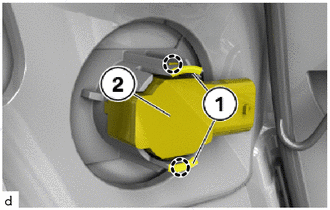
Attach the claws (1) to install the front side ultrasonic sensor (2).
Connect connector and lock.
7.INSTALL FRONT BUMPER ASSEMBLY