B58 FUEL FUEL INJECTOR REMOVAL
CAUTION / NOTICE / HINT
- CAUTION:
- ·
Working on 12 V vehicle electrical system.
Risk of short circuits! Risk of fire!
-Detach battery earth lead from battery.
-For an auxiliary battery:
Disconnect battery earth lead of auxiliary battery.
- NOTICE:
- ·
Damage to battery terminal, the safety battery terminal or the intelligent battery sensor (IBS).
·Damaged battery terminals can lead to malfunctions or vehicle electrical system faults.
-Pull off battery terminal from battery pole by carefully moving to and fro. Do not pry off using a tool.
PROCEDURE

 23801P
1.REMOVE NO.1 FUEL PIPE SUB-ASSEMBLY
23250
2.REMOVE FUEL INJECTOR ASSEMBLY (for Front Side)
- NOTICE:
- ·
Contaminant or foreign body.
Contamination can result in malfunctions, operating failure or leaks.
-Adhere to the utmost cleanliness.
-Protect components from contamination e.g. by covering.
-Close off line connections with seal plugs.
·Damage to the ignition coil.
The silicone hose of the ignition coil must not be contaminated by fuel as this can lead to failure of the ignition coil.
-Cover ignition coils using suitable covers when working on the fuel system, if necessary remove them.
-Do not oil or grease the silicone tube of the spark plug connector. The silicone tube is coated with talc to reduce the pulling forces.
·Damage to the injector tips and Teflon ring.
Improper handling of the injector tips and Teflon ring can lead to malfunctioning of the injector.
-Avoid mechanical contact with injector tip.
-When exchanging Teflon ring, hands and work surface must be clean and free of oil. Do not use any lubricating agents.
-Do not use fingernails to slide Teflon ring on.
·Electrostatic discharge.
Damage to or destruction of electrical components.
-Only touch the housings of electrical components. Do not touch pins or multi-pin connectors directly
-For additional information see:
Click hereGeneral>INTRODUCTION>REPAIR INSTRUCTION>PRECAUTION
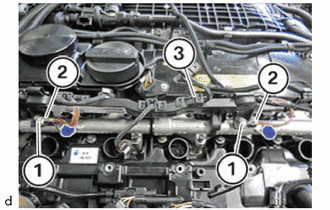
Loosen nuts (1).
Feed out ground cable (2) and set it aside.
Feed out cable channel (3) and set it aside.
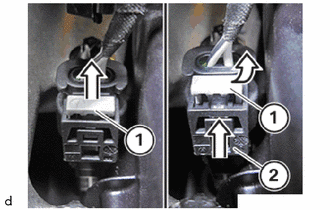
Unlock lock (1) in direction of arrow from the top.
Press the lock (1) together and release it in the direction of the arrow.
Pull off the connector (2) from the injectors.
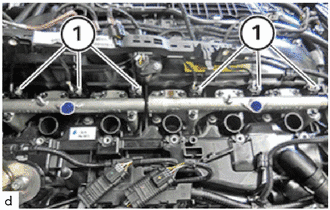
Unlock all connectors (1) on injectors and detach.
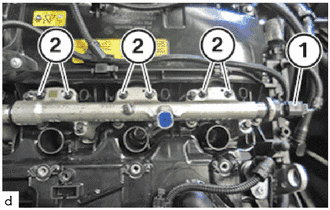
Unlock and loosen connector (1).
Release E6 bolts (2).
- NOTICE:
-
Do not reuse the bolts (2).
Catch and dispose of escaping fuel with suitable materials.
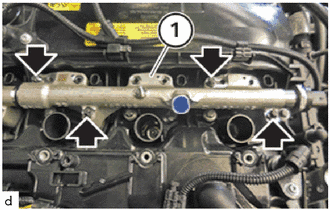
Unscrew the E8 bolts (arrows).
- NOTICE:
-
Do not reuse the bolts.
Remove the rail (1) in upward direction.
- HINT:
-
The injectors remain in the cylinder head.
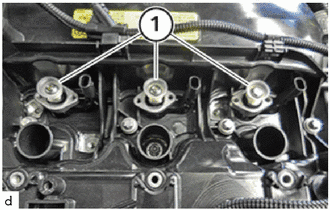
Remove the gaskets (1).
- HINT:
-
The gaskets (1) are required during first assembly with in the plant only and will not be installed again.
If the specified value for the tensile force is exceeded: Replace fuel injector
- NOTICE:
- ·
Damage to injectors.
Excessive force may damage the injector and this means having to replace the injector.
-Twist the injectors with a maximum torsional movement of 13 N*m (133 kgf*cm, 10 ft.*lbf).
Use the special tool 2 358 417 to remove the injectors.
- SST
- 09200-WA520 09200-WA680
The special tool 2 358 417 is used to ensure that the tensile force is not exceeded.
- SST
- 09200-WA520 09200-WA680
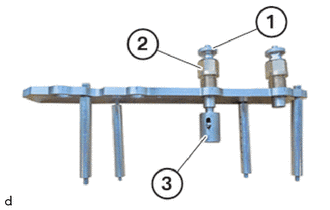
The special tool 2 358 417 consists of:
- SST
- 09200-WA520 09200-WA680
(1) Threaded sleeves
(2) Pull-out thread (left-hand thread)
(3) Mounting for the injectors
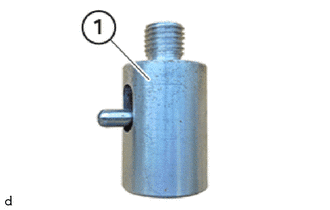
Unscrew the fixture for the injectors (1) from the special tool 2 358 417 .
- SST
- 09200-WA520 09200-WA680
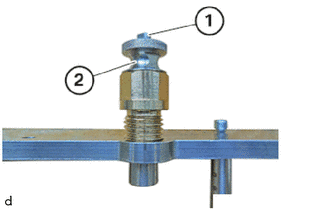
Press the lock (1) in and remove threaded sleeve (2) from the special tool 2 358 417 .
- SST
- 09200-WA520 09200-WA680
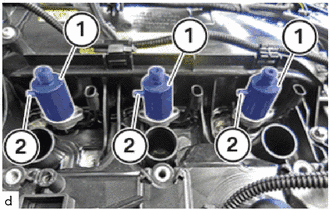
Install all fixtures (1) for the injectors.
- HINT:
-
The fixtures (1) are not locked when the levers (2) are up.
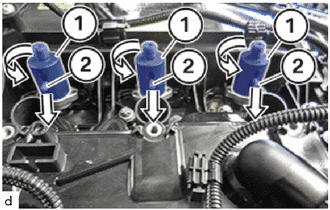
Turn fixtures (1) by 90° and lock the lever (2) downwards.
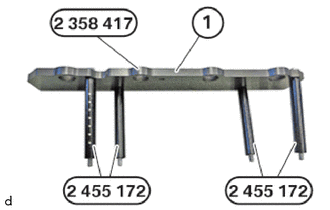
Prepare the panel (1) from the special tool 2 358 417 with the spacer sleeves 2 455 172 .
- SST
- 09200-WA520 09200-WA680
- NOTICE:
- ·
Damage to injectors.
Excessive force may damage the injector and this means having to replace the injector.
-Do not use the puller plate as a support.
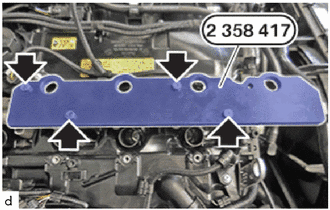
Attach special tool 2 358 417 to cylinder head.
- SST
- 09200-WA520 09200-WA680
Hand-tighten the bolts (arrows).
- HINT:
-
The extraction thread is a left-hand thread.
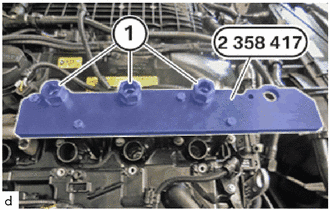
Screw in pull-out thread (1) on the special tool 2 358 417 fully.
- SST
- 09200-WA520 09200-WA680
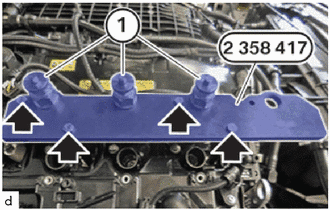
Insert threaded sleeves (1) and screw the threaded sleeves completely onto the fixtures for the injectors.
Tighten the screws (arrows) on the special tool 2 358 417.
- SST
- 09200-WA520 09200-WA680
- Torque:
- 5.0 N*m (51 kgf*cm, 44 in.*lbf)
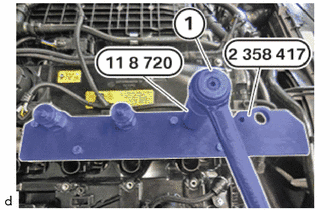
Adjust the torque wrench to 13 N*m (133 kgf*cm, 10 ft.*lbf), clockwise rotation.
Turn torque wrench (1) in clockwise direction with 24 mm deep socket wrench until the injector is pulled out.
- SST
- 09200-WA180
Disassemble all injectors individually.
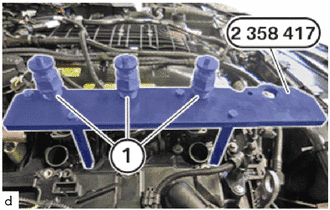
Before removing the special tool 2 358 417 with the injectors, check if all the injectors were completely pulled out of the cylinder head.
- SST
- 09200-WA520 09200-WA680
This can be recognised on the completely visible threads of the threaded sleeves (1).
Loosen screws on special tool 2 358 417 .
- SST
- 09200-WA520 09200-WA680
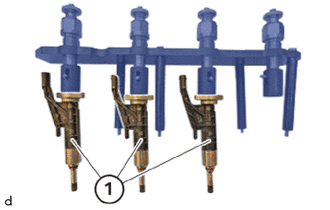
Carefully remove the special tool 2 358 417 with the injectors (1) vertically straight up from the cylinder head.
- SST
- 09200-WA520 09200-WA680
Place the combination of the special tool 2 358 417 and the injectors (1) flat onto a clean table.
- SST
- 09200-WA520 09200-WA680
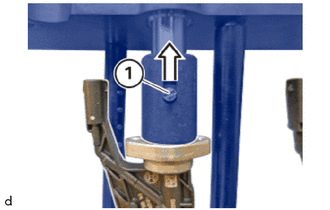
Unlock the fixture lock (1) from the top.
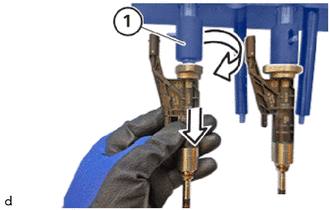
Turn the unlocked fixture (1) by 90°.
Release and remove the injector downwards.
23250
3.REMOVE FUEL INJECTOR ASSEMBLY (for Rear Side)
- NOTICE:
- ·
Contaminant or foreign body.
Contamination can result in malfunctions, operating failure or leaks.
-Adhere to the utmost cleanliness.
·Protect components from contamination e.g. by covering.
·Close off line connections with seal plugs.
·Damage to the ignition coil.
The silicone hose of the ignition coil must not be contaminated by fuel as this can lead to failure of the ignition coil.
-Cover ignition coils using suitable covers when working on the fuel system, if necessary remove them.
-Do not oil or grease the silicone tube of the spark plug connector. The silicone tube is coated with talc to reduce the pulling forces.
·Damage to the injector tips and Teflon ring.
Improper handling of the injector tips and Teflon ring can lead to malfunctioning of the injector.
-Avoid mechanical contact with injector tip.
-When exchanging Teflon ring, hands and work surface must be clean and free of oil. Do not use any lubricating agents.
-Do not use fingernails to slide Teflon ring on.
·Damage to injectors.
Excessive force may damage the injector and this means having to replace the injector.
-Twist the injectors with a maximum torsional movement of 13 N*m (133 kgf*cm, 10 ft.*lbf).
·Electrostatic discharge.
Damage to or destruction of electrical components.
-Only touch the housings of electrical components. Do not touch pins or multi-pin connectors directly.
-For additional information see:
Click hereGeneral>INTRODUCTION>REPAIR INSTRUCTION>PRECAUTION
Loosen nuts (1).
Feed out ground cable (2) and set it aside.
Feed out cable channel (3) and set it aside.
Unlock lock (1) in direction of arrow from the top.
Press the lock (1) together and release it in the direction of the arrow.
Pull off the connector (2) from the injectors.
Unlock all connectors (1) on injectors and detach.
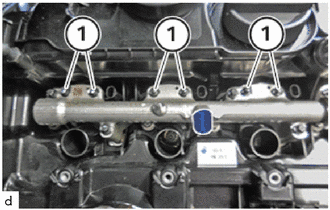
Release E6 bolts (1).
- NOTICE:
-
Do not reuse the bolts (1).
Catch and dispose of escaping fuel with suitable materials.
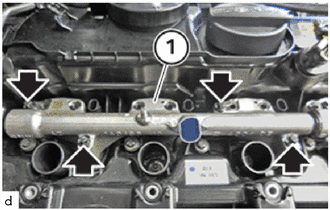
Unscrew the E8 bolts (arrows).
- NOTICE:
-
Do not reuse the bolts.
Remove the rail (1) in upward direction.
- HINT:
-
The injectors remain in the cylinder head.
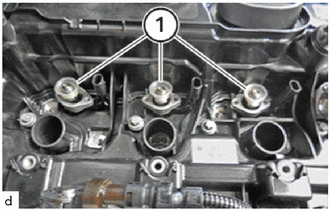
Remove the gaskets (1).
- HINT:
-
The seals (1) are required during first assembly within the plant only and will not be installed again.
If the specified value for the tensile force is exceeded: Replace injectors.
- NOTICE:
- ·
Damage to injectors.
Excessive force may damage the injector and this means having to replace the injector.
-Twist the injectors with a maximum torsional movement of 13 N*m (133 kgf*cm, 10 ft.*lbf).
Use the special tool 2 358 417 to remove the injectors.
- SST
- 09200-WA520 09200-WA680
The special tool 2 358 417 is used to ensure that the tensile force is not exceeded.
- SST
- 09200-WA520 09200-WA680
The special tool 2 358 417 consists of:
- SST
- 09200-WA520 09200-WA680
(1) Threaded sleeves
(2) Pull-out thread (left-hand thread)
(3) Fixture for the injector
Unscrew the fixture for the injectors (1) from the special tool 2 358 417.
- SST
- 09200-WA520 09200-WA680
Press the lock (1) in and remove threaded sleeve (2) from the special tool 2 358 417 .
- SST
- 09200-WA520 09200-WA680
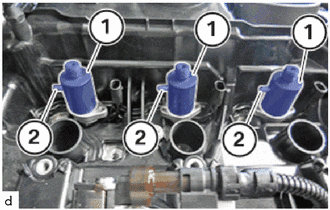
Install all fixtures (1) for the injectors.
The fixtures (1) are not locked when the levers (2) are up.
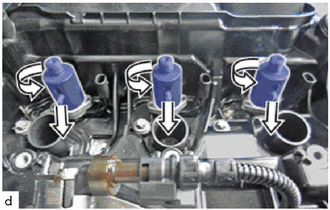
Turn fixtures (1) by 90° and lock the lever (2) downwards.
Prepare the panel (1) from the special tool 2 358 417 with the spacer sleeves 2 455 172 .
- SST
- 09200-WA520 09200-WA680
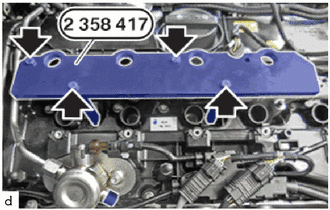
Attach special tool 2 358 417 to cylinder head.
- SST
- 09200-WA520 09200-WA680
- CAUTION:
- ·
Damage to injectors.
Excessive force may damage the injector and this means having to replace the injector.
-Do not use the puller plate as a support.
- NOTICE:
- ·
Damage to injectors.
Excessive force may damage the injector and this means having to replace the injector.
-Do not use the puller plate as a support.
Hand-tighten the bolts (arrows).
- HINT:
-
The extraction thread is a left-hand thread.
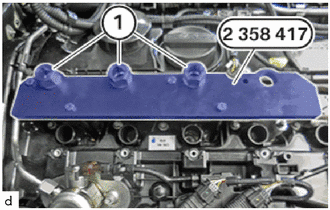
Screw in pull-out thread (1) on the special tool 2 358 417 fully.
- SST
- 09200-WA520 09200-WA680
Insert threaded sleeves (1) and screw the threaded sleeves completely onto the fixtures for the injectors.
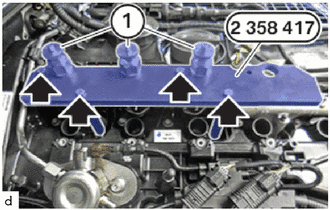
Tighten the screws (arrows) on the special tool 2 358 417.
- SST
- 09200-WA520 09200-WA680
- Torque:
- 5.0 N*m (51 kgf*cm, 44 in.*lbf)
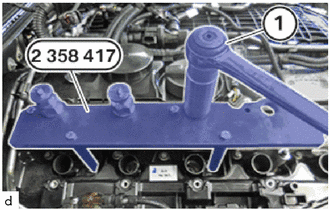
Adjust the torque wrench to 13 N*m (133 kgf*cm, 10 ft.*lbf), clockwise rotation.
Turn torque wrench (1) in clockwise direction with 24 mm deep socket wrench until the injector is pulled out.
- SST
- 09200-WA180
Disassemble all injectors individually.
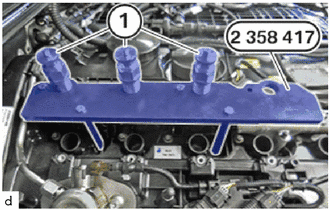
Before removing the special tool 2 358 417 with the injectors, check if all the injectors were completely pulled out of the cylinder head.
- SST
- 09200-WA520 09200-WA680
This can be recognised on the completely visible threads of the threaded sleeves (1).
Loosen screws on special tool 2 358 417.
- SST
- 09200-WA520 09200-WA680
Carefully remove the special tool 2 358 417 with the injectors (1) vertically straight up from the cylinder head.
- SST
- 09200-WA520 09200-WA680
Place the combination of the special tool 2 358 417 and the injectors (1) flat onto a clean table.
- SST
- 09200-WA520 09200-WA680
Unlock the fixture lock (1) from the top.
Turn the unlocked fixture (1) by 90°.
Release and remove the injector downwards.