STEERING GEAR / LINKAGE STEERING GEAR REMOVAL
CAUTION / NOTICE / HINT
- HINT:
- ·
In a warranty case, you must always provide a fault memory printout with the defective part, even if the fault memory does not contain an entry.
·Vehicle programming/coding must be performed after installation.
For additional information see:
Click hereSteering>STEERING GEAR / LINKAGE>STEERING GEAR>INSTALLATION
·Use the same procedure for LHD and RHD vehicles.
·The procedure listed below is for the LHD vehicles.
PROCEDURE

 1.REMOVE FRONT WHEELS
51219
2.REMOVE FRONT SUSPENSION MEMBER LOWER PROTECTOR
45047
3.DISCONNECT TIE ROD END SUB-ASSEMBLY LH
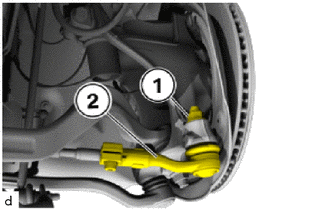
Loosen the nut (1).
- HINT:
-
If necessary, counter-hold the T40 "TORX" socket wrench.
Pull the tie rod end sub-assembly LH (2) off the steering knuckle LH.
45046
4.DISCONNECT TIE ROD END SUB-ASSEMBLY RH
- HINT:
-
Perform the same procedure as for the LH side.
45220
5.DISCONNECT STEERING INTERMEDIATE SHAFT ASSEMBLY
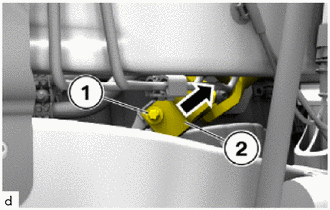
Loosen E10 bolt (1).
Detach the steering intermediate shaft assembly (2) from the steering gear assembly in the direction of the arrow.
6.REMOVE STEERING LINK ASSEMBLY
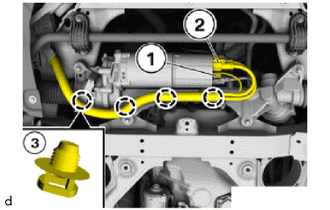
for LHD:
Unlock and disconnect the plug connections (1) and (2).
Loosen the wiring harness from the holder (3).
Put the vehicle wiring harness to one side and secure it.
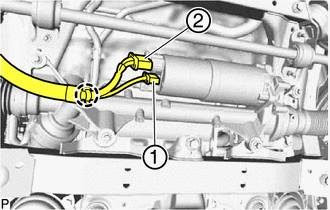
for RHD:
Unlock and disconnect the plug connections (1) and (2).
Disengage the wiring harness clamp.
Put the vehicle wiring harness to one side and secure it.
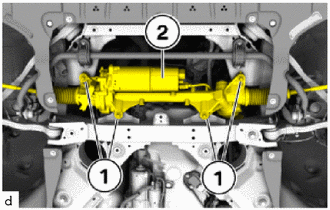
Loosen E14 bolts (1). In this process, counter support at the 18 mm nuts.
Remove the steering link assembly (2) towards the bottom.
- NOTICE:
-
Holding the steering gear by the tie rods may damage the tie rods and the steering gear.
-
Only hold the steering gear by the housing.