 |
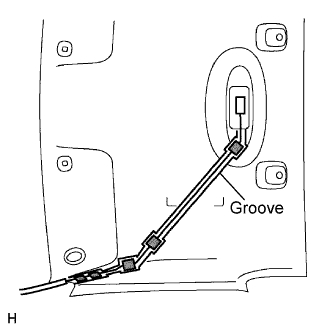
Install the roof wire with 5 new adhesive tapes, as shown in the illustration.
ROOF HEADLINING (for Regular Cab) > INSTALLATION |
| 1. INSTALL ROOF WIRE |
|
Install the roof wire with 5 new adhesive tapes, as shown in the illustration.
| 2. INSTALL ROOF HEADLINING PAD |
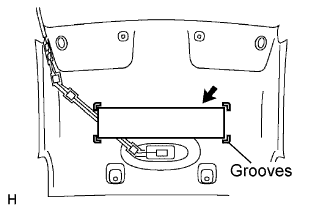 |
Install a new roof headlining pad onto the roof headlining, as shown in the illustration.
| 3. INSTALL ROOF HEADLINING ASSEMBLY |
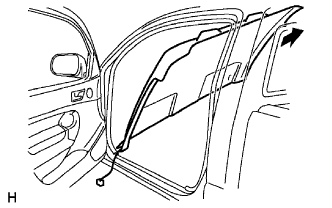 |
Install the roof headlining into the vehicle.
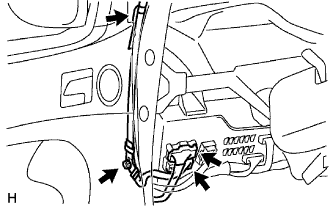 |
Install the 2 wire harness clamps.
Connect the roof wire connector.
Connect the frame wire connector.
| 4. INSTALL COAT HOOK |
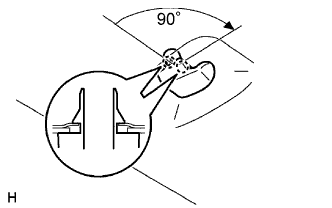 |
Turn the coat hook 90° clockwise and install it.
| 5. INSTALL VISOR HOLDER |
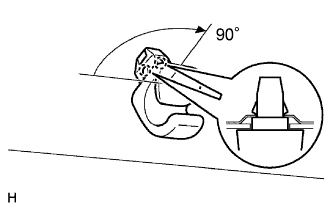 |
Turn the visor holder 90° clockwise and install it.
| 6. INSTALL VISOR ASSEMBLY LH |
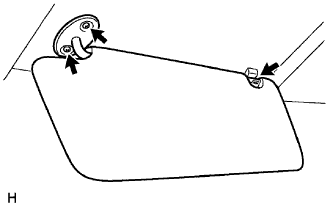 |
Install the visor into the visor holder.
Install the 2 screws.
| 7. INSTALL VISOR ASSEMBLY RH |
| 8. INSTALL ROOM LIGHT ASSEMBLY |
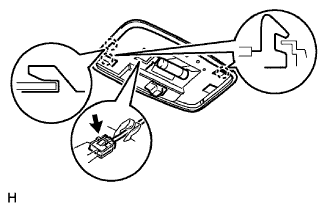 |
Connect the room light connector.
Engage the 3 claws and install the room light.
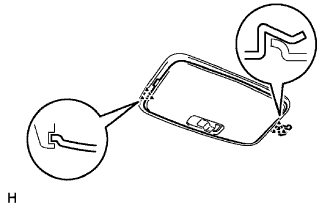 |
Engage the 2 claws and install the room light lens.
| 9. INSTALL QUARTER INSIDE TRIM BOARD LH |
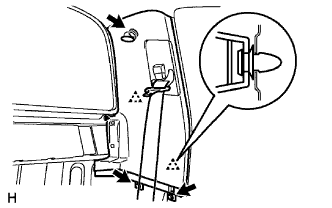 |
Engage the 2 clips and install the quarter trim board.
Tighten the 3 screws.
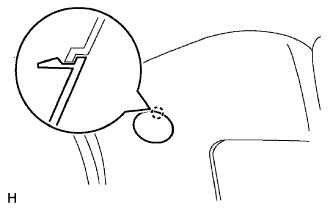 |
Engage the claw and close the cover.
 |
for LH Side and Separate Seat Type RH Side:
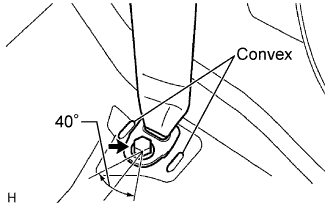
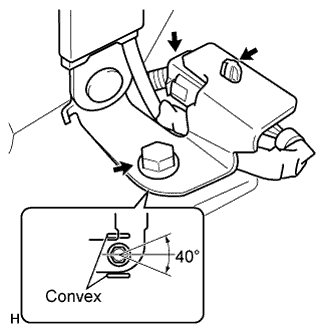
Install the floor anchor of the front seat outer belt with the bolt.
 |
for Bench Seat Type RH Side:
Install the wiring harness clamp.
Connect the belt tension sensor connector.
Install the floor anchor of the front seat outer belt with the bolt.
| 10. INSTALL QUARTER INSIDE TRIM BOARD RH |
| 11. INSTALL QUARTER TRIM LOWER PANEL LH |
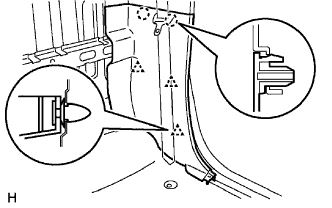 |
Engage the 2 claws and 3 clips, and install the quarter trim lower panel.
| 12. INSTALL QUARTER TRIM LOWER PANEL RH |
| 13. INSTALL BACK PANEL TRIM COVER (for Separate Seat Type) |
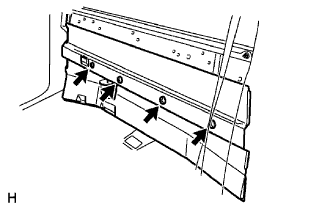 |
Install the back panel trim with the 4 clips.
| 14. INSTALL BACK PANEL TRIM COVER (for Separate Seat Type) |
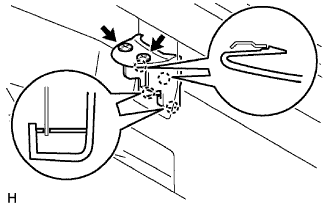 |
Engage the 4 claws and install the back panel trim cover.
Install the 2 clips.
| 15. INSTALL JACK ASSEMBLY (for Separate Seat Type) |
| 16. INSTALL BACK PANEL UPPER GARNISH |
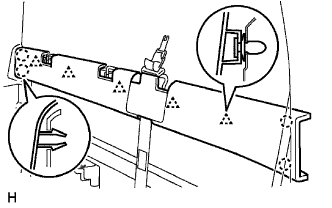 |
Engage the 4 claws and 5 clips, and install the back panel upper garnish.
| 17. INSTALL BACK PANEL TRIM COVER |
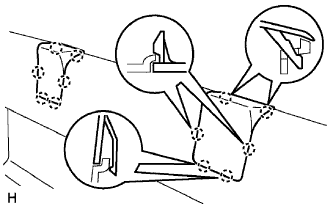 |
for Separate Seat Type and Bench Seat Type:
Engage the 6 claws and install the back panel trim cover.
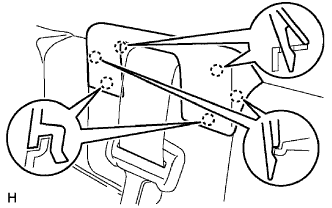 |
for Bench Seat Type:
Engage the 6 claws and install the back panel trim cover.
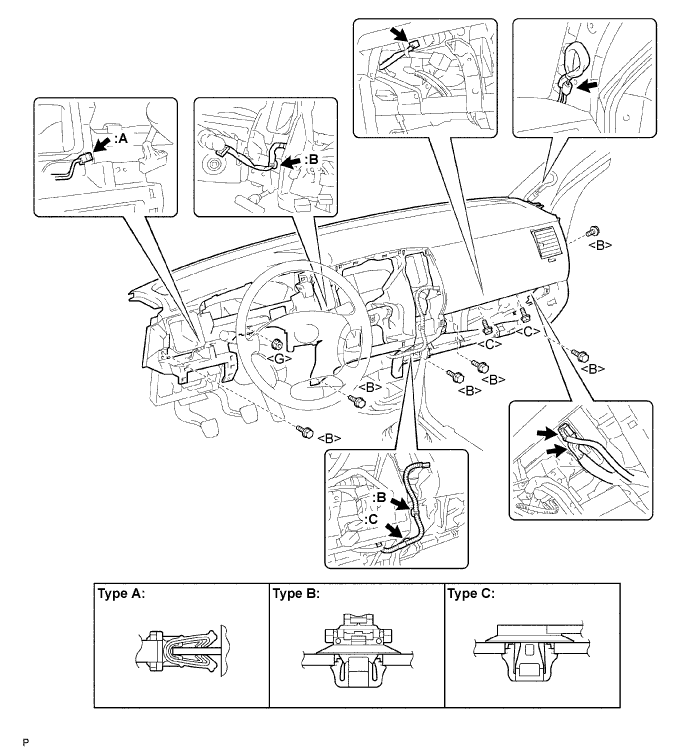
| 18. INSTALL INSTRUMENT PANEL SUB-ASSEMBLY |
Install the instrument panel sub-assembly w/ passenger air bag assembly with the 8 bolts and nut.
Engage the 5 clamps and connect the 4 connectors.
Remove the protective tape from the steering column cover upper and steering wheel sub-assembly.
| 19. CONNECT PASSENGER AIRBAG CONNECTOR |
| 20. INSTALL INSTRUMENT SIDE PANEL |
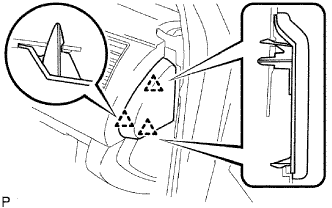 |
Engage the 3 claws and install the instrument side RH.
| 21. INSTALL INSTRUMENT LOWER COVER SUB-ASSEMBLY |
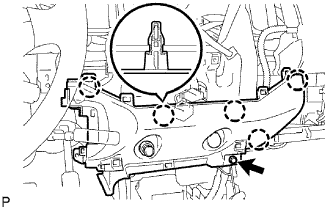 |
Connect the 2 connectors.
Engage the 5 clips and install the instrument lower cover.
Install the bolt <B>.
| 22. INSTALL INSTRUMENT LOWER PANEL |
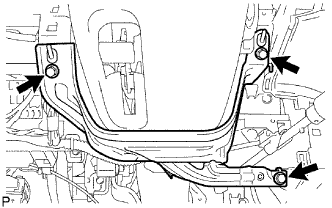 |
Install the lower instrument panel LH with the 3 bolts <B>.
| 23. INSTALL INSTRUMENT LOWER PANEL FINISH PANEL SUB-ASSEMBLY |
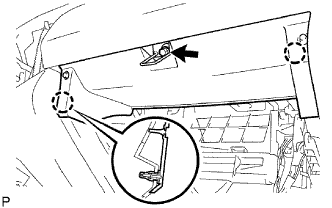 |
Engage the 2 clips and install the instrument panel lower finish panel sub-assembly RH.
Install the bolt <B>.
| 24. INSTALL GLOVE COMPARTMENT DOOR ASSEMBLY |
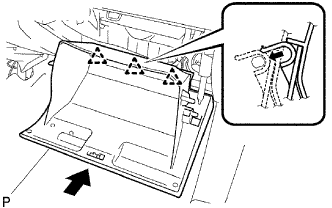 |
Install the glow compartment door assembly with 3 hinges, holding it horizontal.
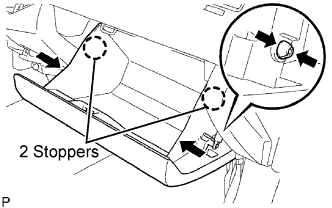 |
Slightly deform the upper part of the glove compartment door assembly, and install the glove compartment door assembly.
Install the glove compartment door stopper onto the glove compartment door.
| 25. INSTALL INSTRUMENT CENTER CLUSTER FINISH PANEL SUB-ASSEMBLY |
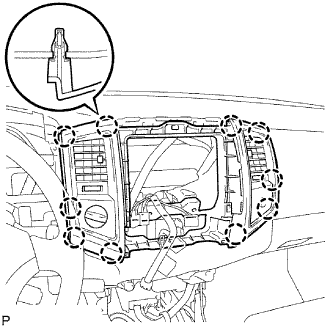 |
Engage the 10 clips and install the instrument cluster center finish panel sub-assembly.
| 26. INSTALL COMBINATION METER ASSEMBLY |
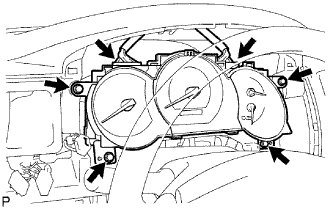 |
Connect the 2 connectors.
Install the combination meter assembly with the 4 screws <E>.
| 27. INSTALL INSTRUMENT CLUSTER FINISH PANEL SUB-ASSEMBLY |
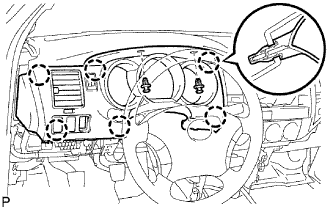 |
Connect the connectors.
Engage the 6 clips and install the instrument cluster finish panel sub-assembly.
Install the 2 clips.
| 28. INSTALL INSTRUMENT LOWER PANEL FINISH PANEL |
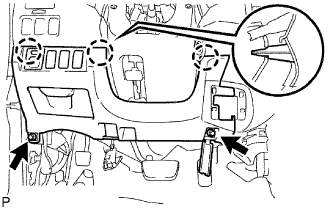 |
Connect the connectors.
Engage the 3 clips and install the lower NO. 1 instrument panel finish panel sub-assembly.
Install the 2 bolts <B>.
| 29. CONNECT HOOD LOCK CONTROL LEVER SUB-ASSEMBLY |
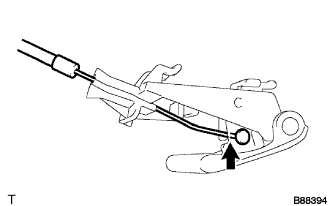 |
Connect the hood lock control cable assembly.
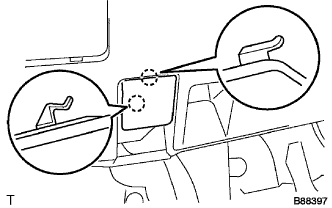 |
Engage the 2 claws and install the hood lock control lever sub-assembly.
| 30. INSTALL RADIO RECEIVER ASSEMBLY |
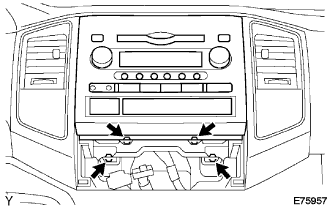 |
Connect the connector.
Install the radio receiver assembly with bracket with the 4 bolts.
| 31. INSTALL AIR CONDITIONING CONTROL ASSEMBLY |
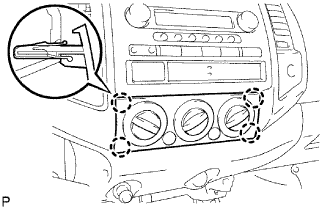 |
Connect the 2 connectors.
Engage the 4 clips and install the air conditioning control assembly.
| 32. INSTALL FRONT CONSOLE BOX |
for Automatic Transmission on Separate Seat Type:
Install the front console box .
for Automatic Transmission on Bench Seat Type:
Install the front console box .
for Manual Transmission on Separate Seat Type:
Install the front console box .
for Manual Transmission on Bench Seat Type:
Install the front console box .
| 33. INSTALL INSTRUMENT PANEL CUP HOLDER TRAY (for Automatic Transmission on Separate Seat Type) |
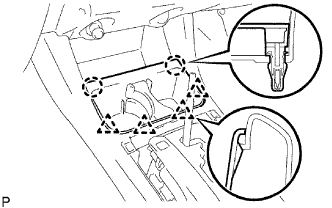 |
Engage the 2 clips and 4 claws, and install the instrument panel cup holder tray.
| 34. INSTALL REAR CONSOLE BOX ASSEMBLY (for Separate Seat Type) |
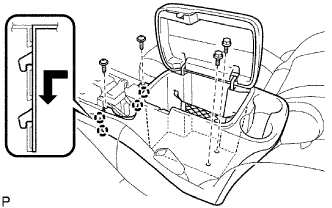 |
Engage the 4 claws and install the console box rear.
Install the 2 screws <F> and 2 bolts <B>.
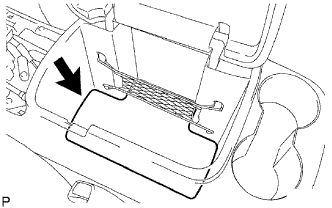 |
Install the console box carpet.
| 35. INSTALL REAR CONSOLE UPPER PANEL SUB-ASSEMBLY |
for Automatic Transmission on Separate Seat Type:
Install the rear console upper panel sub-assembly .
for Manual Transmission on Separate Seat Type:
Install the rear console upper panel sub-assembly .
| 36. INSTALL INSTRUMENT PANEL UNDER TRAY (for Pedal Type Parking Brake) |
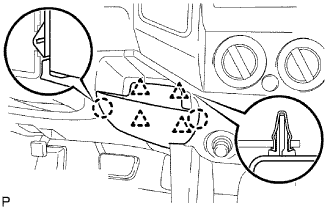 |
Engage the 4 clips and 2 claws, and install the instrument panel under tray.
| 37. INSTALL INSTRUMENT PANEL HOLE COVER (for Lever Type Parking Brake) |
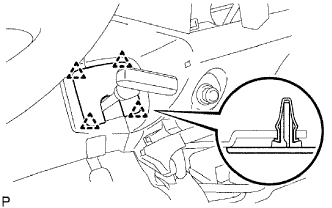 |
Engage the 4 clips and install the instrument panel hole cover.
| 38. INSTALL FRONT PILLAR GARNISH LH |
 |
for LH Side:
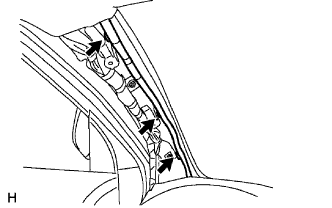
Install the 3 wire harness clamps.
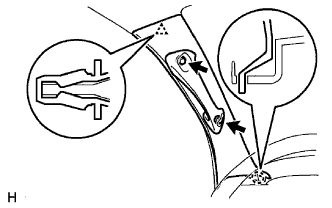 |
Engage the claw and clip, and install the front pillar garnish.
Tighten the 2 screws.
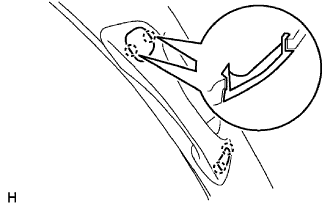 |
Engage the 2 claws and install the assist grip plug.
| 39. INSTALL FRONT PILLAR GARNISH RH |
| 40. INSTALL FRONT DOOR OPENING TRIM WEATHERSTRIP LH |
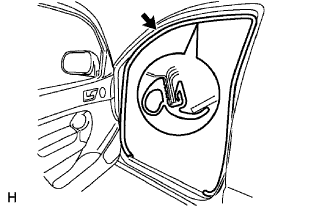 |
Install the front door opening trim weatherstrip.
| 41. INSTALL FRONT DOOR OPENING TRIM WEATHERSTRIP RH |
| 42. INSTALL COWL SIDE TRIM BOARD LH |
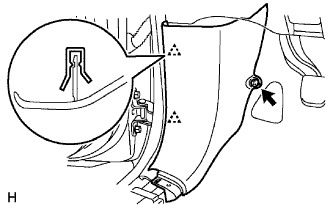 |
Engage the 2 clips and install the cowl side trim board.
Install the clip.
| 43. INSTALL COWL SIDE TRIM BOARD RH |
| 44. INSTALL FRONT DOOR SCUFF PLATE LH |
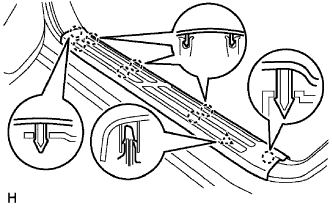 |
Engage the 8 claws and clip, and install the front door scuff plate.
| 45. INSTALL FRONT DOOR SCUFF PLATE RH |
| 46. INSTALL FRONT FLOOR FOOTREST |
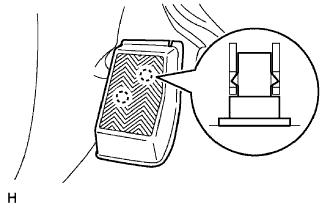 |
Engage the 2 clips and install the front floor footrest.
| 47. CONNECT CABLE TO NEGATIVE BATTERY TERMINAL |
| 48. INSPECT SRS WARNING LIGHT |