Install the 2 caps.
AIR CONDITIONING UNIT > INSTALLATION |
| 1. INSTALL AIR CONDITIONING UNIT ASSEMBLY |
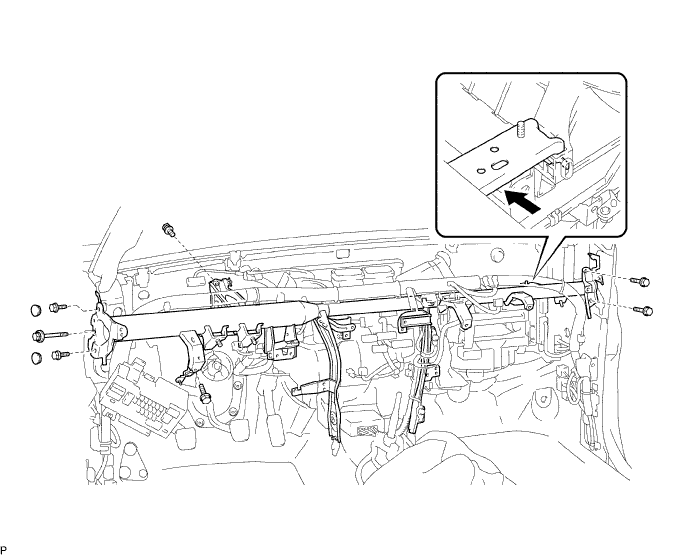
Provisionally install the air conditioning unit assembly.
Insert the bracket hook into the holes of the reinforcement bracket, and provisionally install the reinforcement.
Install the instrument panel reinforcement with the 7 bolts.
Install the 2 caps.
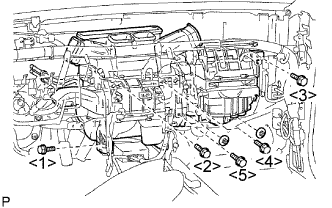 |
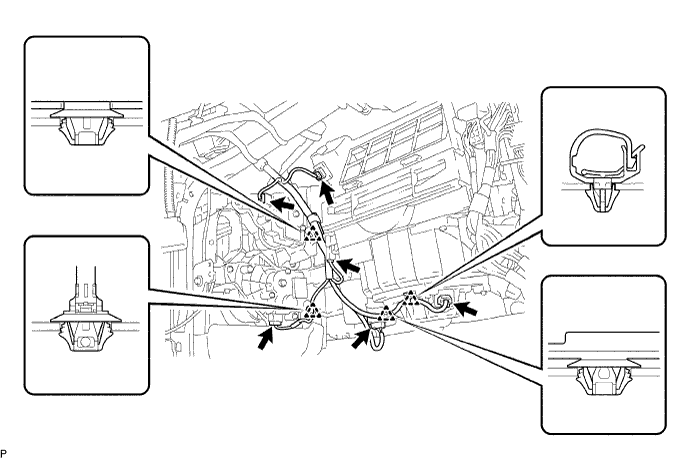
Install the 5 bolts.
Install the 2 nuts.
Engage the 20 clamps.
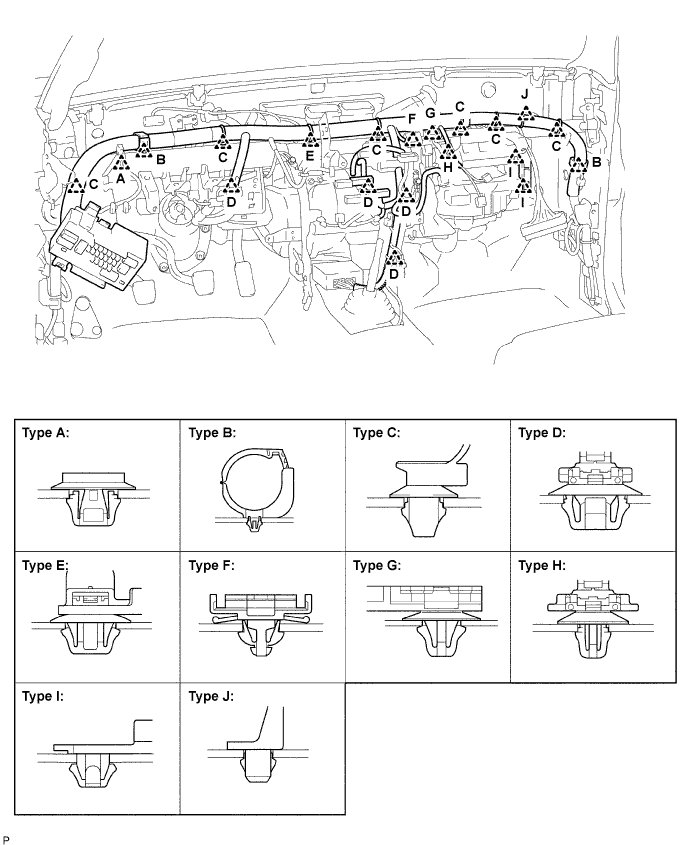
Connect the connector.
Connect the 2 airbag connectors (Click here).
Install the 3 bolts.
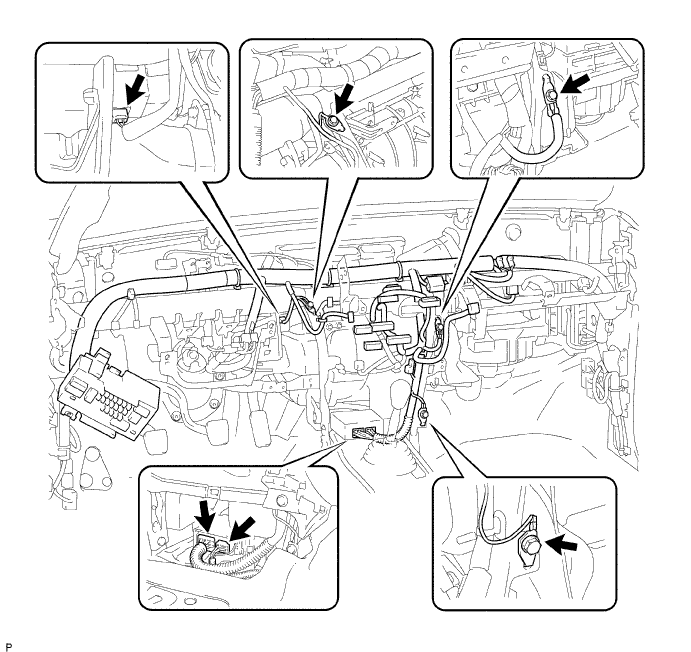
Engage the 2 clamps and connect the 6 connectors to the air conditioning unit assembly.
| 2. INSTALL AIR CONDITIONER AMPLIFIER ASSEMBLY |
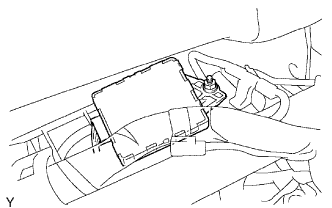 |
Install the air conditioner amplifier assembly with the nut.
Connect the connector.
| 3. INSTALL TRANSPONDER KEY ECU ASSEMBLY |
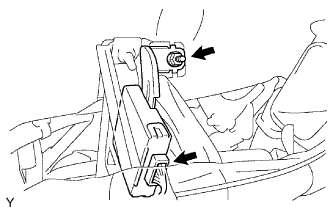 |
Install the transponder key ECU assembly with the nut.
Connect the connector.
| 4. INSTALL DRIVER SIDE JUNCTION BLOCK |
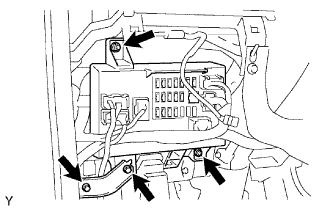 |
Install the driver side junction block assembly with the 2 nuts.
Install the bracket with the 2 bolts.
| 5. INSTALL ECM (for 2TR-FE) |
| 6. INSTALL ECM (for 1GR-FE) |
| 7. INSTALL PARKING BRAKE CONTROL LEVER ASSEMBLY (for Lever Type Parking Brake) |
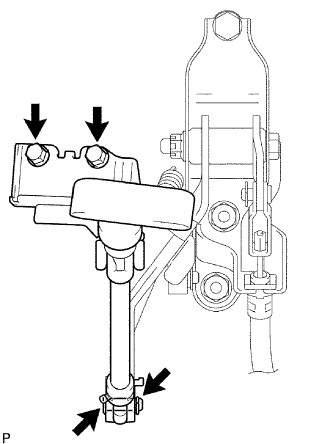 |
Install the parking brake lever assembly with the 2 bolts.
Install the sleeve with the pin and clip.
| 8. INSTALL STEERING COLUMN ASSEMBLY |
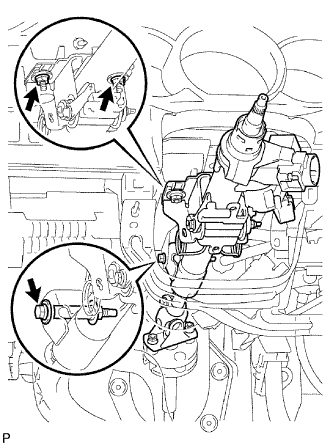 |
Install the steering column assembly with the 2 nuts and bolt.
Connect each of the connectors to the steering column assembly.
Connect the wire harness clamps to the steering column assembly.
| 9. INSTALL STEERING SLIDING YOKE |
Align the matchmarks on the steering column and steering sliding yoke.
Install the steering sliding yoke onto the steering column assembly and slide it upward.
Align the matchmarks on the intermediate shaft sub-assembly No. 2 and steering sliding yoke.
Install the sliding yoke onto the intermediate shaft sub- assembly No. 2 with bolts A and B.
| 10. INSTALL STEERING COLUMN HOLE COVER |
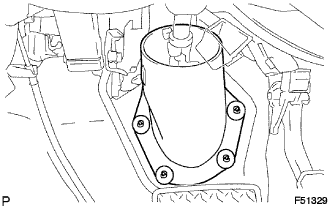 |
Install the steering column hole cover with the 4 clips.
| 11. INSTALL NO. 1 INSTRUMENT PANEL BRACE MOUNTING BRACKET |
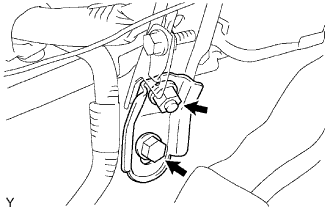 |
Install the instrument panel brace mounting bracket RH with the bolt and nut.
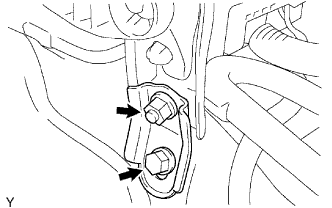 |
Install the instrument panel brace mounting bracket LH with the bolt and nut.
| 12. INSTALL AIR DUCT ASSEMBLY RH |
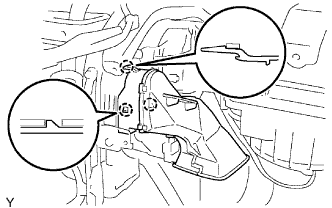 |
Engage the 3 claws and install the air duct assembly.
| 13. INSTALL AIR DUCT ASSEMBLY LH |
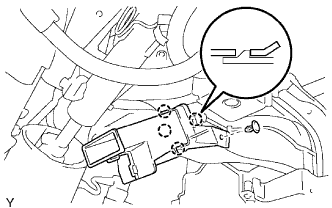 |
Engage the 4 claws and remove the air duct assembly heater.
Engage the clip.
| 14. INSTALL NO. 1 REAR AIR DUCT (for Double Cab) |
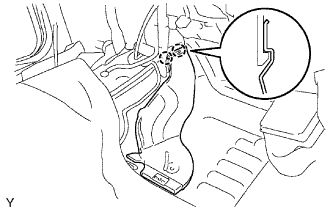 |
Engage the 2 claws and install the air duct rear.
Put the floor carpet back down.
| 15. INSTALL NO. 2 REAR AIR DUCT (for Double Cab) |
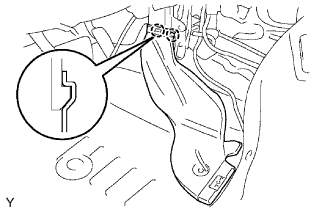 |
Engage the 2 claws and install the air duct rear.
Put the floor carpet back down.
| 16. INSTALL NO. 3 HEATER TO REGISTER DUCT |
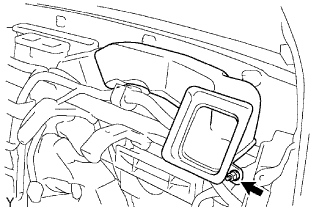 |
Install the heater to register duct with the nut.
| 17. INSTALL NO. 1 HEATER REGISTER DUCT |
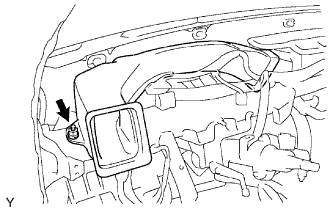 |
Install the heater to register duct with the nut.
| 18. INSTALL INSTRUMENT PANEL SUB-ASSEMBLY W/ PASSENGER AIRBAG ASSEMBLY |
Install the instrument panel sub-assembly w/ passenger air bag assembly with the 8 bolts and nut.
Engage the 5 clamps and connect the 4 connectors.
Remove the protective tape from the steering column cover upper and steering wheel sub-assembly.
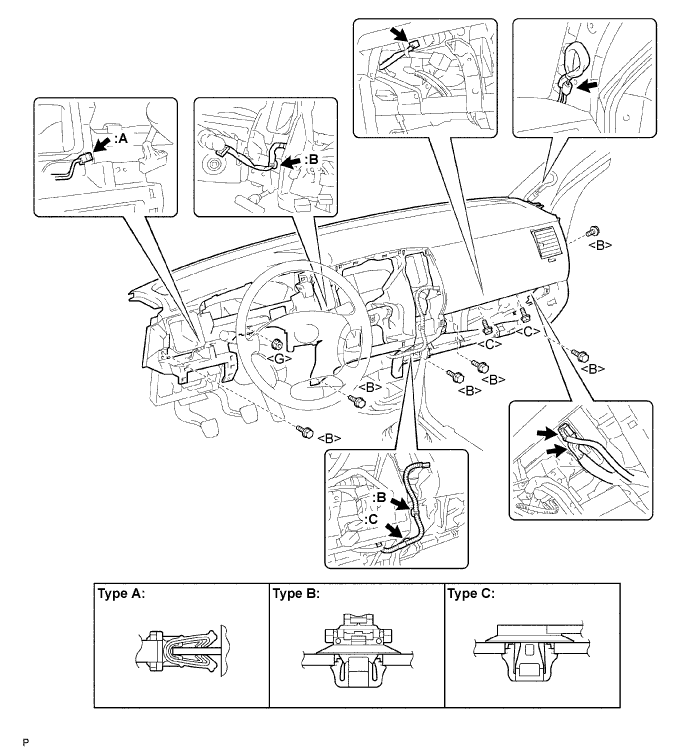
| 19. CONNECT PASSENGER AIRBAG CONNECTOR |
| 20. INSTALL INSTRUMENT SIDE PANEL RH |
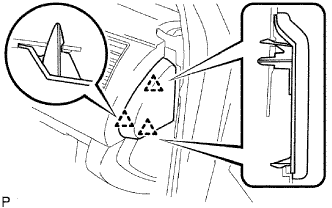 |
Engage the 3 claws and install the instrument side RH.
| 21. INSTALL INSTRUMENT LOWER COVER SUB-ASSEMBLY |
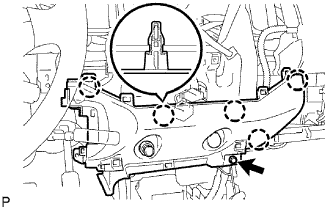 |
Connect the 2 connectors.
Engage the 5 clips and install the instrument lower cover.
Install the bolt <B>.
| 22. INSTALL LOWER INSTRUMENT PANEL LH |
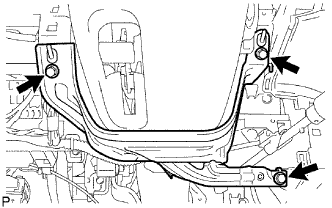 |
Install the lower instrument panel LH with the 3 bolts <B>.
| 23. INSTALL INSTRUMENT PANEL LOWER FINISH PANEL SUB-ASSEMBLY RH |
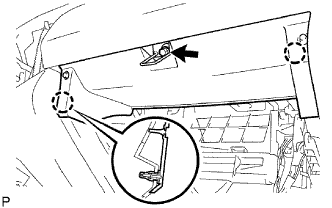 |
Engage the 2 clips and install the instrument panel lower finish panel sub-assembly RH.
Install the bolt <B>.
| 24. INSTALL GLOVE COMPARTMENT DOOR ASSEMBLY |
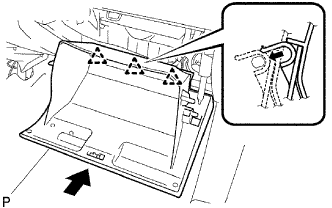 |
Install the glow compartment door assembly with 3 hinges, holding it horizontal.
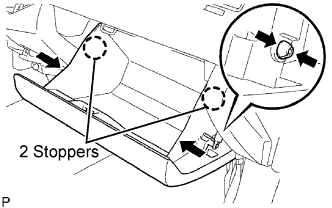 |
Slightly deform the upper part of the glove compartment door assembly, and install the glove compartment door assembly.
Install the glove compartment door stopper onto the glove compartment door.
| 25. INSTALL INSTRUMENT CLUSTER CENTER FINISH PANEL SUB-ASSEMBLY |
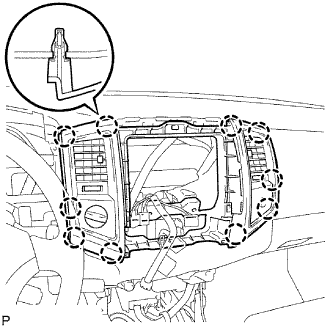 |
Engage the 10 clips and install the instrument cluster center finish panel sub-assembly.
| 26. INSTALL COMBINATION METER ASSEMBLY |
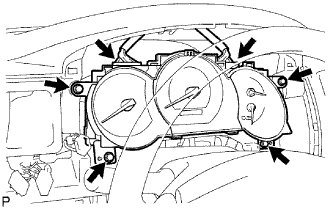 |
Connect the 2 connectors.
Install the combination meter assembly with the 4 screws <E>.
| 27. INSTALL INSTRUMENT CLUSTER FINISH PANEL SUB-ASSEMBLY |
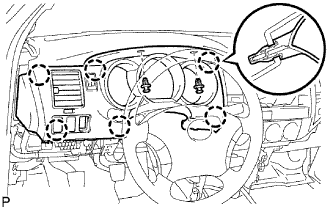 |
Connect the connectors.
Engage the 6 clips and install the instrument cluster finish panel sub-assembly.
Install the 2 clips.
| 28. INSTALL LOWER NO. 1 INSTRUMENT PANEL FINISH PANEL |
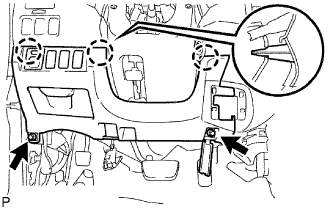 |
Connect the connectors.
Engage the 3 clips and install the lower NO. 1 instrument panel finish panel sub-assembly.
Install the 2 bolts <B>.
| 29. CONNECT HOOD LOCK CONTROL LEVER SUB-ASSEMBLY |
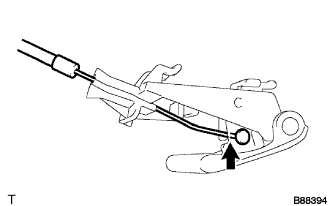 |
Connect the hood lock control cable assembly.
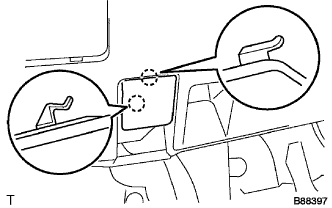 |
Engage the 2 claws and install the hood lock control lever sub-assembly.
| 30. INSTALL RADIO RECEIVER ASSEMBLY |
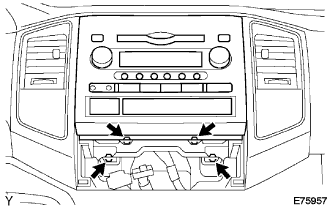 |
Connect the connector.
Install the radio receiver assembly with bracket with the 4 bolts.
| 31. INSTALL AIR CONDITIONING CONTROL ASSEMBLY |
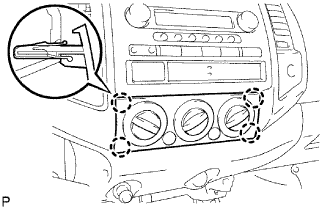 |
Connect the 2 connectors.
Engage the 4 clips and install the air conditioning control assembly.
| 32. INSTALL FRONT CONSOLE BOX (for Manual Transmission on Bench Seat Type) |
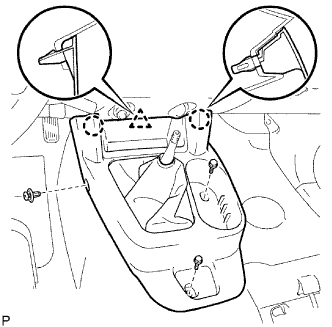 |
Engage the 2 clips and claw, and install the front console box.
Install the clip and 2 bolts <A>.
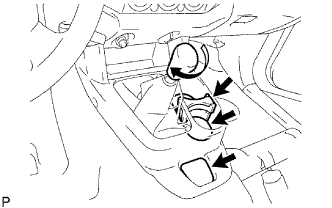 |
Install the No. 2 box bottom mat.
Install the instrument panel cup holder.
Install the box bottom mat.
Install the shift knob.
| 33. INSTALL FRONT CONSOLE BOX (for Automatic Transmission on Bench Seat Type) |
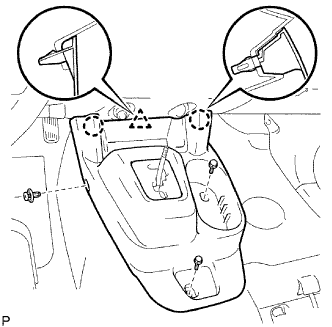 |
Engage the 2 clips and claw, and install the front console box.
Install the clip and 2 bolts <A>.
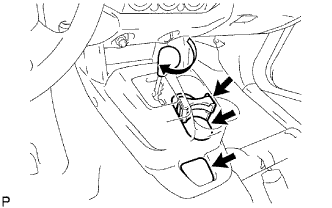 |
Install the No. 2 box bottom mat.
Install the instrument panel cup holder.
Install the box bottom mat.
Install the shift knob.
| 34. INSTALL FRONT CONSOLE BOX (for Manual Transmission on Separate Seat Type) |
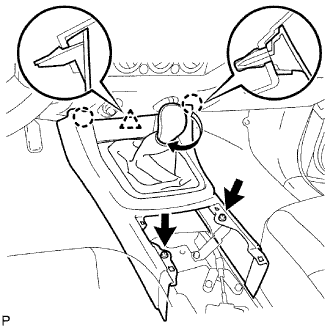 |
Engage the 2 clips and claw, and install the front console box.
Install the 2 screws <F>.
Install the shift knob.
| 35. INSTALL FRONT CONSOLE BOX (for Automatic Transmission on Separate Seat Type) |
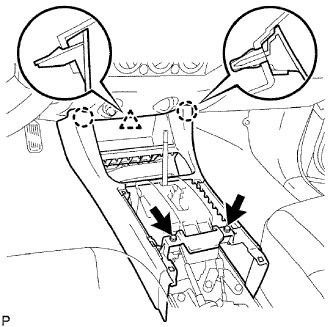 |
Engage the 2 clips and claw, and install the front console box.
Install the 2 screws <F>.
| 36. INSTALL INSTRUMENT PANEL CUP HOLDER TRAY (for Automatic Transmission on Separate Seat Type) |
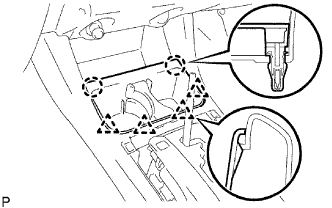 |
Engage the 2 clips and 4 claws, and install the instrument panel cup holder tray.
| 37. INSTALL REAR CONSOLE BOX ASSEMBLY (for Separate Seat Type) |
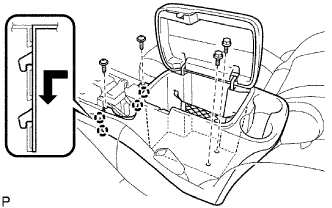 |
Engage the 4 claws and install the console box rear.
Install the 2 screws <F> and 2 bolts <B>.
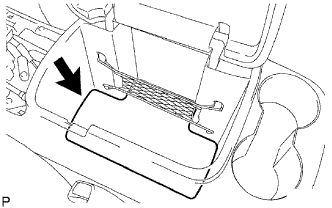 |
Install the console box carpet.
| 38. INSTALL CONSOLE UPPER REAR PANEL SUB-ASSEMBLY (for Manual Transmission on Separate Seat Type) |
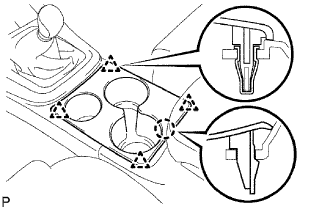 |
Engage the 4 clips and claw, and remove the console upper panel sub-assembly.
| 39. INSTALL CONSOLE UPPER REAR PANEL SUB-ASSEMBLY (for Automatic Transmission on Separate Seat Type) |
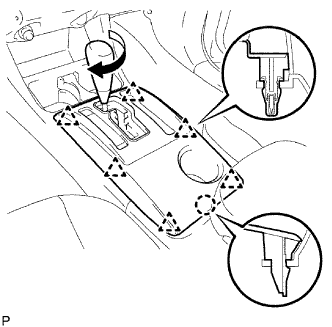 |
Engage the 6 clips and claw, and remove the console upper rear panel.
Install the shift knob.
| 40. INSTALL INSTRUMENT PANEL HOLE COVER (for Lever Type Parking Brake) |
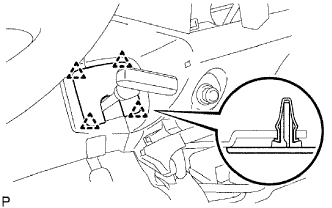 |
Engage the 4 clips and install the instrument panel hole cover.
| 41. INSTALL INSTRUMENT PANEL UNDER TRAY (for Pedal Type Parking Brake) |
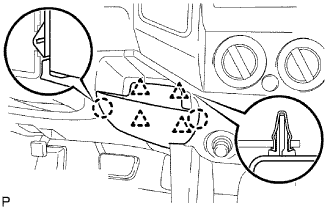 |
Engage the 4 clips and 2 claws, and install the instrument panel under tray.
| 42. INSTALL FRONT PILLAR GARNISH LH (for Regular Cab) |
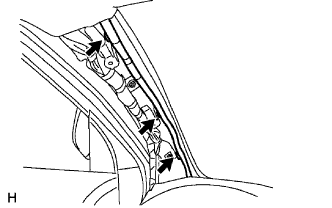 |
for LH Side:
Install the 3 wire harness clamps.
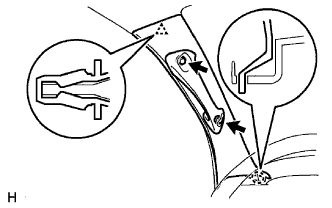 |
Engage the claw and clip, and install the front pillar garnish.
Tighten the 2 screws.
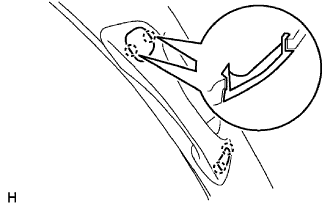 |
Engage the 2 claws and install the assist grip plug.
| 43. INSTALL FRONT PILLAR GARNISH LH (for Access Cab) |
|
for LH Side:
Install the 3 wire harness clamps.
|
Engage the claw and clip, and install the front pillar garnish.
Tighten the 2 screws.
|
Engage the 2 claws and install the assist grip plug.
| 44. INSTALL FRONT PILLAR GARNISH LH (for Double Cab) |
|
Install the 3 wire harness clamps (LH side only).
|
Engage the claw and clip, and install the front pillar garnish.
Tighten the 2 screws.
|
Engage the 2 claws and install the assist grip plug.
| 45. INSTALL FRONT PILLAR GARNISH RH (for Regular Cab) |
| 46. INSTALL FRONT PILLAR GARNISH RH (for Access Cab) |
| 47. INSTALL FRONT PILLAR GARNISH RH (for Double Cab) |
| 48. INSTALL FRONT DOOR OPENING TRIM WEATHERSTRIP LH |
| 49. INSTALL FRONT DOOR OPENING TRIM WEATHERSTRIP RH |
| 50. INSTALL COWL SIDE TRIM BOARD LH (for Regular Cab) |
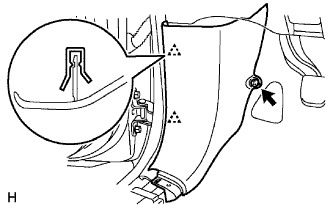 |
Engage the 2 clips and install the cowl side trim board.
Install the clip.
| 51. INSTALL COWL SIDE TRIM BOARD LH (for Access Cab) |
|
Engage the 2 clips and install the cowl side trim board.
Install the clip.
| 52. INSTALL COWL SIDE TRIM BOARD LH (for Double Cab) |
|
Engage the 2 clips and install the cowl side trim board.
Install the clip.
| 53. INSTALL COWL SIDE TRIM BOARD RH (for Regular Cab) |
| 54. INSTALL COWL SIDE TRIM BOARD RH (for Access Cab) |
| 55. INSTALL COWL SIDE TRIM BOARD RH (for Double Cab) |
| 56. INSTALL FRONT DOOR SCUFF PLATE LH (for Regular Cab) |
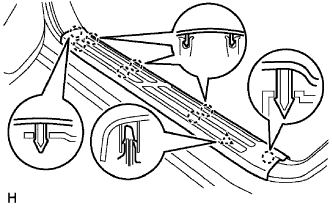 |
Engage the 8 claws and clip, and install the front door scuff plate.
| 57. INSTALL FRONT DOOR SCUFF PLATE LH (for Access Cab) |
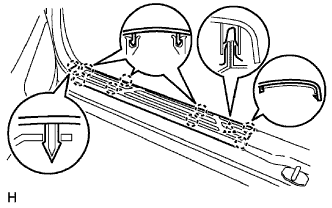 |
Engage the 9 claws and clip, and install the front door scuff plate.
| 58. INSTALL FRONT DOOR SCUFF PLATE LH (for Double Cab) |
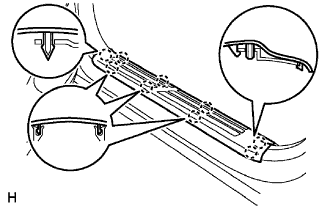 |
Engage the 9 claws and install the front door scuff plate.
| 59. INSTALL FRONT DOOR SCUFF PLATE RH (for Regular Cab) |
| 60. INSTALL FRONT DOOR SCUFF PLATE RH (for Access Cab) |
| 61. INSTALL FRONT DOOR SCUFF PLATE RH (for Double Cab) |
| 62. INSTALL FRONT FLOOR FOOTREST |
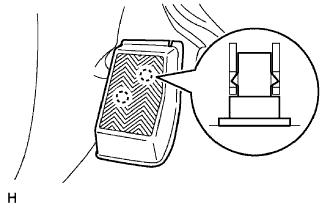 |
Engage the 2 clips and install the front floor footrest.
| 63. INSTALL WINDSHIELD WIPER SWITCH ASSEMBLY |
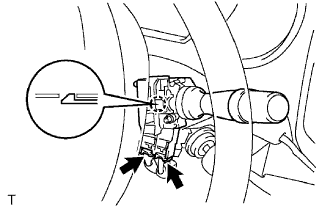 |
Engage the claw and install the windshield wiper switch assembly.
Connect the 2 connectors.
| 64. INSTALL SPIRAL CABLE SUB-ASSEMBLY |
Set the turn signal switch in neutral position.
Install the spiral cable sub-assembly with the 4 screws.
Connect the airbag connector and connector.
Install the steering column cover with the 3 screws.
| 65. CENTER SPIRAL CABLE |
Check that the ignition switch is OFF.
Check that the cable is disconnected from the negative battery terminal.
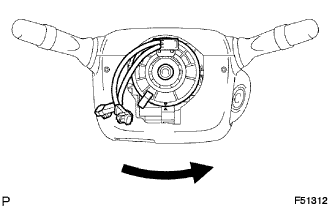 |
Turn the cable counterclockwise by hand until it becomes harder to turn.
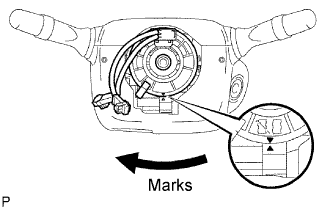 |
Turn the cable clockwise about 2.5 turns to align the marks.
| 66. INSTALL STEERING COLUMN COVER UPPER |
Engage the claw, then install the upper steering column cover.
| 67. INSTALL STEERING COLUMN COVER LOWER |
Engage the 2 claws.
Install the lower steering column cover with the 2 screws.
| 68. INSTALL STEERING WHEEL ASSEMBLY |
Align the matchmarks on the steering wheel assembly and steering main shaft assembly.
Install the steering wheel assembly set nut.
| 69. INSTALL HORN BUTTON ASSEMBLY |
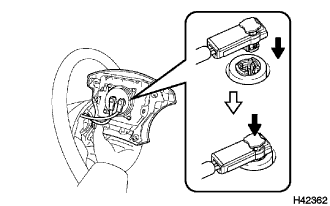 |
Support the steering pad with one hand, as shown in the illustration.
Connect the 2 airbag connectors.
Connect the horn ground harness to the steering pad.
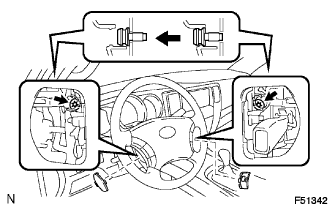 |
Confirm that the circumference groove of the "torx" screws fits in the screw case, and install the steering pad.
Using a "torx" socket wrench (T30), install the 2 screws.
| 70. INSTALL NO. 3 STEERING WHEEL COVER LOWER |
Engage the 2 claws, install the No. 3 lower steering wheel cover to the steering wheel assembly.
| 71. INSTALL NO. 2 STEERING WHEEL COVER LOWER |
Engage the 2 claws, install the No. 2 lower steering wheel cover to the steering wheel assembly.
| 72. INSTALL COWL TOP VENTILATOR LOUVER SUB-ASSEMBLY |
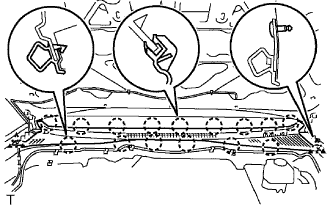 |
Engage the 15 claws and install the cowl top ventilator louver sub-assembly.
Engage the 2 clips
| 73. INSTALL FRONT FENDER TO COWL SIDE SEAL RH |
| 74. INSTALL FRONT FENDER TO COWL SIDE SEAL LH |
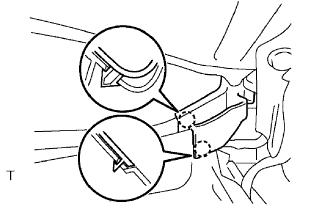 |
Engage the 2 claws and install the front fender onto cowl side seal LH.
| 75. INSTALL FRONT WIPER ARM RH |
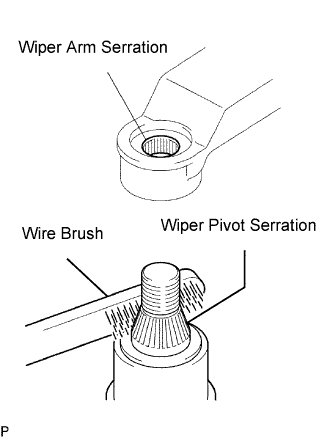 |
Scrape any metal powder off the serration part of the wiper arm with a round file or equivalent (when reinstalling).
Clean the wiper pivot serration with a wire brush.
Operate the wiper, then stop the windshield wiper motor assembly at the automatic stop position.
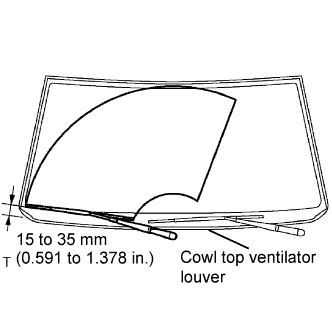 |
Install the front wiper arm RH onto the position with the nut as shown in the illustration.
| 76. INSTALL FRONT WIPER ARM LH |
|
Scrape any metal powder off the serration part of the wiper arm with a round file or equivalent (when reinstalling).
Clean the wiper pivot serration with a wire brush.
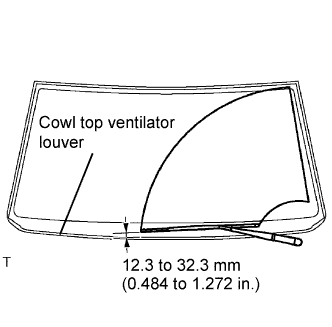 |
Install the front wiper arm LH onto the position with the nut as shown in the illustration.
Operate the front wipers while spraying water or washer fluid on the windshield. Ensure that there is no interference between the blades and pillar.
| 77. INSTALL FRONT WIPER ARM HEAD CAP |
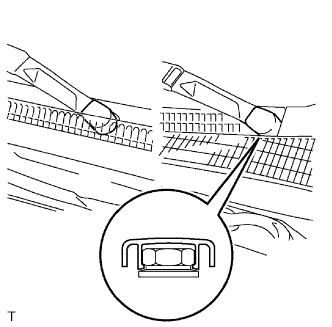 |
Engage the claw and install the 2 front wiper arm head caps.
| 78. INSTALL HEATER WATER OUTLET HOSE (for 2TR-FE) |
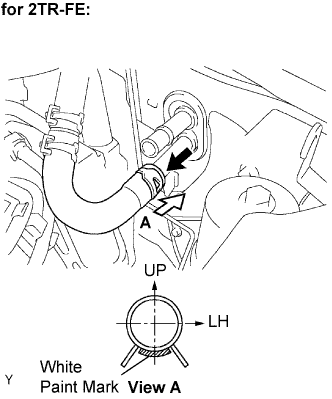 |
Install the heater water outlet hose onto the heater unit.
| 79. INSTALL HEATER WATER OUTLET HOSE (for 1GR-FE) |
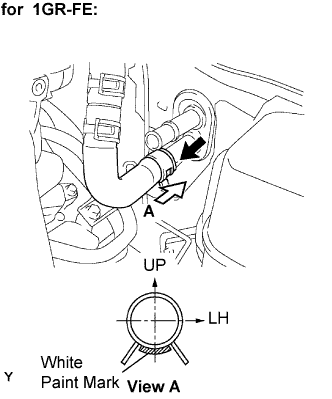 |
Install the heater water outlet hose onto the heater unit.
| 80. INSTALL HEATER WATER INLET HOSE (for 2TR-FE) |
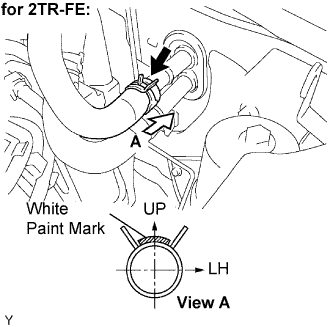 |
Install the heater water inlet hose onto the heater unit.
| 81. INSTALL HEATER WATER INLET HOSE (for 1GR-FE) |
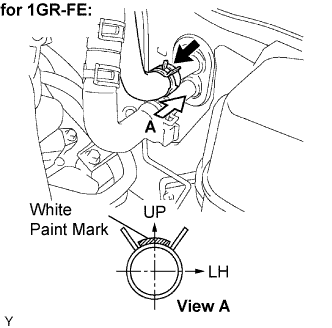 |
Install the heater water inlet hose onto the heater unit.
| 82. INSTALL AIR CONDITIONING TUBE ASSEMBLY |
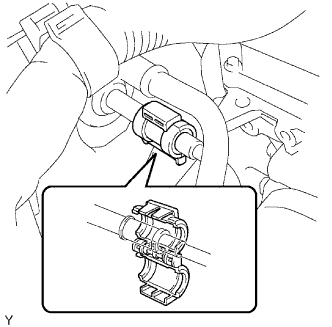 |
Apply compressor oil to 2 new O-rings and install them onto the hose.
Install the air conditioner tube and piping clamp.
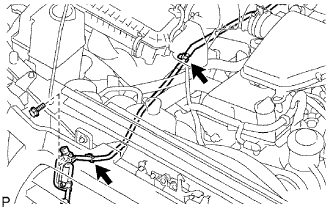 |
Install the bracket with the bolt and 2 clamps.
| 83. INSTALL SUCTION HOSE SUB-ASSEMBLY |
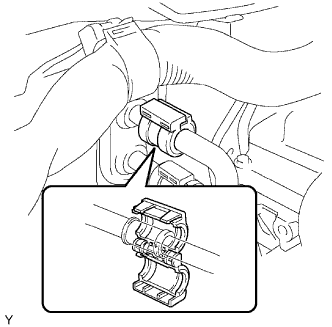 |
Apply compressor oil to 2 new O-rings and install them onto the pipe.
Install the suction hose and piping clamp.
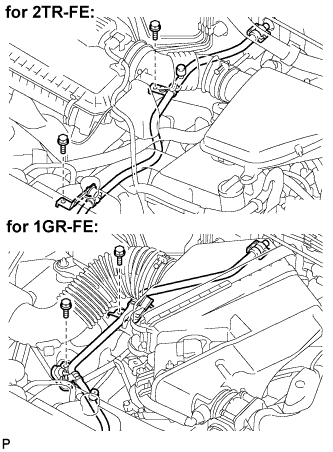 |
Install the bracket with the 2 bolts.
| 84. CONNECT CABLE TO NEGATIVE BATTERY TERMINAL |
| 85. ADD ENGINE COOLANT (for 2TR-FE) |
Tighten the engine drain plug.
Tighten the radiator drain plug.
Disconnect the 2 vinyl hoses.
Slowly fill the system with engine coolant.
Check the coolant level inside the radiator by squeezing the inlet and outlet radiator hoses several times by hand. If the coolant level goes down, add coolant.
Install the radiator cap securely.
Slowly pour coolant into the radiator reservoir until it reaches the FULL line.
Warm up the engine until the cooling fan operates.
| Item | Condition |
| Fan speed | Any setting except OFF |
| Temperature | Toward warm |
| Air condition switch | OFF |
Squeeze the inlet and outlet radiator hoses several times by hand while warning up the engine.
Stop the engine and wait until the coolant cools down.
Remove the radiator cap and check the coolant level inside the radiator.
If the coolant level is below the full level, perform the steps from (d) through (k) and repeat the operation until the coolant level remains at the full level.
Check the coolant level inside the radiator reservoir tank again. If it is below the full level, add coolant.
Install the engine under cover No. 1 with the 4 bolts. (PRE RUNNER AND 4WD TYPE)
| 86. ADD ENGINE COOLANT (for 1GR-FE) |
Pour coolant into the radiator until it overflows.
| Transmission | Capacity |
| Manual Transmission | 9.7 liters (10.3 Us qts, 8.5 Imp. qts) |
| Automatic Transmission | 9.8 liters (10.4 Us qts, 8.6 Imp. qts) |
Check the coolant level inside the radiator by squeezing the inlet and outlet radiator hoses several times by hand. If the coolant level goes down, add coolant.
Install the radiator cap securely.
Slowly pour coolant into the radiator reservoir until it reaches the FULL line.
Warm up the engine until the cooling fan operates.
Set the air conditioning as follows while warming up the engine.
| Item | Condition |
| Fan Speed | Any setting except OFF |
| Temperature | Toward WARM |
| Air Conditioning Switch | OFF |
Maintain the engine speed at 2,000 to 2,500 rpm and warm up the engine until the cooling fan operates.
Squeeze the inlet and outlet radiator hoses several times by hand while warming up the engine.
Stop the engine and wait until the coolant cools down.
Remove the radiator cap and check the coolant level inside the radiator.
If the coolant level is below the full level, perform the steps from (a) through (h) and repeat the operation until the coolant level remains at the full level.
Check the coolant level inside the radiator reservoir tank again. If it is below the full level, add coolant.
| 87. CHECK FOR ENGINE COOLANT LEAKAGE (for 2TR-FE) |
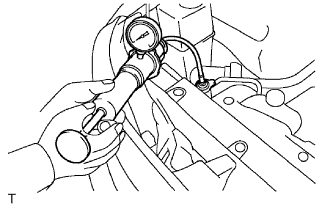 |
Fill the radiator with coolant and attach a radiator cap tester.
Warm up the engine.
Pump it up to 118 kPa (1.2 kgf/cm2, 17.1 psi) and check that the pressure does not drop.
| 88. CHECK FOR ENGINE COOLANT LEAKAGE (for 1GR-FE) |
Fill the radiator with coolant and attach a radiator cap tester.
Pump it to 118 kPa (1.2 kgf/cm2 17.1 psi), then check for leakage.
| 89. CHARGE REFRIGERANT |
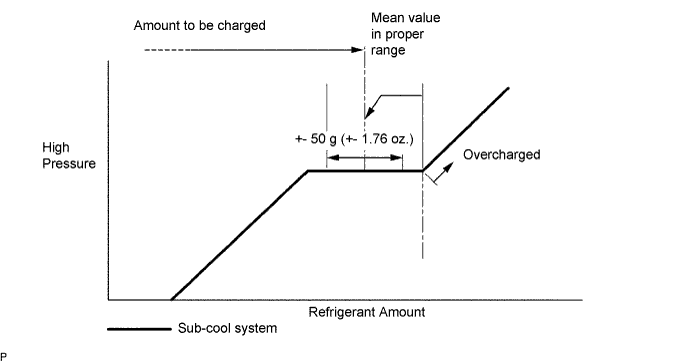
Perform vacuum purging using a vacuum pump.
Charge refrigerant HFC-134a (R134a).
| 90. WARM UP ENGINE |
| 91. CHECK FOR REFRIGERANT LEAKAGE |
After recharging the refrigerant gas, check for refrigerant gas leakage using a halogen leak detector.
Perform the operation under these conditions:
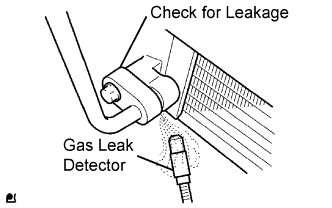 |
Using a gas leak detector, check the refrigerant line for leakage.
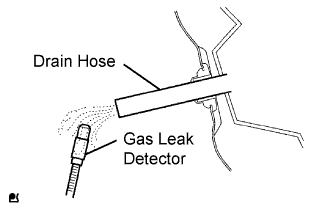 |
Bring the gas leak detector close to the drain hose with the detector power off.
If a gas leak is not detected from the drain hose, remove the blower motor control from the cooling unit. Insert the gas leak detector sensor into the unit and perform the test.
Disconnect the pressure switch connector and leave it for approximately 20 minutes. Bring the gas leak detector close to the pressure switch and perform the test.
| 92. PLACE FRONT WHEELS FACING STRAIGHT AHEAD |
| 93. INSPECT SRS WARNING LIGHT |